Release Notes Jan 2024
January 4, 2024- Bulk Change to a Sales Cycle now updates Milestones
- Action Plan Step – Change Contact Type
- also requires Sales Cycle Setting
- can’t be blank
- Contact Profile – Quarantine Email now shows a reason
- Duplicate lead Accepted now launches Action Plan
- Duplicate leads created from simple lead form has been stopped
- Improvements to Username or Password Reset
- SMTP Settings UX improvement
- Searchable list of Accounts (in more places)
- Searchable list of attachments
- Contact List Search improvements
- Calendars – 2 way sync with new External Calendar Sync
- Franchise Estimate Count Report
- Emailed properly
- Links to raw data
- User Settings
- password changed immediately effects access
- archived user immediately effects access
- Archived User removed from New Lead Email
- Lead Routing – Duplicate Check for Multi-level Accounts to Subaccounts by Round Robin
- Notifications –
- Archive search to include contact name
- View Assigned User in right side panel
- Proposal
- Bid Type Multiplier
- Clear Signature now generates a History Note
- Show more of the Field Header for longer fields
- Block Editor – Cover Page, About Me, Terms and Conditions – Limited Release
- Thumbtack Integration to accept Appointments
- Templates for Notes / Log-a-Call
- Contact Profile
- Quarantine Email – now shows a reason
- Opportunity Count shows above the field
ClientTether Mobile App
August 30, 2023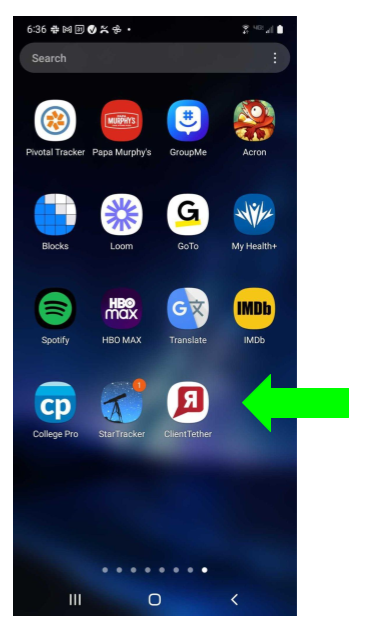
The ClientTether Mobile App is designed for Users in the field, with a focus on Contacts, Proposals and Notifications. All Settings and Design modes are reserved for the desktop version.
You must already have an account with ClientTether to take advantage of this app as the same Username and Password are used for accessing both the Mobile and Desktop versions.
The App is free to use for account holders to extend your access to the ClientTether CRM.
The v1 App does NOT support Dark Mode.
Get the ClientTerther App from the Google Play Store. After Installing, you will find an App icon like this one.
This is an App, please do not expect it to have all the power of the desktop version. This App is focused on Contacts, Proposals and Notifications.
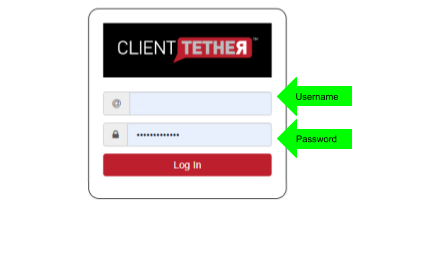
The Login screen is the same form as found on the desktop version.
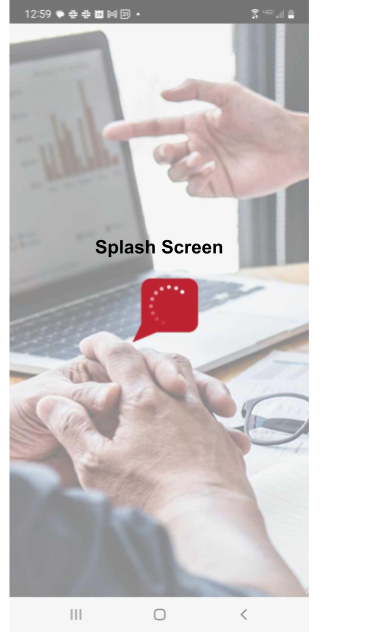
Whenever the App is loading data, you might see this splash screen.
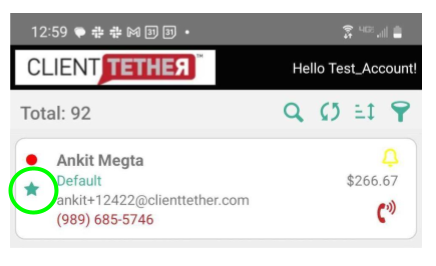
Contact List
The Contact List is the default landing page in the ClientTether Mobile app. Each Contact is shown as its own card with some of the same visual details as shown on the desktop. Contacts are loaded ten (10) at a time. When you scroll to the bottom of the first set of ten name swipe up again to load the next ten Contacts.
Dots in the top left corner
Red: indicates this contact is in the New Lead Sales Cycle.
Yellow: indicates there was a contact reminder that has been missed. This color will over-ride red.
Green: indicated there is a contact reminder for today. This color will over-ride both yellow and red.
Stars in the left margin
Filled Stars: indicates this contact is a main contact.
Unfilled Stars: indicates this contact is attached to some other main contact.
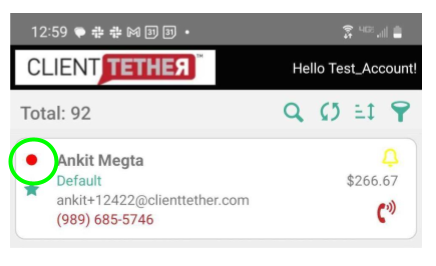
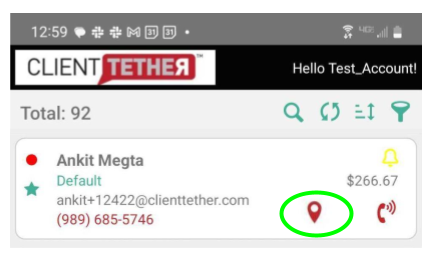
Map Pin Icon
If the contact has an address that can be mapped, an interactive Map Pin will appear with the Contact Card. You can click on that icon to view the address on a Google Map.
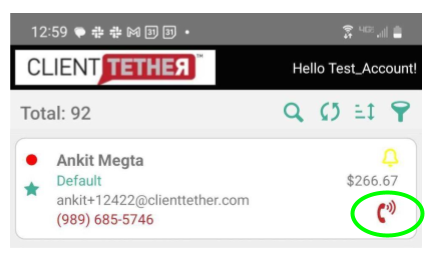
Phone Icon
The phone icon is interactive and will initiate the same Click-to-Call process as the desktop application where the system will call the User and ask for confirmation to call.
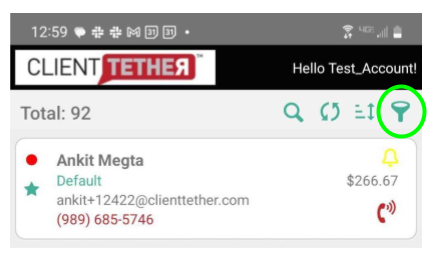
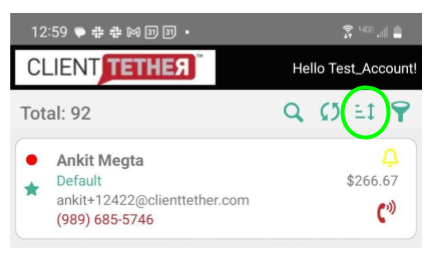
Filter
The system shows there are 92 leads in this account. Even though your full contact list might have many lead, the system will only load 10 contacts at a time. Use the Filter to narrow down the list to the Contacts you really want to work with.
Sort
When working with a list of Contacts you might need to sort them. Use the Sort Icon to select from several sorting options.
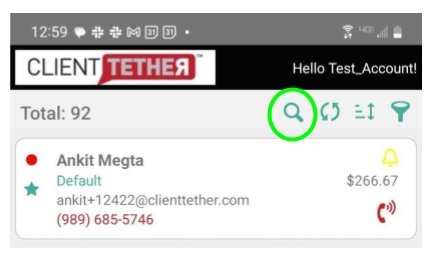
Search
Any long list can be narrowed down by a simple Search. Click on the search Icon to open the Search input field.
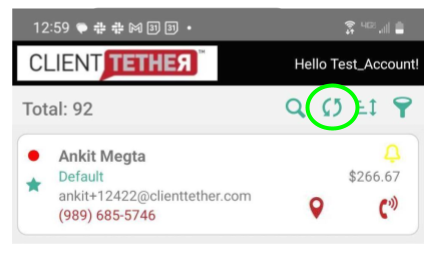
Reset
Use the Reset Icon to remove any previously set Filter, Sort or Search
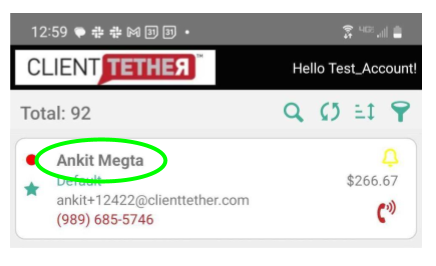
Contacts Name
Similar to the full application, the Contact’s Name is interactive and will open the Contact Profile.
Contact Profile
The Contact Profile is the main hub to interact with the Contact’s information. This will open as a popup above your Contact Profile. Thus you will have to click on the X in the top right to Close this popup when you are finished. The most often actions take in Contact Prorils are: Whiteboard, Text, Email and Events
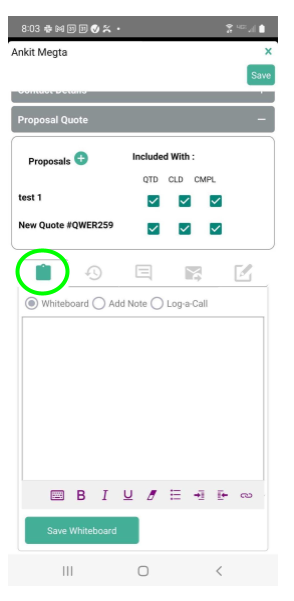
Whiteboard
The Whiteboard allows you to enter shareable quick notes about the contact acquired via conversation or observation. These notes are shared with other User in your account.
NOTICE: After typing Whiteboard Notes, you must click the “Save Whiteboard” button.
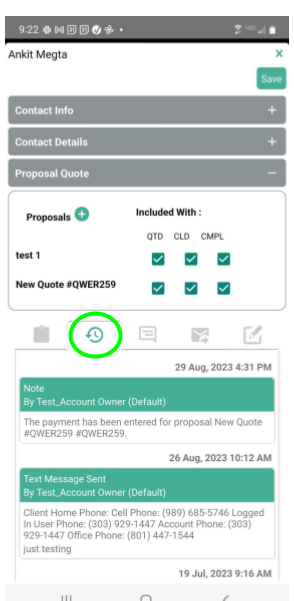
History Notes
The system auto-logs most everything you do as History Notes. For example, if you sent a text or email, the system will put a date and time stamped copy in History Notes. This save you time by not having to write a History Note that you sent an email.
The History Notes section is where you can review the of communication and automation that has occurred with each Contact.
Text
ClientTether allows you to send text messages through the system thereby sending the message from the ClientTether number instead of your personal mobile number. Returned text messages will be shared with you in this same location for each Contact.

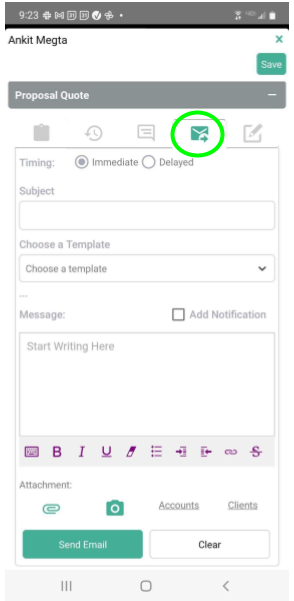
Email
The mobile app allows you to send emails to contacts using the email setting entered in the desktop application Settings. You will either let our email server send them or enter your own SMTP settings.
Events
There are three types of events that can be set in ClientTether: Automated Call, Contact Reminder and Next Appointment.
User the Event Type dropdown to choose which of the three you would like to set. With that selection made fill out the rest of the custom form to create the event.

Proposals
Proposals are the next most common activity in the field with the App. Click on the Proposal expansion bar in the Contact Profile to open this section. Again this is an App, please do not expect it to have everything the desktop version has.
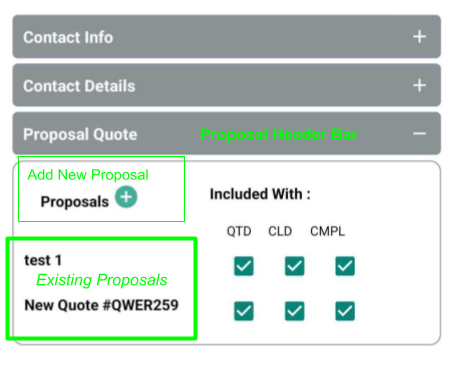
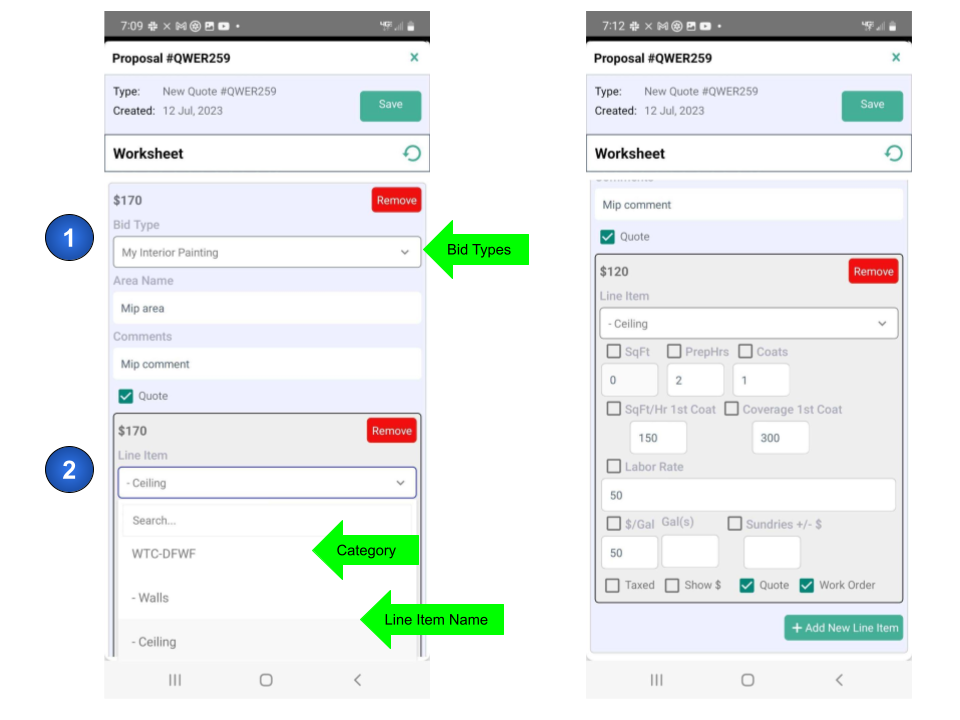
Create or Open a Proposal
In the Contact Profile there is a proposal section, which will show Existing Proposals and allow you to Add (create) a new one. When you have opened a Proposal it will show the Worksheet.
A proposal’s organization is built around Bid Types, Categories, and Line Items. Choose the dropdown at position 1 to select a Bid Type.
Choose the dropdown at position 2 to scroll through the combined menu list of Categories and Line Items. In the example below, Category WTC-DFWF includes Line Items: Walls, Trim and Ceiling.
After selecting the Line Item – Ceiling, the rest of the input fields will be displayed according to the design. Repeat the process of adding Line Items to complete the Proposal
Calendar
Calendar is an option at the bottom of the mobile app. This will open a Month calendar. YOu can click on any day in the month to show an agenda view for the day. Click on any Agenda item to see the details.
Notifications
Notifications is a big part of this app and is found in the bottom right of the screen. All notifications that the User has set up see will be shown here. Notifications tell you what is going on with your Contacts.
After viewing or handling a Notification, you can swipe right to begin the archive process. You will have to then click on the Red Archive button that appears.
Block Incoming Calls and Texts
July 13, 2023Sometimes you just need to block calls from a specific number. There is an easy access switch on the Contact Profile that allows you to do just that. It also pseudo blocks text messages.
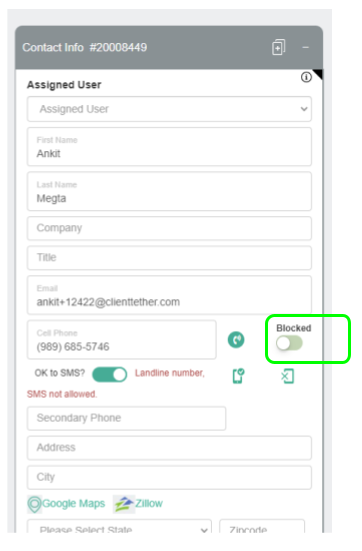
When that switch is turned on (image show off), the phone number associated with that contact is blocked from calling your ClientTether phone number. You can flip the switch either direction and any time.
While the Blocked Switch is turned off, incoming text messages will be captured and stored with the Contact’s Profile, but it will not generate incoming Notifications. We call this pseudo blocked.
Multiple Users in one Contact Profile
July 13, 2023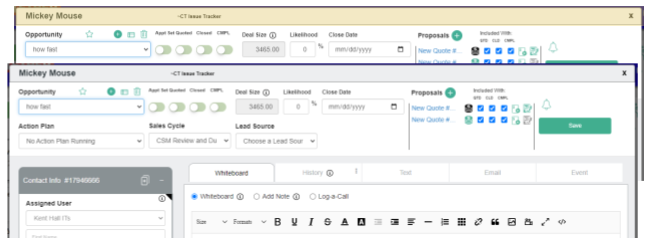
Contact Profile header color will change if multiple Users are in the same one.
Notifications associated with an open Contact Profile will also change color.
In the image example above, the gray header color is normal and the yellow-ish color is the warning that two or more Users have opened the same Contact Profile.
Notifications on Contact Profile
June 29, 2023Accessing Notifications for a specific Contact is easy with the Notification Icon found on the Contact Profile. Please watch this short video
CompanyCam Integration
June 28, 2023Our integration with CompanyCam allows you to share photos from CompanyCam within ClientTether’s Contact Profile and Proposal. This feature allows you to incorporate visual documentation into your ClientTether workflow, enhancing your ability to create compelling proposals and improve communication with your clients. By setting up the integration between CompanyCam and ClientTether, you can now easily access and include relevant project photos directly within your proposals and Contact info, providing a comprehensive and professional experience for your Users and Clients. In this support documentation, we will guide you through the process of setting up and utilizing this integration to optimize your workflow and enhance your project management capabilities. Let’s dive in and explore the benefits and steps to make the most out of this valuable integration.
Setup
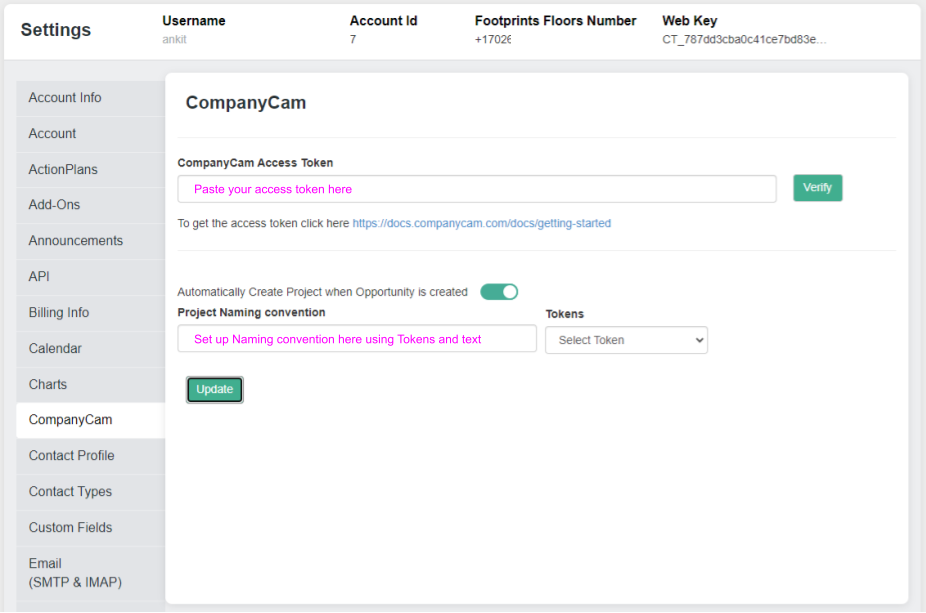
This integration is an Add-On feature and must be activated before the integration tab will be visible. Please visit the Add-On support page to learn how to activate Add-Ons.
Note: You will need to create an Access Token in CompanyCam to complete this activation.
After CompanyCam integration has been activated, a new Settings Tab will become visible. Click on that new tab to continue with the setup process.
There are two fields in the setup.
1. CompanyCam Access Token: this is a token that you create inside of your CompanyCam account. A link is provided to the documentation from CompanyCam on how to create your Access Token. Please contact them if you have questions on this procedure. Once you have created the Access Token simple copy and paste that value into the first field.
2. Project Naming convention: This is an optional field that can be used to auto-generate Project Names if you choose to create a new project from within ClientTether. Use ClientTether Tokens from the dropdown list to the right or type in some text. For example: if I wanted projects that start in ClientTether to be named with the initials of CT_ and then the address of the property where the work would be done and finally followed by today’s date; then in the Project Naming convention field you would enter:
CT_{{client.address}}_{{tokens.today}}. Remember the tokens will come from the Token dropdown menu t the right. When you select the token by name, the value is copied to the clipboard so that all you have to do is paste into the naming convention field.
Using CompanyCam in ClientTether
After the setup is complete, there are two location where the CompanyCam icon will appear:
1. in the Contact Profile
2. in Proposals on the Overview tab
Each location is independent of each other. Below is a video showing this two locations and how to use them. We assume that you already have a CompanyCam account and know how to use it.
Multiple Proposals per Opportunity
March 29, 2023This was a customer driven feature. There are generally two scenarios where multiple proposals are useful. One scenario is when each proposal is unique and the other scenario is when a portion of a proposal is duplicated on another.
Because proposal data is used in charts, Users will need to pay attention to the checkboxes provided to control whether the proposal dollars are included or not at each milestone of the Opportunity

In the image above, the Blue section represents the Opportunity and the Green section shows the Proposals. The image below shines more light on the features of the Proposal area. Features that were once several clicks away are now at your fingertips: Add New Proposal, Open Proposal, Payments, Invoice, Proposal Signed.

Contact Profile: Wrong Number
February 2, 2023When working in the Contact Profile, and it is discovered that the phone number is wrong, there is a one-click button to handle this.
When the Wrong Number button is click the system will:
– replace the current phone number with 555-555-5555 and
– generate a History Note with the original number and the replaced number
– turn off OK to SMS ?

Event updates when Contact’s Info changes
November 2, 2022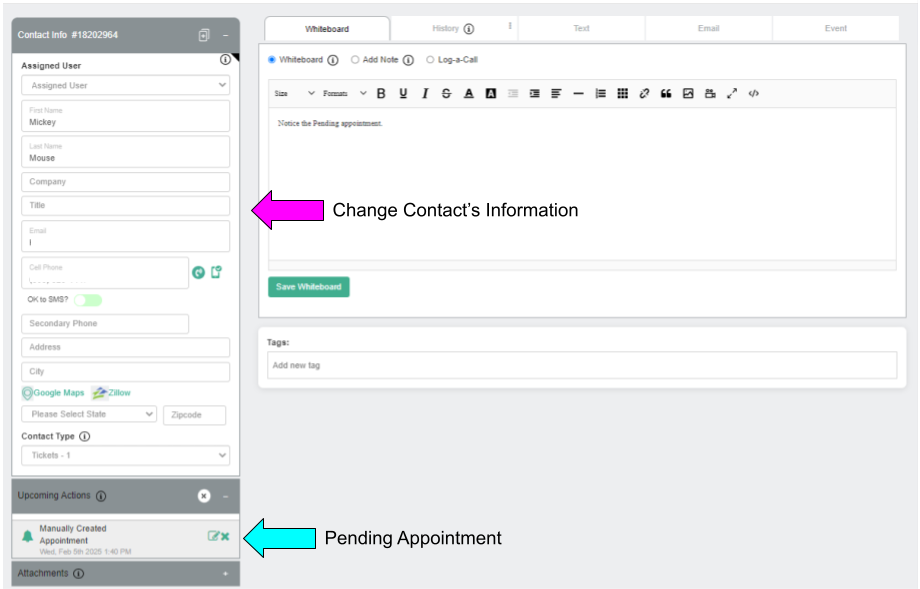
If a User has a pending appointment and the contact’s information: Name, address, phone and or email are edited, then that information is synchronized into the Appointment information.
Phone Number Lookup: Verification of Text-Enabled VS Landline
October 20, 2022The system now has the ability to confirm if a number entered in the ‘Cell Phone’ field of a Contact Profile is text-enabled versus identified as a land-line or not text enabled.
This verification process is performed in the following instances: when a new Contact is added, when the number in the Cell Phone field is edited, and/or when the mobile phone icon to the right of the Cell Phone number is clicked. If the number is verified to be text-enabled, the ‘Ok to SMS?’ toggle will be set to active (on) and the corresponding Text tab will be available for use. If the number is determined to not be text-enabled/a landline number, the toggle will be set to in-active (off), the Text tab will not be accessible, and a statement in red will appear next to the toggle stating “Landline number, SMS not allowed.”