How to Connect Leads to ClientTether
September 9, 2024There are multiple ways to connect leads to ClientTether. Work with your lead provider to select the best fit.
- Parser – Connecting leads with a parser is the most common way. Forward a lead email from your lead provider or website to your Client Success Partner, and we can usually build a parser for you.
Ask your lead provider to send the leads in a plain text format, if possible. If they are not able or willing to do this there is a higher chance that the leads will not be able to parse. We can try and let you know, but it is better if they can send them in a plain text email.
Once we build and test the parser, have your lead provider send leads to your parser email. You can find this in Settings on the Parser tab. - API – If your lead provider would like to send your leads via the API, they need the API Details found in Settings on the API tab.
API Details look like this:
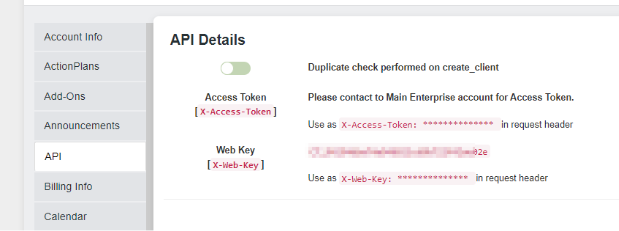
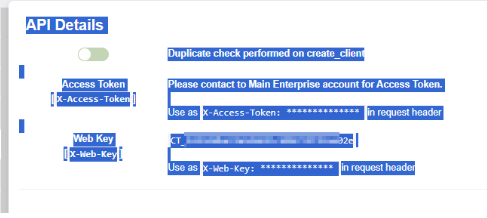
Highlight all the text as shown below, then copy and paste, and send it to your lead provider along with this link to our documentation: https://support.clienttether.com/api-document/clienttether-api-2-0-doc/
Ask your Client Success Partner (CSP) for help by emailing support@clienttether.com
Tip: tell your lead provider to be sure to pay attention to the part in the document about lead notifications.
3. Zapier – Documentation for Zapier is found here: https://support.clienttether.com/zapier/
If your leads will not parse using our parsers and if your lead provider cannot use the API to send leads, you may want to sign up for a Zapier account. Zapier is an outside service and there are fees involved. Please note that your CSP may not be able to help you set up Zaps to bring leads in, so you may need to hire someone to help you do this. Freelance sites like Fiverr can help you find people who are willing to provide this service.
Preparing for New Lead Generation Requirements (Jan 2025)
August 29, 2024As of January 2025, the FCC’s new lead generation requirements will mandate significant changes in how businesses handle consumer consent. The key update is the requirement for express written consent on a seller-by-seller basis, ensuring that each interaction is directly linked to the consumer’s specific inquiry. This move away from batch consents underscores the importance of clear and conspicuous disclosures in all communications.
What This Means for Your Business
- Tailored Consent: Moving forward, businesses must obtain consent that is specific to each seller, rather than relying on blanket consents. This ensures that each interaction is traceable to a clear consumer inquiry, improving transparency and reducing the risk of non-compliance.
- Clear Disclosure: All communications with consumers must include clear and conspicuous disclosures that explicitly state the purpose of the contact and the entity involved. This helps consumers make informed decisions and strengthens the legitimacy of your outreach efforts.
- Record Keeping: Meticulous documentation of all consent records is now more critical than ever. Businesses must implement robust systems for managing and storing consent documentation, ensuring that it is easily accessible for compliance audits and consumer inquiries.
- Vendor Scrutiny: Evaluate your current vendors and partners to ensure they are compliant with the new regulations. This may involve renegotiating contracts, updating service agreements, and ensuring that all third-party activities align with the FCC’s new standards.
Action Steps for ClientTether Users
- Audit Your Processes: Begin by conducting a thorough review of your current lead generation and consent practices. Identify areas where changes are needed to comply with the new regulations.
- Update Consent Forms: Modify your consent forms to ensure they meet the new seller-specific requirements. Clearly outline the nature of the consent being given and the specific entity it pertains to.
- Train Your Team: Ensure that all team members understand the new requirements and their implications. Provide training on how to obtain and document consent in a compliant manner.
- Monitor Compliance: Regularly monitor and review your lead generation activities to ensure ongoing compliance. Consider implementing automated tools within ClientTether to help manage consent records and streamline the compliance process.
Conclusion
The upcoming changes to lead generation requirements are designed to enhance consumer protection and transparency. By taking proactive steps now, businesses can ensure they are fully prepared to meet these new standards, thereby reducing the risk of non-compliance and building stronger, more trustworthy relationships with their customers.
Filtering Contact Lists
July 16, 2024Overview
ClientTether CRM provides robust filtering options to help users manage and organize their contact lists effectively. This guide will walk you through the steps to apply filters to your contact lists, enhancing your ability to find specific contacts based on various criteria.
Accessing the Filter Options
- Navigate to the Contact List Page
- Log in to your ClientTether account.
- Click on the
Contactsmenu to navigate to your contact list.
- Open the Filter Panel
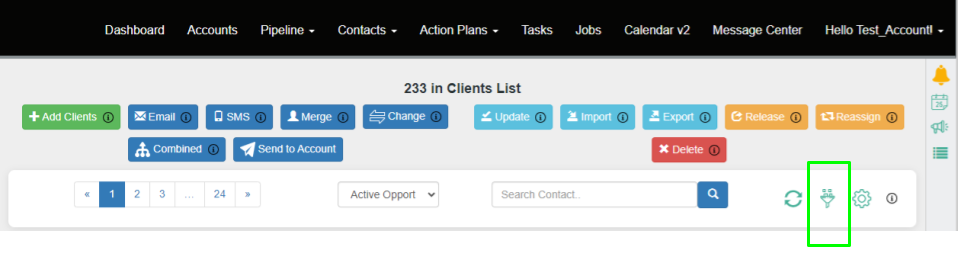
- Locate the filter icon near the top right of the page (as shown in Image 2).
- Click on the filter icon to open the filtering options.
Applying Filters
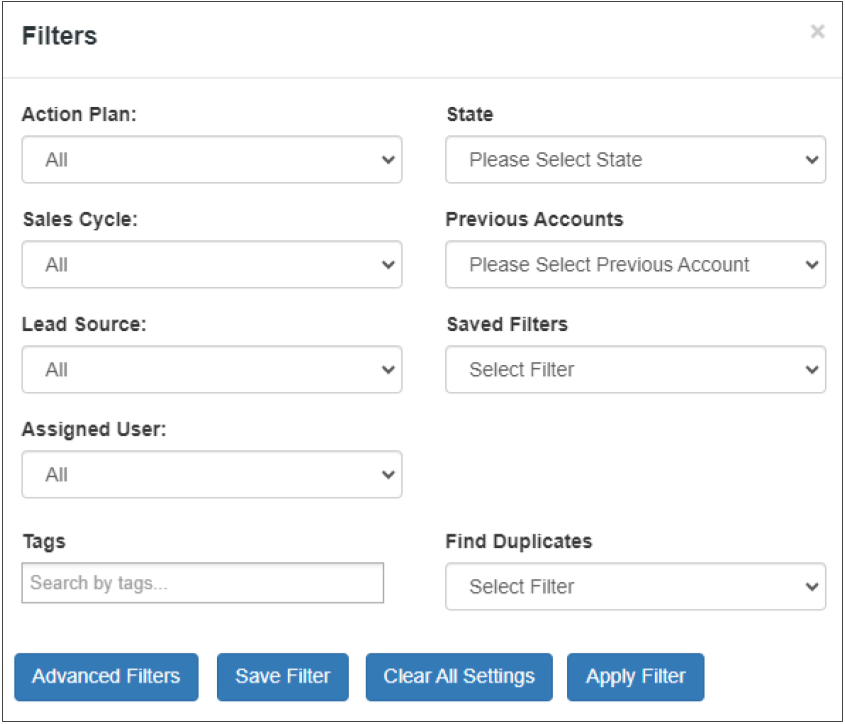
Once the filter panel is open, you will see various filtering options (as shown in Images 1 and 3). You can apply one or multiple filters based on the following criteria:
- Action Plan
- Select an action plan from the dropdown menu to filter contacts associated with a specific action plan.
- State
- Choose the desired state to filter contacts based on their location.
- Sales Cycle
- Filter contacts by selecting a specific stage in the sales cycle.
- Previous Accounts
- Select a previous account to filter contacts linked to that account.
- Lead Source
- Use the dropdown menu to choose a lead source. This allows you to filter contacts based on how they were sourced (e.g., Facebook, Home Advisor, etc.).
- Assigned User
- Select an assigned user to filter contacts managed by a specific team member.
- Tags
- Enter tags to filter contacts associated with specific tags.
- Saved Filters
- Choose from your saved filters to quickly apply pre-defined filter settings.
- Find Duplicates
- Use this option to identify and filter duplicate contacts based on selected criteria.
Saving and Applying Filters
- Save Filter
- After setting your desired filters, click on the
Save Filterbutton to save the current filter settings for future use.
- After setting your desired filters, click on the
- Clear All Settings
- To reset all filter settings, click the
Clear All Settingsbutton.
- To reset all filter settings, click the
- Apply Filter
- Click on the
Apply Filterbutton to apply the selected filters to your contact list.
- Click on the
Example
Step-by-Step Example of Applying a Lead Source Filter
- Open the Filter Panel
- Click on the filter icon near the top right of the contact list page.
- Select Lead Source
- In the filter panel, locate the
Lead Sourcedropdown menu. - Click on the dropdown menu and select a lead source (e.g., Facebook).
- In the filter panel, locate the
- Apply the Filter
- Click on the
Apply Filterbutton to view the contacts filtered by the selected lead source.
- Click on the
Filter By Lead Source (unassigned)
Choosing No Lead Source Selected will show leads that do not have any lead source assigned and leads that have a lead source that belongs to another account.

4o