Below are the following setting options you have in the Account Section:
Active/Pause Switch – If this switch shows active then all action plans will be running. If it reads paused then no actions plans will run in that account.
First and Last Name – The first and last name of the main contact for the Account.
Company – The company name. This will also be how your company name is displayed.
Account Holder– the name of the Account Holder. This is usually the same as the first and last Name.
Address 1, 2, 3 – These are used to store your company’s mailing address.
Phone – This sets the default phone number for the account. This is the number that will be called by default for all Action Plan automated calls.
Office-Phone – The number that will be inserted into your email unsubscribe footer to ensure CANSPAM compliance. It is a display only field in that place.
Website – Allows you store your company’s website information in ClientTether.
Email – Sets the default email for the account. Unless other options are selected, this is the default email that will receive daily reminder notices and will be the reply-to email for outbound emails from Action Plans.
Notification Auto-Delete Days – This allows you to set how many days a notification will be in the notification bar before it will automatically be removed.
Record Call Switch – If green, or on, all calls in and out of will be recorded. If grey, or off, the calls will not be recorded.
Notification Switch – If green, or on, you will hear a ding every time you get a notification. If it is grey, or off, you will not hear the ding.
Changing Password
This allows the Account Owner to change their log in password. To do this:
Type your current password in the field marked “Current Password”
Type in the new password in the field marked “New Password”
Confirm the new password by retyping it in the field marked “Repeat New Password”
Common mistakes include mistyping your current password or having the two instances of the new password not match.
Theme Settings
Theme Color will adjust the text color in certain areas of your account.
Header Color will adjust the color of the header.
Footer Color will change the color of the footer.
Logo allows you to upload your company logo. This will then be displayed in the top left of the header and the bottom right of the footer.
If your ClientTether account has been enabled as a Multi-Unit account, you will be able to add sub-accounts beneath your Enterprise Account. If not, you will not see the Account tab in the Settings menu within your account.
The Account tab in the Settings menu allows you to
You can click next to the account to login to that sub account.
This is helpful if you want to review that account’s pipeline details, lead conversion rate, activity, or other reports. It also enables you to view contacts, history, and to help support sub accounts by engaging contacts on their behalf.
Edit Existing Account
Click and you can edit the account’s:
First Name
Last Name
Phone Number
Email
Company Name
Web Address
Account Owner
Time Zone
Activation of Proposals
Royalty Rate
Marketing Rate
Update Password
Please remember you cannot currently activate self pay for an existing account.
Delete Existing Account
Click to delete an account.
You cannot undo this action once it is done.
Also be aware that you cannot delete an account that has sub accounts.
Complete Set Up for New Sub-Account
Once a new sub account has been created, regardless if it is a clone, you will need to complete set up for the account.
You will note there is a check box below the Default setting. This will route automated calls to the phone number for the Assigned User. This will work as long as the Assigned User account has a phone number listed in their user profile.
Ordered – Will ring through a set order of users.
Simultaneous – Will call a set group of users at the same time. The first to pick up gets the call.
With ordered and simultaneous options a list of users and phone numbers will appear that you can organize between Active and In-Active columns.
Please note the order is important for the Ordered setting. The order does not matter on simultaneous.
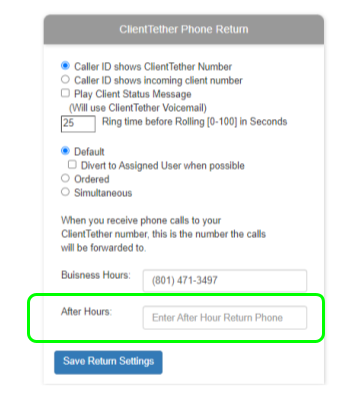
ClientTether Phone Returns
These settings affect how things are handled in your system when someone calls your ClientTether account phone number.
You have seven general setting choices in this section.
Caller Id – select if you would prefer to see the ClientTether Number on your phone or the number of the client calling in.
Play Client Status Message – Let’s the caller know they have reached your company and someone will be with them shortly. This setting also immediately calls your team (per the call settings below) and notifies them of who the caller is (if known) and gives them the option to accept or decline the incoming call. If Declined, the caller will receive a notification that all agents are busy and that they can leave a message.
Ring Time Before Rolling – how long the caller is allowed to be on without an answer. Depending on your settings this will either move them straight to voicemail or to the next number if you are using Ordered calling.
You will note there is a check box below the Default setting. This will route automated calls to the phone number for the Assigned User. This will work as long as the Assigned User account has a phone number listed in their user profile.
Pass Through – Allows you to tell the system to NOT check for machine answering, which allows a machine to answer and give a prompt or message. Ideal if you are using a hunt group for your main number. This feature is not available in all accounts. If you are interested please reach out to your Client Success Manager.
Ordered – Will ring through a set order of users.
Simultaneous- Will call a set group of users at the same time. The first to pick up gets the call.
This field is for you to type the phone number you want incoming calls to your ClientTether Account phone number to be forwarded to.
With ordered and simultaneous a list of users and phone numbers will appear that you can move between Active and In-Active columns.
Please note the order is important for the Ordered setting. The order does not matter on simultaneous.
System Emails to/from Users
This series of settings allows you to determine what happens when emails are being received into the system and being sent out from the system.
You have three General Categories
BCC Account Owner When… – Allows you to choose to bcc the account owner when certain events take place such as when
Action plans or scheduled emails are sent
Bulk emails are sent
Manual Emails are sent
New Leads are created by parse, post, or API
Account Owner sends an email
Send Today’s Schedule To… – You can opt to have the schedule sent to either the account owner or the account users. If you don’t check either box it won’t be sent to anyone.
Action Plan Emails
You can opt to have Action Plan Emails “sent” from Assigned Users. If this is not checked all Action Plan Emails are “sent” from the account owner.
Account Text Settings
These settings affect how things are handled in your account when you receive a text to your ClientTether number.
In this category you have four settings.
The phone number you want to receive all text notifications if there is no Assigned User (AU)
Whether to send texts to the Account Owner during Operation hours only or not.
Whether to send Delayed Action Plan texts during business hours only or not.
In the Account Text Settings, enter the phone number where ‘all’ Text Notifications should be sent if the Account Owner’s Settings includes Text AU and the Contact does not have an Assigned User (AU).
Notice the Purple ellipse in the image above. This highlights that Text Received is set in the AO’s settings to send the AO a message by text if they are the AU or fwd the text to the specified number if there is no AU. In other words , if a text is received from a Contact that does not have an AU, then the text notification will be sent to the phone number entered.
For example let’s suppose two different Contacts send a text message into the system. One has an AU and the other does not.
Contact 1 has an Assigned User (AU). Therefor the system will only consider the Notification Controls of the AU (both Text and Email).
Contact 2 does not have an Assigned User. In this case the Notification Controls of the AO will be considered. If Text AU is true, then a Text Notification is fwd to the specified number entered here because there is not AU. (If the Email AU is true, then the system will fwd an email to the AO’s Email.)
Notice the second checkbox in the Purple ellipse is not checked, which means if Contact 2 sends in a “Stop” texting me message, that message will not fwd to the specified number entered here.
One might ask, is it possible to shut down Notifications enough that all messages are essentially lost? The answer is, “yes”. But Notification’s control on a User by User basis is the User requested feature now embodied in Notification Control and Account Text Settings. The Account Text Settings is an attempt to have one last bucket to collect messages.
The Add-Ons tab in Settings allows you to turn on and off various optional features that are available.
The Add-On features available in your account are dependent on several factors. Not all Add-Ons are available for all accounts.
To activate a feature, you simply need to click in the checkbox to the left of the description.
If more configuration or options are available, they will either be accessed in the Add-Ons settings tab (i.e. Mailbox Power) or in a new settings tab that will appear once the corresponding Add-On has been activated.
If you are looking for a feature and cannot find it please reach out to your Account’s Success Manager.
The system redirects incoming calls to an approiate agent number during business hours as defined in your Operation Settings. Then during After Hours the same or different phone number can be entered.
Announcements will come in periodically about updates or new features in ClientTether.
Also if you are an account owner you can create announcements to keep your team and sub-accounts up to date on new developments within your organization
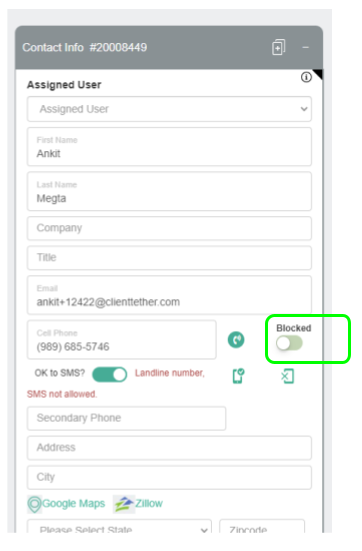
Sometimes you just need to block calls from a specific number. There is an easy access switch on the Contact Profile that allows you to do just that. It also pseudo blocks text messages.
When that switch is turned on (image show off), the phone number associated with that contact is blocked from calling your ClientTether phone number. You can flip the switch either direction and any time.
While the Blocked Switch is turned off, incoming text messages will be captured and stored with the Contact’s Profile, but it will not generate incoming Notifications. We call this pseudo blocked.
There are two sides of capturing external emails inside of ClientTether.
Inside of the SMTP Settings tab you will find a system generated BCC email. This is your key to capturing external emails inside of ClientTether.
Capture Outgoing Emails
The first use case is when you are sending an email to a contact from your email system: Gmail, Outlook or etc. Put your system generated BCC Email in the BCC field before sending. In this case, the outgoing email is sent to your contact and to ClientTether’s email parsing system. ClientTether will read the message, find the original recipient’s email and compare that to Contact Emails in the system already. Supposing the system finds a match, the body of the outgoing email will be captured as an History Note.
Capture Incoming Emails
The second use case is capturing incoming emails in ClientTether. In this case, a little more setup may be required. The basic concept is that you will fwd the incoming email to our system generated BCC Email. This can be done one at at time if you want to be strategic. Or you can set up a Filtering Rule in your email tool to send lots of items. In either instance, ClientTether will read the message and find the original sender’s email. Our system will attempt to match the sender’s email with a Contact in your list. Supposing a match is found, the body of the email is captured as an History Note.
Please Note: Google will not Fwd email with a Rule without the receiving end agreeing to such an action. Hence, you will have to work with your CSM to respond to Google in acceptance of FWD emails.
Contact Types are used to segment various Contacts into logical groups for managing, reporting and sales. Additionally, you are able to create a unique Sales Cycle for each Contact Type.
The System defaults to 5 Contact Types named as follows: Clients, Employees, Partners, Vendors and Other.
Many Account Owners elect to rename the Contact Types within their account to better suite their specific business needs. This process can be completed via the Settings Menu at the Contact Type tab.
To capture information within a Contact Profile that is not already included in available fields, add a Custom Field.
To view available information fields and add a Custom Field, click the Contact Info tab to expand the information panel.
To create a Custom Field, follow these steps:
To add a Custom Field, after clicking the tab icon to expand the Contact Info tab, click on the button. Now choose the input field type from the drop-down selections. Next, add the name of this Custom Field in the Label field and then add the Value and click the This Custom Field is now added to this Contact Profile. To also add this Custom Field to ALL CONTACTS within your account, proceed to the next step.
When adding a Custom Field within a Contact Profile, to also add this new Custom Field to all Contacts within the account, navigate to Settings–>Custom Fields and click this icon at the far right of that specific Custom Field you wish to add to all Contacts within your Account.
Please note: When updating all Contacts to include this newly added Custom Field, the update process timeline will be determined by the volume of Contacts within the Account as well as ongoing system activity.
Email settings allow us to set up SMTP and IMAP configurations with outside email services.
In other words, you can send email out from ClientTether from your email account, whether it be GMail, Outlook, iCloud, etc. This can help boost your deliverability rates and keeps a record of all sent emails in your email account Sent folder.
Always make sure, when you use this feature to check the box in the top that says enable SMTP and IMAP as you set up your connection.
Make sure you have done everything with your email service to allow SMTP and IMAP options to be available. This differs by service, so you will need to verify with your email provider anything you need to do on your end.
If you need to find out who hosts your email service please follow the directions in this link.
The Custom option allows you to use any email provider to set up your SMTP/IMAP service with.
You will need to look at documentation provided by your email provider to get the
SMTP Host address
SMTP Port
IMAP Host
IMAP Port
Password (Usually App Specific)
Make sure you check the Check Box for Enable SMTP and IMAP
Gmail
Gmail is by far the simplest setup. This can be used with any google email system.
Check box for Enable SMTP and IMAP
Select Gmail (Auth Process)
If you set up Gmail through the old process you will need to do this new process. You will see the word’s OLD and NEW. Select the Gmail with NEW. See this video.
If you don’t see New and Old then you never set up on the old system.
Type your email address into the box
Click “Sign in with Google” button
Select the google Account you wish to use
Click “Allow”
You will see a message appear in green that will say “Success: Congratulations, token for your gmail is generated successfully.”
Click “Test SMTP Send” and you will get a test email sent from ClientTether that will display that it was sent from your email address.
Please note that the name that shows on your GMAIL SMTP sent emails is your First Name and company name in your ClientTether Account.
iCloud
The the SMTP Host/port and the IMAP Host/Port are already provided for you here. You will just need to
Check box for Enable SMTP and IMAP
Enter your email address
Get the correct password
This should be an app specific password
Log in to the app to connect your email account to ClientTether
Select “Outlook via OAuth2” from the dropdown Menu
Click “Sign in with Microsoft”
Select the Microsoft account you wish to link to ClientTether
You will be directed to a sign in page
Once your sign in has been verified you will be directed back to ClientTether and see you are connected.
Warning: Some PDF files will not be allowed to send via Microsoft SMTP OAUTH 2.0. This is something caused on Microsoft’s side and is outside of ClientTether Control. To be safe we always recommend attaching the PDF files as a link and not as an attachment.
Email capabilities
This connection will allow you to send emails directly from your Microsoft Outlook account via ClientTether.
As long you have clicked the checkbox next to read email your incoming Microsoft emails will create a notification in ClientTether and be accessible via the history notes.
Please be aware that there can be up to a 15 minute delay from when the reply email hits your Outlook account and it shows up in ClientTether.
Signatures must match the email type. Hence if you plan on sending an email generated with the Sun Editor, you need to have a signature that is created with the Sun Editor.
If you plan on sending an email generated with the Block Editor, you need to have a signature that is created with the Block Editor.
The same is true with Raw HTML.
Otherwise the coding between the email and the signature can conflict.
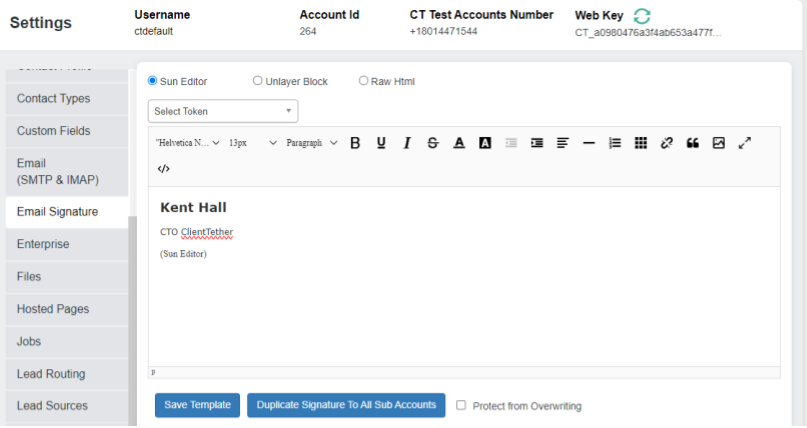
Overview
The email signature page allows you to create an email signature for your login and potentially for all users in your organization.
Use the text editor to insert and edit images and/or texts.
To make a signature conducive to being reused by multiple users please make sure to use the Logged In User Tokens.
We highly recommend not using the table feature of the text editor to create signatures.
When you are done click “Save Template”. If you wish to send it down to all sub accounts and users then click “Export Signature To All Sub Accounts”. If you want to protect from being changed click the box next to “Protect from Overwriting”.
Putting Logos on left side of Signature
A common issue that has been reported by our users is when they design their signatures they have an image or logo they want to the left of their information.
When they design their signature in our text editor it appears to do just that, but when it is sent the image or logo is above the information.
Here is how to fix this issue:
Go to Settings
Got to Email Signature
Click in the text editor this will open the code editor
scroll to the top of the code
This is important in case you have more than one image.
You will see this:
To be clear this may not be the very first thing in the code. You want to find the first <div…> followed by a <figure…> that is listed in the code.
Highlight the <div ….> line
Replace it with this (copying and pasting is very acceptable):
You may have to add spaces at the beginning of your text lines to create the proper space between the text and the image. This can be done in the regular editing mode. It does not need to be done in code editor.
Always test your signature in an email to make it looks the way you want it to in delivery.
Enterprise Settings is available to the Enterprise Account Owner and Admins.
This portion of the account settings options allows the Enterprise Account Owner to maintain brand consistency, sale cycle, lead source, proposal template, and contact deletion consistency across all sub accounts. Our Franchisor and Dealer clients use this setting frequently to ensure data integrity across their national brands.
Remember that locking the lead source at an enterprise level will restrict franchisees or other sub accounts from adding their own lead sources to their accounts. This can restrict some flexibility at the local level that you may need to allow.
If you will be using ClientTether to track your Royalty reports, please note that you can adjust Royalty rates and Marketing Fees in this area of the account settings.
A Special Note on Sales Cycle
If you lock a sales cycle it will only lock the sales cycle for the Accounts directly under you.
It will not lock the sales cycle for accounts that are sub accounts for other accounts in your system.
It will not lock the sales cycle for other accounts that are the same level as you.
Accessing Settings
Login to your account and navigate to the settings menu.
Select Enterprise from the settings menu on the left-hand side.
Enterprise Sub-Account Settings
The Enterprise Sub-Account Settings section allows administrators to lock specific features and set permissions for sub-accounts.
Lock Features
Check the boxes next to the features you want to lock, preventing users from making changes to these items:
Logo
Tags
Log Code
Sales Cycle
Custom Field
Action Plan
Delete Clients
Lead Sources
Note: Checking these boxes will enforce the use of enterprise presets for all.
Subaccounts Creation
Enable or disable the ability for subaccounts to create their own settings for the following:
Action Plans
Log Code
Lead Sources
Reset Password Days
Set the number of days after which users will be required to reset their passwords. Max setting is 180 days.
Contact Export Permissions
Control the ability to export contact lists based on user levels:
Admin User
Standard User
Salesperson User
Steps to Adjust Permissions:
Locate the Contact Export Permissions section.
Use the toggle switches to enable or disable the export permission for each user level.
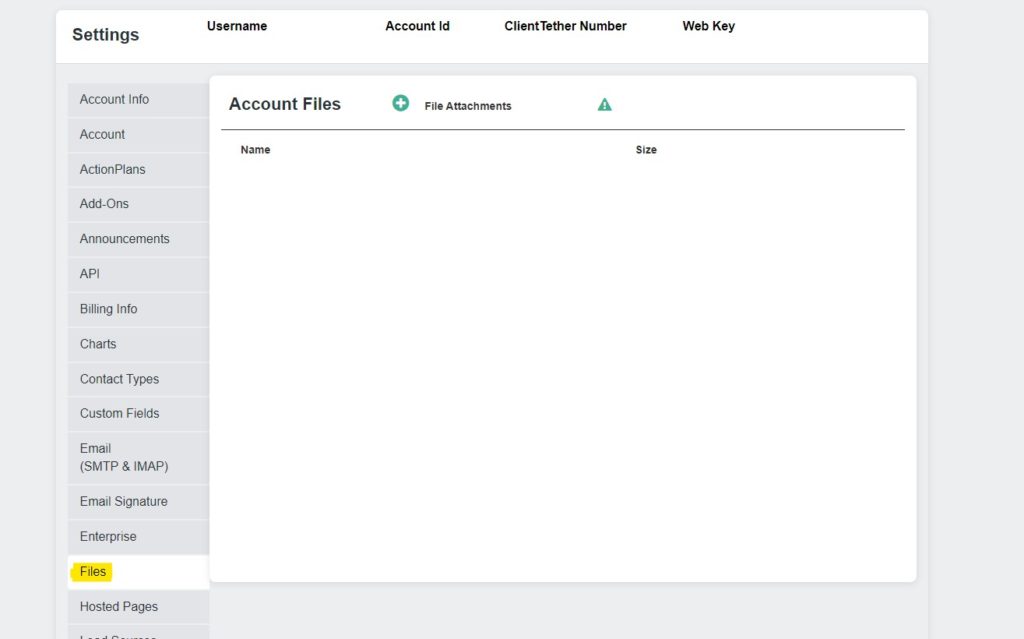
The Files feature in the Settings menu allows the user to add and save content to be used within the account.
Files added here can include PDFs, company logos, videos, thumbnail and other images, etc.
The most common use of this feature is to have the system generate a URL to be used when embedding content within emails and SMS messages sent from the system. The purpose of utilizing the File feature and URL tool is to allow the system to store and host added account content on system servers that may otherwise be too large or if included directly, cause a message to be flagged as spam.
To add a File within this menu, click on the green plus sign at the top of the page. Next, select the File to be added to the account, from your device/computer files.
Once the selected File has been added to this menu, note the icons generated at the far right:
The circled down arrow icon allows for download of the File to your device/computer.
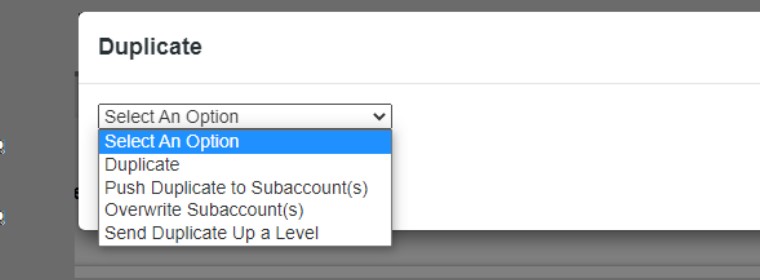
The plus-sign icon allows duplication of the File within the account.
At the Duplicate menu, select from provided options to only duplicate the File or share/send a duplicate of the File as preferred.
The link icon allows the user to copy the system generated URL to the clipboard to then be used to embed the link to this File within emails and SMS messages sent from the system.
Hosted pages are designed to allow your team and clients access to tools that we host on our servers like:
Online Scheduling tools
Data Entry Forms
Chatbots
Most Hosted Pages allow two different access points. One is for known Contacts that are already in your ClientTether CRM. The second is used for potential contacts that are not in the ClientTether CRM already. Note: For security reasons, you cannot iframe a hosted page on your site. However, you can create links to our Hosted Pages.
Hosted Pages can be used by embedding them in websites or by using them in templates by utilizing hosted page token with the correct “Slug”.
You can also use them when scheduling events in a contact profile
Creating
These are the types of hosted pages you can create. – Simple Lead Form – Custom Lead Form – CT-Sign – New Meeting Schedule – Private AI Chatbots
ChatTool Test Page
This page will be activated by out ChatTool Engineer if you have commissioned at ChatTool to be built. It is designed to allow you to test your ChatTool before launching it on your website.
If you are interested in a ChatTool please reach out to your success manager.
Lead Form
Go to Settings
Select Hosted Pages Tab
Click between “Hosted Pages” and “Add New” in upper left corner
Create unique name
Create unique Page slug
Select “Simple Lead Form” from Type drop menu
Select Categories you wish to include in lead form
When done click
Editing
Go to Settings
Select Hosted Pages tab
Select icon next to Hosted page you wish to edit
Make your desired changes
When done click
Deleting
Go to settings
Select Hosted Page Tab
Find Hosted Page you wish to delete
Select icon for that Hosted page.
Confirm you wish to delete it.
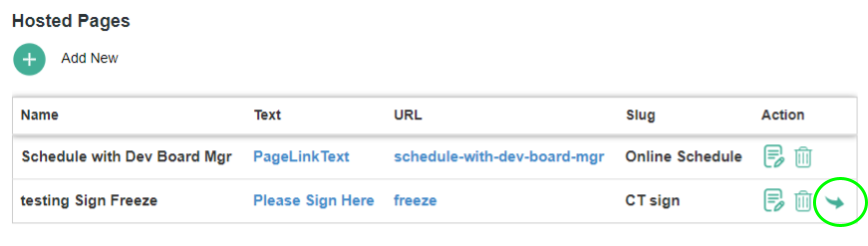
After you have create a Hosted Page, you can share that page with subaccount using the identified icon in the image just above. When shared, the receiving subaccount will NOT be able to edit the hosted page. All editing rights remain with the originating account.
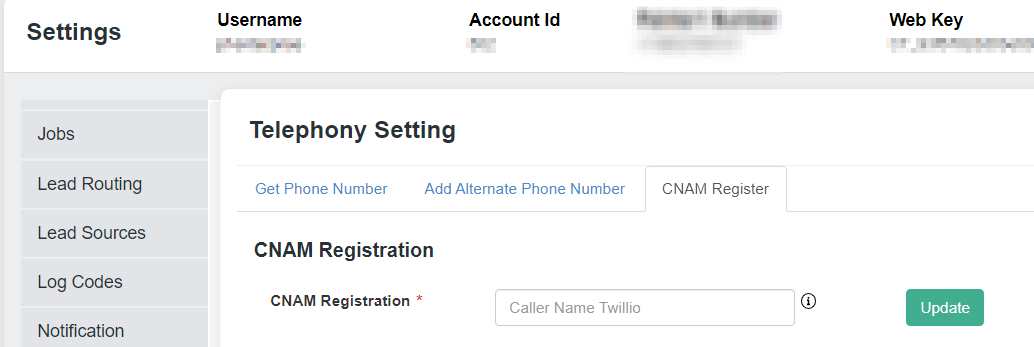
The CNAM Registration field is limited to sixteen characters. Put in your business name and click Update. You must have a Twilio phone number and A2P registration must be complete and approved – the CNAM tab will not appear before you have met these requirements.
Once this is done you will see the Lead Routing tab appear above the Lead Source Tab in Settings.
Using Lead Routing
To utilize lead routing
Go to Lead Routing tab in Settings
Select whether you are sorting leads to Users or Sub Accounts
Select how you want to sort the leads
Round-Robin
Evenly distributes leads among Users or Sub Accounts.
State/Province
Allows you to assigns specific States/Provinces to the Users or Sub Accounts.
Postal Code
Allows you to assigns specific Postal code(s) to the Users or Sub Accounts.
Lead Source
Allows you to assigns specific Lead Source(s) to the Users or Sub Accounts.
Set your Mapping
Select if you want this to apply to Existing Customers in your account
Select if you want action plans is sub accounts to activate based on lead source. (IF you are applying the lead routing to existing customers this option is not available)
For everything other than Round Robin, Select who you want default leads (so leads that don’t fit any of the mapping) to go to.
For everything other than Round Robin assign the mapping to the correct User or Sub Account.
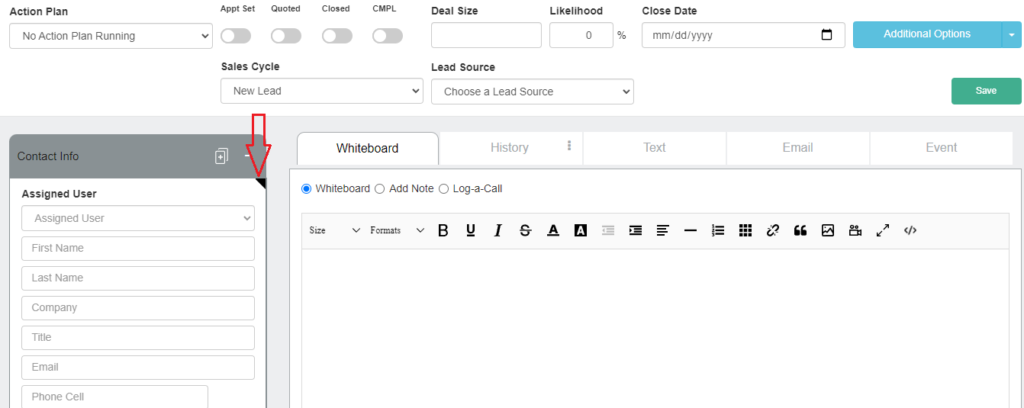
Our Log Codes function allows you to provide a systematic framework of reporting calls “Call Codes” within your organization. This directly affects what is available to your organization in the Log-a-Call feature in the Whiteboard Tab.
When your team uses this tool within a client profile, they can send automatic updates to the account owner by email or text that includes the logged call notes and Call Codes attached to it.
When setting this feature up, you can select whether communication on Log-a-Calls is done via Email and/or text by default.
You can create your Reason and Disposition Codes
Select Contact Type
Select Code Type
Enter Code name
Enter a description
Click
You can also see the list of your current Codes at the bottom of the page.
As a note, Reason Codes are there to provide the reason for the call, such as, “Reschedule”, “Complaint”, “New Service Request”, etc. Disposition Codes are intended to indicate what action was taken with the client on the call, such as, “Rescheduled”, “Cancelled Service”, “Forwarded to Sales”, etc.
The control tab allows each User to decide exactly what type of Notifications they will receive.
In some cases you have three options for your notifications:
System
This controls whether the Notification is displayed in the right side panel of ClientTether. This is not specified by AU.
This option is available for every Notification type.
AU
System Notifications will only show to you for that notification if they are generated in relation to a contact where you are the Assigned User.
Text AU
If the user is the Assigned User for the contact then they receive a text Notification.
Email AU
If the user is the Assigned user for the contact then they receive an email otification.
Please also note that if the User is rolling up Notifications they will only see the roll up of the notification types they have selected in Control.
Also if you use the gold login button for an account or the green login as button for a user the notifications you see will be the same as the user you just ‘Logged in as’. Your credentialed settings do not go with you.
Control tab is always available in the Notification tab regardless of what Add-ons are turned on or off for the account.
Term
Description of Notification
System
Notifications Generated on the Right Side Panel in ClientTether. This is not dependent the user being the Assigned User for the contact.
If a contact has been assigned an Assigned User via a Sales Cycle or through an Action Plan. You will not receive a notification for a manually Assigned User.
Completion of a mass Contact Update done via update option on the contact list. This requires uploading an excel sheet.
Contact Moved
Contacts moved between accounts for example if a contact is lead routed,released, reassigned, etc.
Download Report
A report from the Dashboard is available for downloading.
Email Failed Error*
An email send failed. This notification only happens if you are NOT SMTPed into an outside email system.
Duplicate Client*
A notification that a duplicate contact has been submitted to the system. Please be aware the AU email and text options will send an email and/or text to the Assigned User of the original contact.
Franchisee Statistics Report
This specific report from the dashboard is available for downloading.
Test Inbox Read
If user has set up SMTP and clicked button to test reading the inbox.
Proposal has been sent to Dispatch. This is a specialty only available to select clients.
Single Reassigned
Contact moved to the account via reassign
Single Released
Contact moved to the account via release
System Information*
System Error Information*
Text Received*
New text message received. Please note the AU email and text messages only send if you are the Assigned user for the contact.
Text Stopped*
Contact has unsubscribed from text messages from your number. Please note the AU email and text messages only send if you are the Assigned User for the contact. Texting can only resume for these contacts if the contact sends a text saying to your ClientTether number saying “Start”.
New voicemail received. Please note the AU email and text messages only send if you are the Assigned User for the contact.
*Strongly encouraged to be selected on
Rollup
The roll up tab allows you to select sub accounts you wish to see notifications for in your right side panel while being in the parent account.
Please note if you have selected to see only specific notification types in the control tab that those types are the only notifications that will roll up to you from the subaccounts.
Remember this setting saves per user and is NOT a universal account setting.
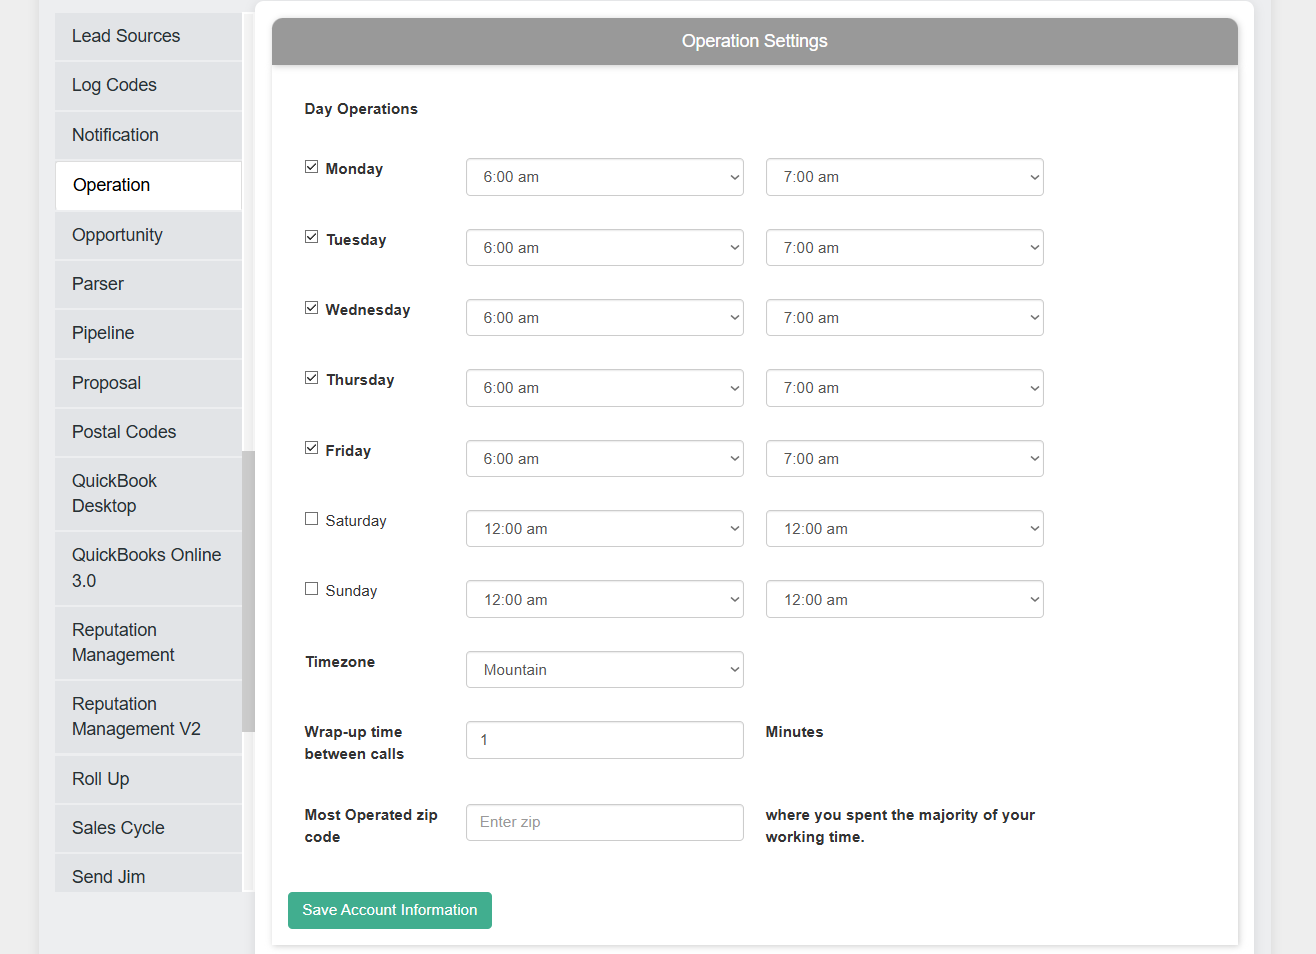
At the top of this page you can set operation hours – which sets the times that automated texts and emails can occur. Immediate texts and emails will always go out immediately, but delayed texts and emails and automated calls will only occur in your hours of operation.
Be sure to set your time zone and click the Save Account Information button.
Here is a video to explain the Operations Settings – click to view
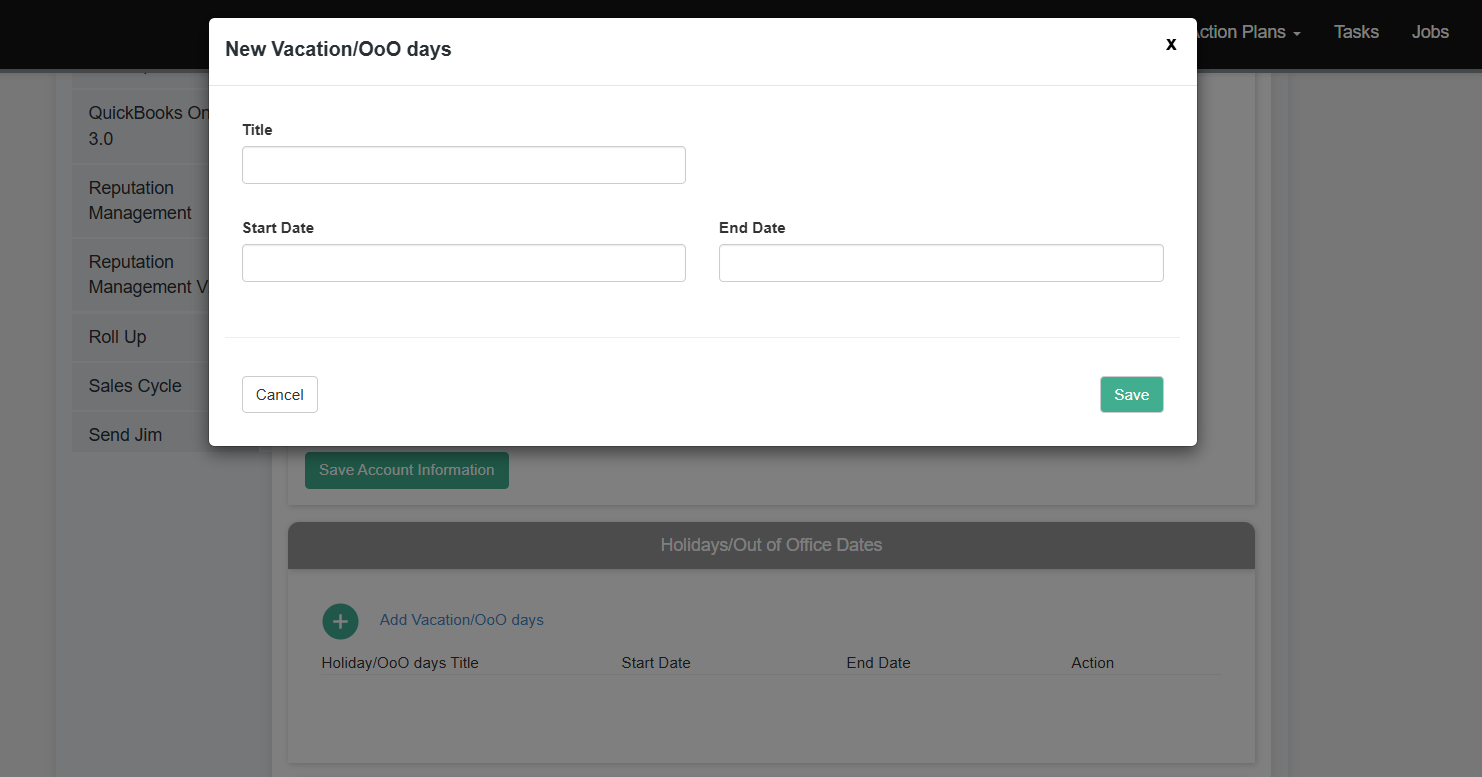
As you scroll down you can set your Holidays/Out of Office Dates by clicking the green plus and choosing your start and end dates, then save.
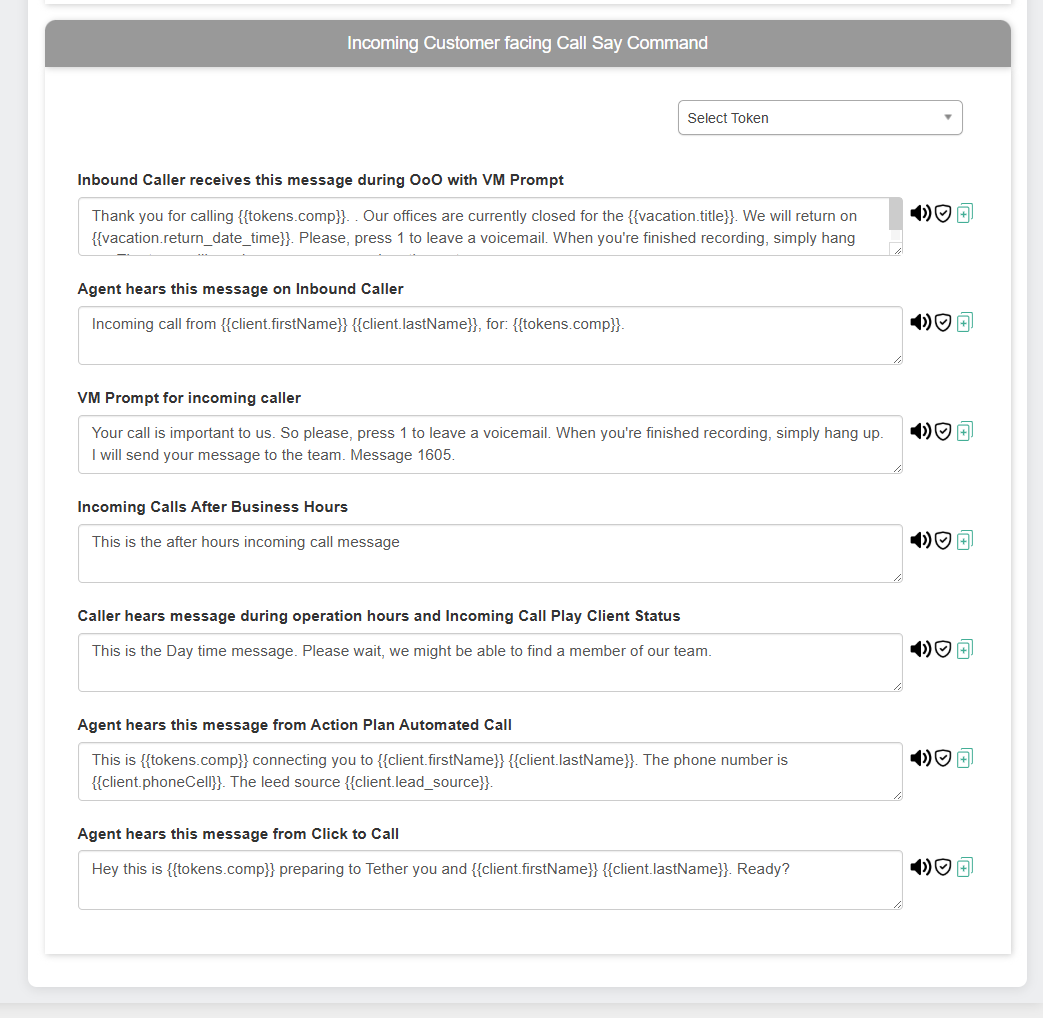
As we scroll further down we find the Incoming Customer facing Call Say Command. This controls how the system handles calls and is set up for you. You can make changes, note that we use tokens to indicate things like first name, last name, company name, and more.
You can select a token from the Select Token dropdown and it will be copied to your clipboard so you can paste it in wherever you want.
You can choose to share “Quote Types” down your organizational structure.
Simply go to the Other tab under Proposal Settings and click any Gray Arrow. That will tell the system to share that Quote Type with subaccounts. A green arrow means that the Quote Type has already been shared. (See image below.)
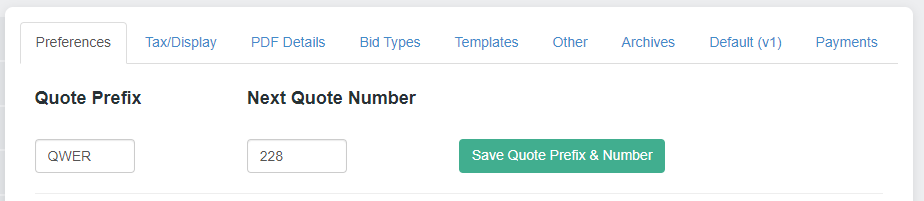
Next Quote Number allows you to set the number that will be used for your first quote. From that point forward the system will auto-increment the number. This field will display the next number in the sequence.
Quote Prefix allows you to add a prefix to the Quote number. This can be used for branding or segmenting multiple system accounts in one Quickbooks account.
Page Header Information
Proposal Header Information Allows a series of check boxes that allow you select what you would like displayed for your clients on their quotes.
Tax/Display Settings
Tax Settings
Allows you to decide for the account (Not sub accounts) whether you want to:
Include Tax in Deal size
if all Line Items are to be taxed
If all of your line items need to be taxed this saves you time. Rather than making you go into each individual line item and have to check to tax it.
Tax Districts
This feature allows you to create individual tax settings for different areas in your territory
You can create a district by:
Clicking Next to Tax Districts
Enter Name
Enter Labor Tax
Enter Manual Tax
Click Save
You can manage your existing Tax districts by:
Editing them
Marking a default
Deleting them
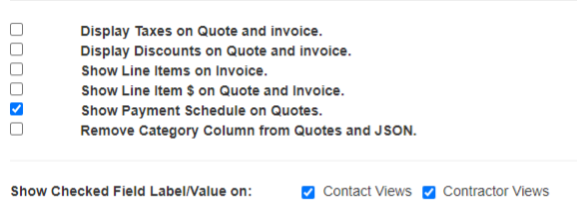
Additional Display Settings
At this menu, you can also determine the following:
Display taxes on Quote and the Invoice
Display discounts on the Invoice and Quote
Show Line Items on the Invoice
Show Line Item price ($) on the Quote or Invoice.
Please note: If this option is selected, the Line Item price ($) and the column will both display. If not selected, neither will display on the quote or invoice.
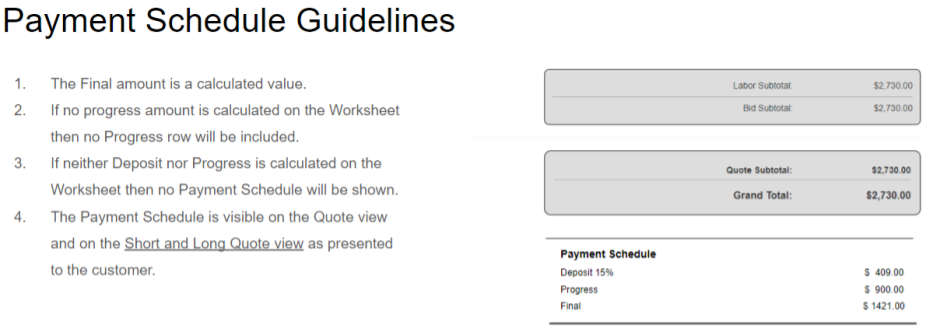
Show Payment Schedule on Quotes
Remove the Category column from Quotes. If your structure is better suited to 2-Tier, this is recommended.
PDF Page Details
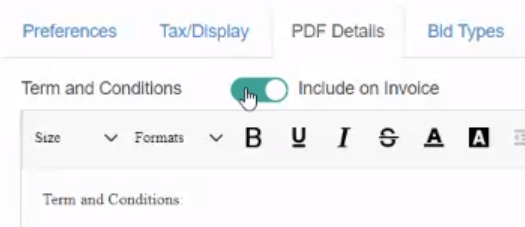
Use the top text field, labeled “Term and Conditions” to enter in any pertinent terms and conditions for your service that your clients need to know.
To include your “Terms and Conditions” information on invoices and and within the system user view, please toggle the “Terms and Conditions” switch on (as shown below) within Proposal Settings at the PDF Details tab. The default setting for this option is set as off or not shown.
Use the bottom text field, labeled “About Me” to provide any additional information about your services or company that would be beneficial for your clients.
Sub Contractor Emails
Use this setting to add in any emails for subcontractors that your company uses.
This makes it possible for you to email information directly from the proposal to your subcontractor.
Pre-Notes
The Pre-Notes section allows you to create notes for common things that you will encounter on a proposal.
Its not for a product, but rather notes about something.
The Bid Type setting allows you to assign Types, Category and Line Items for your proposals.
To help clarify an Type is the most general grouping, for example, Flooring.
The Category is the specfic category under the Type. So for Vinyl could be a category under flooring.
Line Item is the specific product. So Johnny’s Bamboo Vinyl Flooring would be the line item.
So the pattern is we work from the most general to the most specific Type->Category->Line Item.
So in the example it would be Flooring->Vinyl->Johnny’s Bamboo Vinyl flooring.
Type
The steps for creating a Type are:
Click the directly under Bid Type and to the right of “Add New Bid Type”
Enter the Type name
Select if you would like the room measurement feature to be on for this type.
Select any sub accounts you want to allow access to this type.
Click the button
Click the at the type right part of the window
You will see your new Type displayed at the bottom of the type list.
Category
The steps for adding a new category are:
Hover your mouse over any of the existing Bid Types
Click on the icon next the Bid Type you hovered your mouse over
Enter the name for the category
Select the display order
Select the bid Type
Click button
Click in top right part of window
Click next to Bid Type you assigned the new category to
Your new category will be displayed below the Bid Type
Line Item
Select any Drop down of Bid Type
Then select any drop down of bid category
Click next to category
You will notice if you hover over this it will say “Add Line Item”
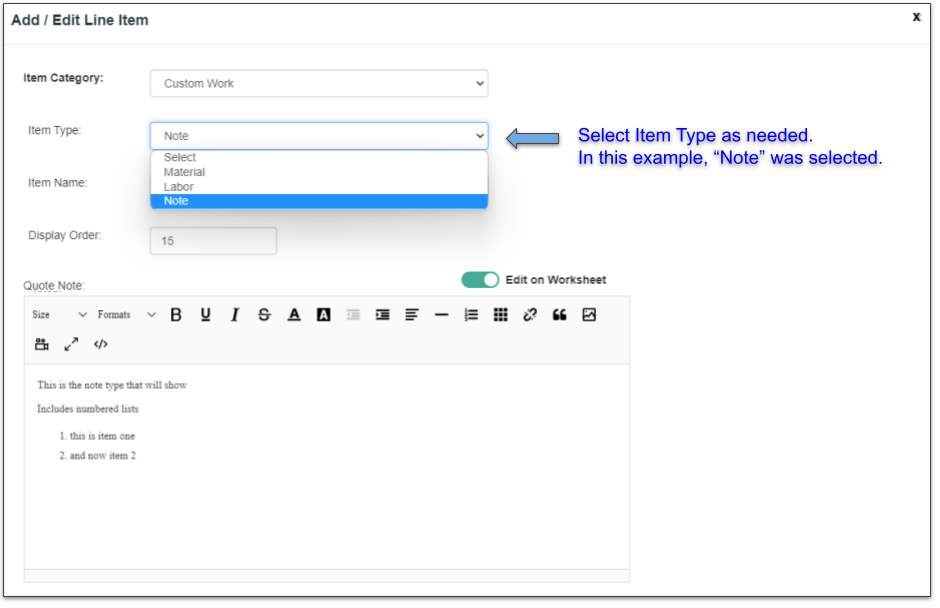
In the Add/Edit Line Item select the category the line item will under
Select item type: Labor, Materials, Notes
Give the Item a name
Write a description of the item
Enter Display Order
Check if taxed
Add any custom fields
Enter any calculations for retail and/or sub rates
For me detail on Calculations see section below this.
Click
Please note: You can also set and save the default field size for your notes in Line item.
Formatting for your notes will also carry over into the quote and invoice descriptions settings.
Please note: When you delete a Line Item, a dialogue box will appear and you must click “OK” to continue. Once deleted, you can view the Line Item in the Archives Tab in Proposal Settings. From that menu you can restore it for use if needed by clicking on the green arrow. Also note that when a Line Item is deleted and archived it will still show in Proposals where it was previously used.
Calculations for Line Items
Predefined calculations for line items will save your team lots of time and take away the potential for human error when calculating totals for proposals.
In this section we are going to walk through how to build those calculations successfully in the Proposal Settings.
These calculations can be created by using Custom Fields and Constants.
Create any needed Constants
On the Proposal Settings page hover your mouse over the bid type the Line item will be under
Click
Enter the name of the new Constant in the Label field
Enter the Value of the new constant in the Value field
Click
In the specified Line item create any needed Custom Fields
Across from Custom Form click
Create a name for the field by entering it in the Field Label field.
Select Field Type
Enter Default Value (not required)
Indicate if the Field will be included on the Quotes by checking the Checkbox
Select Field Size
Enter field Calculation
Only available for Field Type “Calculated”
Please note any variables used for these calculations must either be Constants or Field Keys for Custom field that are above the current Custom field. You cannot use Custom Fields Field Keys below the Custom field you are working on.
In the proposal settings you cannot share the following directly to sub accounts
Sub-Contractor emails
Pre-Notes
Quote Types
However, you can directly share a bid type with sub accounts.
This will autmotically share the categories and line items under the bid type.
Please be aware sub accounts cannot edit line items that have been shared with them. If they wish to make a change they can duplicate the line item and make their desired adjustments to that duplicate.
To share the bid type:
Hover your cursor over the bid type
Click
In the window click on the field under “Select SubAccounts”
Select the account(s) you wish to share this with.
Please note that any accounts you have already shared it with will appear in this field, and will appear with light grey text in the drop menu.
The Sales Cycle allows you to track and visualize the progress of contacts throughout your sales process.
A unique sales cycle can be created for each Contact Type.
To create a new step in the Sales Cycle, first, navigate to the Settings menu, click on Sales Cycle, and:
Click next to “Add New”
Select whether the new step is Inactive or Active
Active steps in Sales Cycle will be displayed in your Pipeline and Dashboards.
Inactive steps are a way of showing the contact is not actively progressing through the Sales Cycle. These are often lost leads. These steps are not displayed in your Pipeline or Dashboards.
Enter the step’s Sort Order
This designates where in your Sales Cycle this step should fall.
Name the Step
If during this step in your sales process a customer is quoted or closed select the appropriate check box to automate tracking of this parameter.
If customer is neither quoted nor closed in the step don’t check either box
Note: Each step following the point when a client is quoted, you will want to check that box, so the data is tracked correctly.
Select if the step has a designated Assigned User
Check the Add Notification box if you want a Notification that a contact has reached this step.
The Self-Pay sub account feature is only available for new sub accounts. You cannot use this feature with existing accounts.
In order to use this feature your account must be enabled as a multi-level accounts, which allows you to create sub accounts.
This feature allows your sub accounts to directly pay ClientTether, so you do not get charged for their account each month.
To use this:
Reach out to your Success Manager and let them know you would like this feature turned on.
You will know the feature is on by going to Add-Ons in Settings and see that it has a check mark next “Activate Self-Pay Subaccount Option. Ask your Success Manager for details“
When the new account owner logs in for the first time they will be prompted for their Credit Card Number and then they will be allowed to select their phone number.
The credit card information for any account can be updated at anytime after set up by going to the Billing Info tab in Settings.
If you have added the Task Management Add-On in Settings > Add-Ons, a task icon will appear on the top right of ClientTether as shown below.
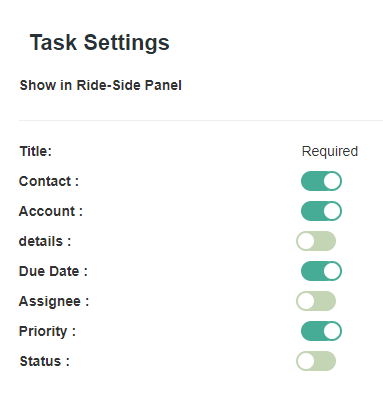
The Task Settings page allows you to control what is shown in this side panel. To see all details of the task, you can click on Tasks on the top of your screen and click on a task.
On the Task Settings page, simply toggle the switches on or off to select which parts of a task show in the side panel.
All items must be compliant in order to enable texting in ClientTether.
Registration:
US Customers: Information on the telephony tab (business name, address, etc.) must exactly match the name associated with the EIN – not the DBA. If it does not match, Twilio may require the company’s CP 575 EIN and/or form 147c Confirmation Letter from the IRS in order to complete registration.
Canadian customers’ information must exactly match the information associated with their tax identification number.
All customers should make sure the information submitted on the telephony tab matches exactly. We recommend getting your sales representative or Client Success Partner to double check in order to avoid unnecessary delays and charges.
Website Requirements:
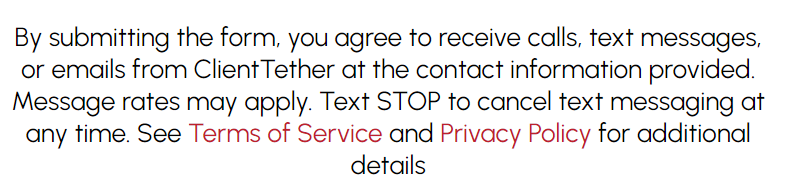
Every form on your website must have a notice to customers that they are opting in to receive automated texts, as well as information on how they can opt out. Here is an example:
Privacy Policy:
A compliant Privacy Policy must state that no mobile information will be shared with third parties/affiliates for marketing/promotional purposes.
It must also give information on how to opt out of text messaging.
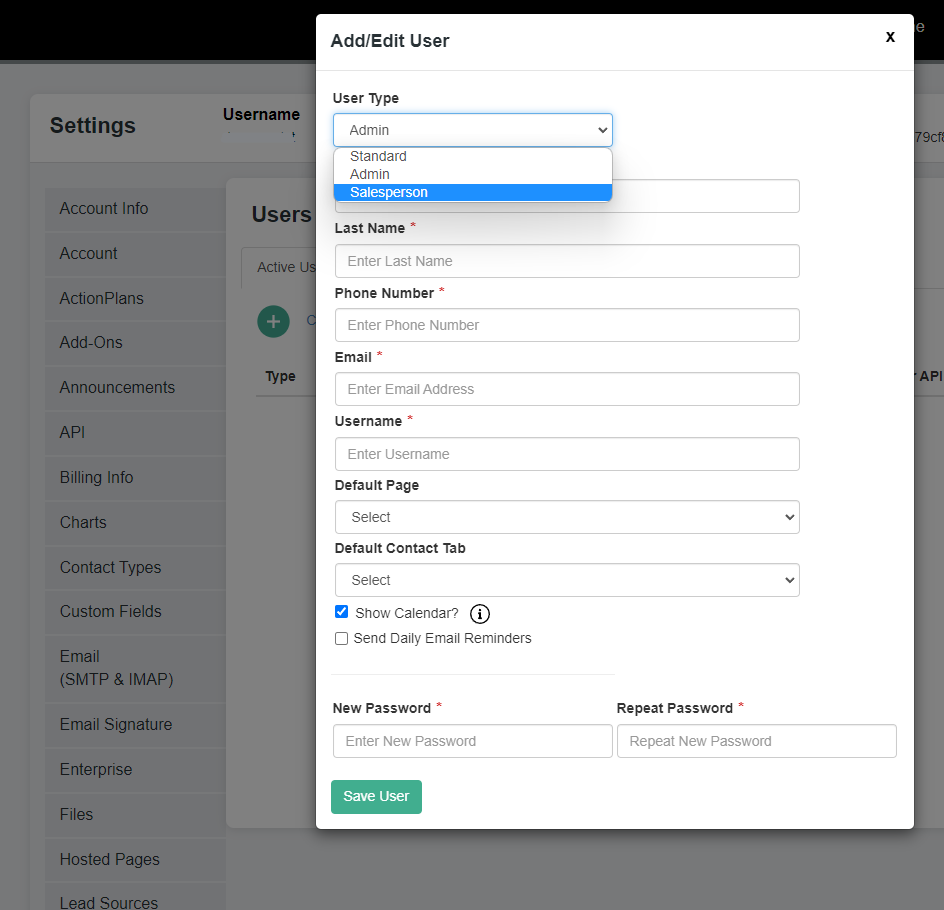
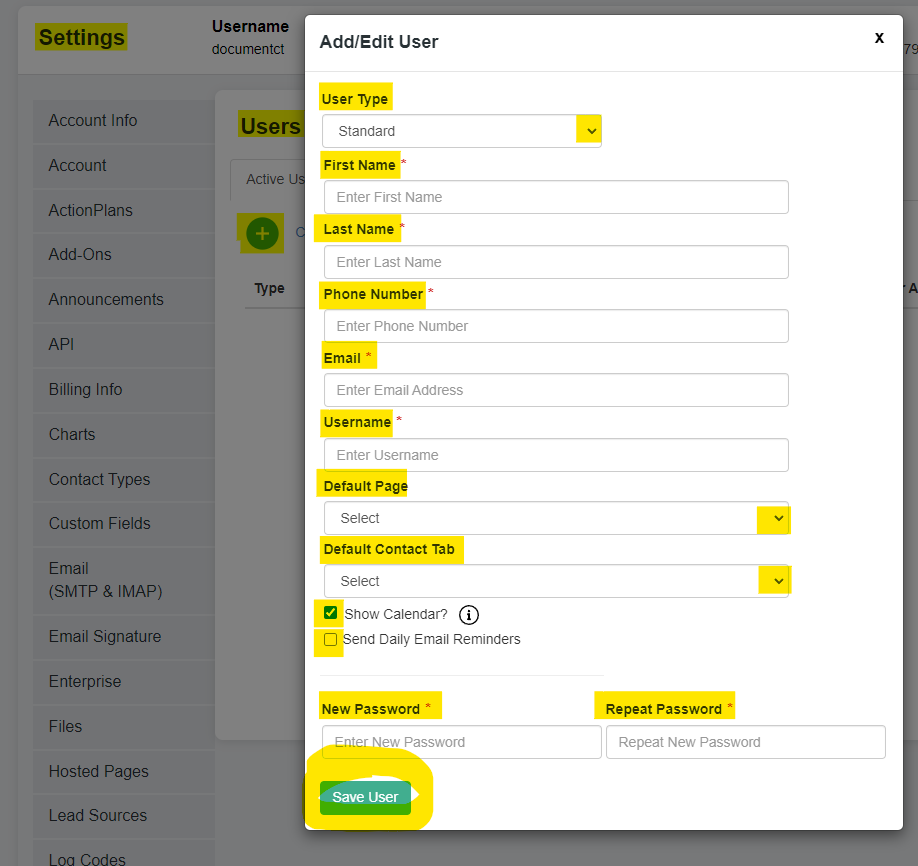
There are four User types available within your ClientTether account:
Account Owner (AO)
Admin User
Standard User
Salesperson
The AO can access all features within the account with the exception of the Call Center feature.
Admin Users can access/view all features of the account, mirroring the access/view of the AO, and also cannot utilize the Call Center feature.
Standard Users have a restricted or limited view of the account which excludes them from having access to edit Action Plans, delete Contacts, and change most Settings. Standard Users do, however, have access for to the Call Center Feature.
Salesperson Users have a restricted or limited view of the account which excludes the from seeing Contacts that are not assigned to them both in the Contacts lists and Pipeline. Additionally, Salesperson users cannot edit Action Plans or change most Settings. Salesperson users are able to set and save custom filters.
Please note: At the Users panel within Settings, the ID for API v2 is provided for use when creating an API or POSTing Calls in regards to specific Users.
Select the Default landing page for this User (determines the first page this User will see after logging into the account).
Select the Default Contact Profile Tab for this User (determines which tab within the Contact Profile is shown first).
Create your Password
Verify Password
Select “Show Calendar” to have your calendar shown when comparing calendars for Events.
Check the box at “Send Daily Email Reminders” to have ClientTether email you each morning with updates regarding Contacts within your account.
Click
Once saved, this new User profile has been created. The new User will then log into the ClientTether account using the unique User Name and Password credentials created here.
Please note: The AO and Admin Users can log in and view the account as a specific User by navigating to Settings and then the Users tab. At the Users List, click on the login button adjacent to the User account profile you wish to view. Confirm your access choice at the pop-up menu and then view the account as that specific User/User Type to confirm access is as intended.
Editing User
Navigate to Settings
Click the User Tab
From the Users List, click on the edit icon
Update the User profile as needed
If you update the password, please click to save your updates.
All other changes made within the User profile will automatically save when you exit the screen.
Deleting User
Navigate to Settings
Click the User Tab
From the Users list, click on icon adjacent to the User profile you wish to delete.
Confirm this selection at the pop-up menu.
Once deleted, the User profile will be stored at the list under the Archived Users tab.
Archived Users
Once Users are deleted their profiles are accessible in the Archived Users tab within the Users List.
Please note that Contacts assigned to an Archived User will have their assigned user box outlined in orange in the Contact Profile.
When a User is archived, the password is automatically reset by the ClientTether system to prevent access to the account using those credentials.
If you wish to restore a User, then click the restore button next the archived User you wish to restore.
Please not: If you restore the User, you must update/reset the password in the Users List and provide those updated credentials for access to the account.


 to on.