Overview
The proposal system allows you to easily create quotes and invoices for clients. Additionally, this feature allows you to directly engage subcontractors and other team members regarding the needs or processes related to a specific project.
Importantly, all aspects of the Proposal system are controlled by the Account and designed specifically for customization.
The Proposal System has recently been updated to include the auto-save feature throughout. This change is now in effect whenever changes are made on any screen within the Proposal System. Additionally, when changes are made to any screen within the Proposal System, calculations are also updated and auto-saved.
For additional support regarding Proposal Settings, please visit Proposal Settings.
Topics
- Turning On Proposal System
- Creating New Blank Proposal
- Creating New Proposal from a Template
- Accessing an Existing Proposal
- Editing Completed Values
- Proposal Overview Tab
- Worksheet
- Proposal Calculations
- Quote
- Payment Schedule
- Work Order
- Change Order
- Punch List
- Invoice
- Creating Templates
- Sending the Proposal
- Signatures
- Marking an Invoice Paid via an Action Plan
Turning On Proposal System
- Go to settings
- Click Add-Ons Tab
- Select Activate Proposal System 2
- Proposal tab will appear
- Select Proposal tab
Creating a New Blank Proposal
- Open the Contact Profile you wish to create a Proposal for
- Click the drop menu at the upper right:

- Select New Proposal
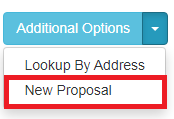
- A blank new proposal will open
Creating New Proposal from a Template
Please note: In order to access Templates when using the Proposal system, you must create those related Templates first, within the Action Plan/Templates menu.
- Open the Contact Profile for the customer you wish to access an existing Proposal for
- Click the drop menu at Additional Options:
- Select the Proposal template:
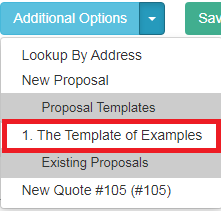
- The existing Proposal you have selected will open.
Accessing an Existing Proposal
Please note: In order to access an existing Proposal, the Proposal must have been previously created within the Contact Profile for your customer.
- Open the Contact Profile you wish to access an existing Proposal for
- Click the drop menu on
- Select the existing Proposal to access:
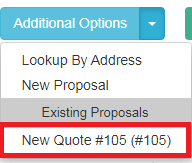
- The existing Proposal you selected will open.
Editing Completed Values
The system is designed for multi-layered account systems. From time to time the Completed date and deal size need to be edited. The system has a method designed to allow Users form a higher level account beyond your own, to edit, remove Completed Dates and Deal Size values. Watch this video.
Proposal Overview Tab
This tab allows you to view the key details of a Proposal at a glance.
This overview is provided in five sections:
- Proposal Phase
- Client Name
- Lead Source for Client
- Estimator
- By default, the logged in User will be set as the Estimator. To change this select a different User from the drop down menu.
- Type
- Allows you to name the proposal
- Proposal Notes
- Client Notes
- These are imported from the History Notes that have been added from the contact profile
- Header Photo
- Allows you to personalize and Brand your proposals.
- Work Phase
- Job Start Date
- Job End Date
- Field Manager
- Selected from the users in account
- Work Notes
- Completion Phase
- Total Due
- Date and Amount of Payments
- To add new payment Click

- Select Date
- Select How Payment was Recieved
- Cash
- Card
- You will need to enter last four digits of card
- Check
- Will need to enter check number
- Other
- Select type of payment
- Deposit
- Progress
- Final
- Enter the Amount of the payment
- Click
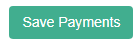
- To add new payment Click
- Amount still remaining
- COGS (Cost of Goods Sold)
- Name of good
- Cost of Good
- To add a new cost click

- Type in name of good
- Type in cost
- Click the button

- To add a new cost click
From this tab you can also choose between  or
or 
Please Note: This is the only location within the Account that allows you to delete a Proposal.
Worksheet
The Worksheet tab is where you build the quote. You use the Bid Types, Categories, Line Items, and Equations you have created in the Proposal Settings.
Any fields in the Worksheet that are filled with grey are not editable. Any fields that are white can be edited.
 To start you will need to add a bid type. Just click the
  next the word Estimate.
 - Select your bid type
- Enter area Name
- Enter any general comments or concerns
- Expand this bid type by clicking on the
 to show
 - Select your Category
- Select your Line Item
- If you have added any custom fields in Proposal Settings for this line item you will fill them out here.
- Check the
 if the item needs tax added.
 - In the Columns on the far right
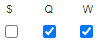 check what you want displayed.
- $ = Displayed Itemized line details on the Quote
- Q = Display this amount on the quote - Unchecking this box will remove this line from the quote entirely.
- W = displayed on the Work Order
- To delete a Line Item, click the trashcan icon
 at on the far right of the line item.
 - Continue to add any additional Line items for this bid type/ area by repeating steps 5-8.
- You can rearrange the order of these line items by clicking
 next to any of the line items. Just click and drag the item to the correct spot.
 - Add any additional notes about this Bid Type/ Area
- Add attachments, such as pictures.
- You can also designate a discount.
- If you want to take off 25% for example, just type 25 in the discount box.
- To Add more Bid Types/ areas repeat this process
Once you have completed the work sheet click
If this proposal is going to be reused. For example if you are going to do the same type of project over and over again and will require the same fields it would be wise to click  and it will save the categories and layout as a template that can be used over and over again with other customers. This is covered in more detail in Creating Templates.
Quote
The Quote tab will display as much or little detail you as you have selected with the column.
Notes for each Area / Bid Type will be displayed automatically as will the total cost.
At the bottom you will find the grand total for the quote.
Below your quote line items, your Terms and Conditions, that you have provided in the Proposal Settings, will display.
A check box is provided that allows your customer to accept the proposal and also access a signature line.
Once checked, the Signature block will show up. When the Signature is captured please click .
You can also view pdf versions of the quote by clicking  or
or  .
.
The short link is a pdf of the quote page. The long link includes your account name, logo, About Me section, and the information on quote tab.
If you click  it will take you back to the Contact Profile where you can use a template with the correct tokens to send the proposal type you wish to send to your client (Short or Long). This is covered more depth in Sending the Proposal.
Payment Schedule (New!)
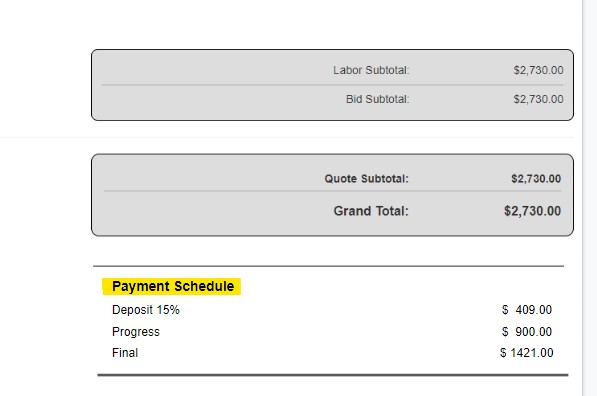
The Proposal System now includes a Payment Schedule that is available at the bottom of the Quote View and in the Customer View. The purpose of this additional information is to clearly show the Deposit amount, Progress amount and expected Final amount as applicable on Quotes created in the system.
Please note: If no values are entered at Deposit and Progress on the Worksheet, the Payment Schedule will not appear on any View of the Quote.
If entered, these values are "locked" to the signature on the Quote (more detail on Signatures found below). If a signature "seal" is broken, the Payment Schedule can be updated. Otherwise, these fields are held constant to the original signature on the Quote.
Work Order
This tab allows you to assign and manage work orders to subcontractors.
You can add items to be available for Work orders by checking checking the box under the W column.
You can then create work orders by Bid Type. You select the bid type(s) and then click  .
.
At the bottom of the page you select to which subcontractor you'd like to assign the work order. Then Click either  or
or  .
.
Change Order
The Change Order tab allows you to make changes to a Proposal after the customer has accepted your original Quote.
Such changes add or remove items by typing a description in the provided field and entering a cost.
Please note: If you are removing an item or lessening the cost then you should use a negative number in the cost field.
Once you are finished with your change order please have the customer sign in acknowledgement and approval of the change.
Change orders will show up on the Invoice for the Proposal.
NOTE: If you are concerned with Taxes or QuickBooks Online integration this legacy feature in not recommended.
You can then click or .
Punch List
The Punch List allows you to have the project manager go through a job and create a list of things that still need to be completed.
You can easily add items to the Punch List by clicking the next to "Add new Row".
As items are completed just check box for each item to the right.
The customer can sign at any time to signify they approve the Punch List is complete.
You can click or .
Invoice
The Invoice is used after the job is complete. It lists the Bid Type and area with the total cost.
It also Shows any payments the customer has made toward Grand total and will display the total left for the customer to pay.
To email the Invoice just click and follow the instructions in Sending the Proposal.
Creating Templates
Creating templates can save you a lot of time and your estimators a lot of headaches.
To create a template for a walk through or basic bid for flooring in a house, you can either create a bid for an actual customer, which is generally applicable, or create a bid for a test customer that is representative of what you would typically see.
For either example, follow these steps:
- Create the proposal on the worksheet.
- Then click
- Give the template a meaningful name and click Save.
- If you decide you want to change something or don't want the Template click Cancel.
Sending the Proposal
To send the Proposal, you should utilize either a Template or an Action Plan. For the purposes of this tutorial we will walk you through this process utilizing the Template option.
The first step in this process is to create a Template utilizing the appropriate Tokens. (If an email Template used for sending the Quote has already been created, skip to the second part of the process noted below.)
- At Action Plans in the top menu, click on Templates.
- Click
 next to "Email Templates"
 - Name the Template and enter the Subject line for the Template email (this will be the subject line the Customer/Client will see).
- Create/edit the content of this email message as needed and based on the purpose of the email, select the correct tokens from the Token drop-down menu at left. FYI, utilizing the Token for your Proposals allows you to send links for the Quote, Invoice, Punch List, etc. For more info on use, please visit the Tokens page for further details.
- Once you have added content, edited and formatted your email to use with your Proposals, Click
 .
.
The second step in this process is to send the email with the linked Proposal. To complete that task, follow these steps:
- Make sure you have clicked the or button for whatever item you are emailing.
- Go the Contact Profile for the person you are sending the information to.
- Go to the email tab in the Contact Profile
- Select the appropriate template and edit as needed.
- Send the email to the client/customer for review.
Signatures
Collecting Signatures is a must in some states and scenarios. This creates a binding contract. To be a valid electronic signature, a person must do two things.
In this proposal system the User must check a box as follows:
I understand this is a legal representation of my signature signifying that I accept this Proposal.
Next they are to sign in the box provided. This is captured in the system.
However, Change Orders are often requested after the signatures has been provided. The system allows for this by maintaining the original version of the proposal with its signature.
The User can edit the proposal by adding or subtracting line items and then collect a new signature.
Marking an Invoice for the Proposal as "Paid" via an Action Plan Step:
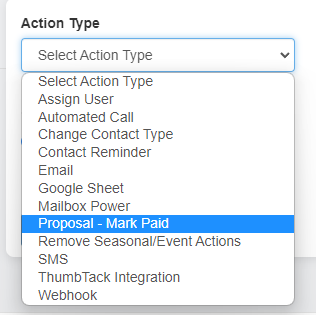
To indicate an Invoice has been "Paid" and to apply a corresponding "Paid" watermark to the Invoice, you can add an Action Plan step within your Proposal-related Action Plan process.
Standard options to name this step, enable a notification, and set timing of this step are provided.
When this step is initiated, the Invoice will be set as Paid and Show watermark.
The recommended next step in this Action Plan would send an email with an Invoice link to the Contact.