Proposals Settings
October 24, 2020Overview
To help you centralize your operations, ClientTether provides a proposal system that is easily customized to suit your needs.
This page will provide the details on how you can customize the proposal system on your settings page.
Topics
- Activating Proposal System
- Quote Header Settings
- Tax/Display Settings
- PDF Page Details
- Sub Contractor Emails
- Pre-Notes
- Bid Types
- Category
- Line Items
- Sharing Bid Types with Sub Accounts
Activating Proposal System
- Go to settings
- Click Add-Ons Tab
- Select Activate Proposal System 2
- Proposal tab will appear
- Select Proposal tab
Quote Header Settings
Quote Number and Prefix
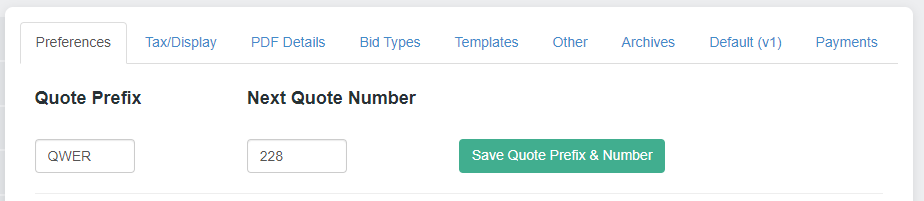
Next Quote Number allows you to set the number that will be used for your first quote. From that point forward the system will auto-increment the number. This field will display the next number in the sequence.
Quote Prefix allows you to add a prefix to the Quote number. This can be used for branding or segmenting multiple system accounts in one Quickbooks account.
Page Header Information
Proposal Header Information Allows a series of check boxes that allow you select what you would like displayed for your clients on their quotes.
Tax/Display Settings
- Tax Settings
- Allows you to decide for the account (Not sub accounts) whether you want to:
- Include Tax in Deal size
- if all Line Items are to be taxed
- If all of your line items need to be taxed this saves you time. Rather than making you go into each individual line item and have to check to tax it.
- Allows you to decide for the account (Not sub accounts) whether you want to:
- Tax Districts
- This feature allows you to create individual tax settings for different areas in your territory
- You can create a district by:
- Clicking
 Next to Tax Districts
 - Enter Name
- Enter Labor Tax
- Enter Manual Tax
- Click Save
- Clicking
- You can manage your existing Tax districts by:
- Editing them
- Marking a default
- Deleting them
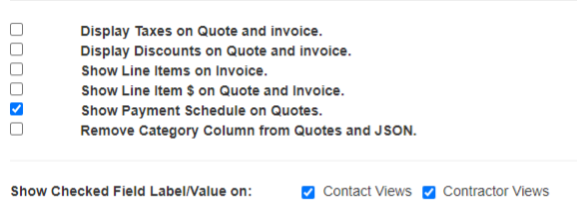
Additional Display Settings
- At this menu, you can also determine the following:
- Display taxes on Quote and the Invoice
- Display discounts on the Invoice and Quote
- Show Line Items on the Invoice
- Show Line Item price ($) on the Quote or Invoice.
- Please note: If this option is selected, the Line Item price ($) and the column will both display. If not selected, neither will display on the quote or invoice.
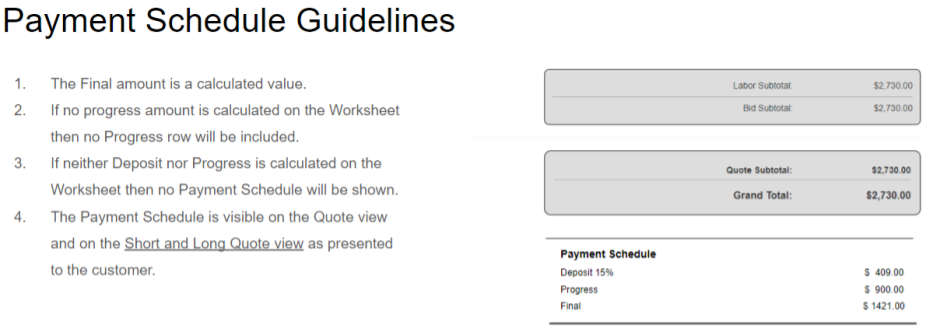
- Show Payment Schedule on Quotes
- Remove the Category column from Quotes. If your structure is better suited to 2-Tier, this is recommended.
PDF Page Details
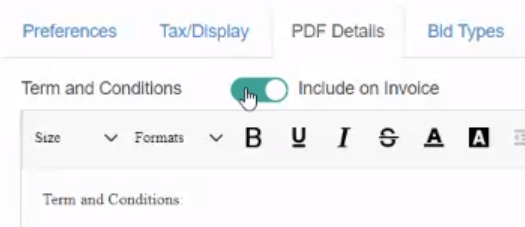
Use the top text field, labeled “Term and Conditions” to enter in any pertinent terms and conditions for your service that your clients need to know.
To include your “Terms and Conditions” information on invoices and and within the system user view, please toggle the “Terms and Conditions” switch on (as shown below) within Proposal Settings at the PDF Details tab. The default setting for this option is set as off or not shown.
Use the bottom text field, labeled “About Me” to provide any additional information about your services or company that would be beneficial for your clients.
Sub Contractor Emails
Use this setting to add in any emails for subcontractors that your company uses.
This makes it possible for you to email information directly from the proposal to your subcontractor.
Pre-Notes
The Pre-Notes section allows you to create notes for common things that you will encounter on a proposal.
Its not for a product, but rather notes about something.
An example would be “Dog present”
Bid Types
Overview
The Bid Type setting allows you to assign Types, Category and Line Items for your proposals.
To help clarify an Type is the most general grouping, for example, Flooring.
The Category is the specfic category under the Type. So for Vinyl could be a category under flooring.
Line Item is the specific product. So Johnny’s Bamboo Vinyl Flooring would be the line item.
So the pattern is we work from the most general to the most specific Type->Category->Line Item.
So in the example it would be Flooring->Vinyl->Johnny’s Bamboo Vinyl flooring.
Type
The steps for creating a Type are:
- Click the directly under Bid Type and to the right of “Add New Bid Type”
- Enter the Type name
- Select if you would like the room measurement feature to be on for this type.
- Select any sub accounts you want to allow access to this type.
- Click the
 button
 - Click the
 at the type right part of the window
 - You will see your new Type displayed at the bottom of the type list.
Category
The steps for adding a new category are:
- Hover your mouse over any of the existing Bid Types
- Click on the icon next the Bid Type you hovered your mouse over
- Enter the name for the category
- Select the display order
- Select the bid Type
- Click button
- Click in top right part of window
- Click
 next to Bid Type you assigned the new category to
 - Your new category will be displayed below the Bid Type
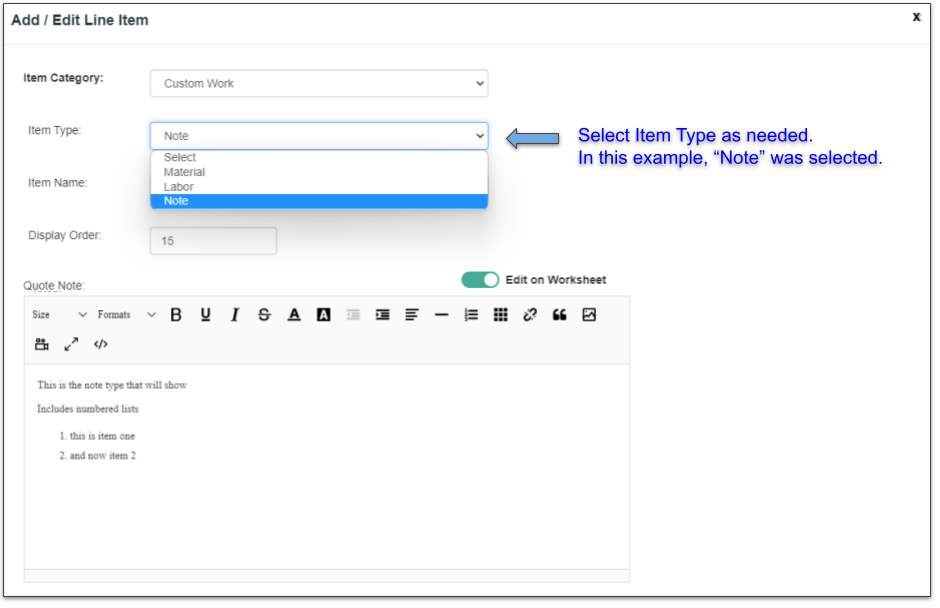
Line Item
- Select any Drop down of Bid Type
- Then select any drop down of bid category
- Click next to category
- You will notice if you hover over this it will say “Add Line Item”
- In the Add/Edit Line Item select the category the line item will under
- Select item type: Labor, Materials, Notes
- Give the Item a name
- Write a description of the item
- Enter Display Order
- Check if taxed
- Add any custom fields
- Enter any calculations for retail and/or sub rates
- For me detail on Calculations see section below this.
- Click
Please note: You can also set and save the default field size for your notes in Line item.
Formatting for your notes will also carry over into the quote and invoice descriptions settings.

Please note: When you delete a Line Item, a dialogue box will appear and you must click “OK” to continue. Once deleted, you can view the Line Item in the Archives Tab in Proposal Settings. From that menu you can restore it for use if needed by clicking on the green arrow. Also note that when a Line Item is deleted and archived it will still show in Proposals where it was previously used.
Calculations for Line Items
Predefined calculations for line items will save your team lots of time and take away the potential for human error when calculating totals for proposals.
In this section we are going to walk through how to build those calculations successfully in the Proposal Settings.
These calculations can be created by using Custom Fields and Constants.
- Create any needed Constants
- On the Proposal Settings page hover your mouse over the bid type the Line item will be under
- Click

- Enter the name of the new Constant in the Label field
- Enter the Value of the new constant in the Value field
- Click
- In the specified Line item create any needed Custom Fields
- Across from Custom Form click

- Create a name for the field by entering it in the Field Label field.
- Select Field Type
- Enter Default Value (not required)
- Indicate if the Field will be included on the Quotes by checking the Checkbox
- Select Field Size
- Enter field Calculation
- Only available for Field Type “Calculated”
- Please note any variables used for these calculations must either be Constants or Field Keys for Custom field that are above the current Custom field. You cannot use Custom Fields Field Keys below the Custom field you are working on.
- Across from Custom Form click
- Create Calculations
- Three Places this can be done
- Field Calculation for a specific Custom Field
- Total for specific field
- Calculation for Line Item Total: Retail
- Total for Line Item for Quote
- Calculation for Line Item Total: Sub Rates
- Used for calculating costs for sub contractors
- This will be shown on work orders
- Field Calculation for a specific Custom Field
- Use order of operations when creating calculations
- Using Tokens in calculations
- Below is a list of symbols that could be used to create your calculations
- () to set order of operations
- * Multiplication
- + addition
- – minus
- / division
- % modulo
- Three Places this can be done

Sharing Bid Types with Sub Accounts
In the proposal settings you cannot share the following directly to sub accounts
- Sub-Contractor emails
- Pre-Notes
- Quote Types
However, you can directly share a bid type with sub accounts.
This will autmotically share the categories and line items under the bid type.
Please be aware sub accounts cannot edit line items that have been shared with them. If they wish to make a change they can duplicate the line item and make their desired adjustments to that duplicate.
To share the bid type:
- Hover your cursor over the bid type
- Click

- In the window click on the field under “Select SubAccounts”
- Select the account(s) you wish to share this with.
- Please note that any accounts you have already shared it with will appear in this field, and will appear with light grey text in the drop menu.