Proposals – Templates and Constants
September 26, 2024The Templates and Constants feature in Proposals allows for predefined values and calculations to be built into proposal templates. These constants can streamline calculations and ensure consistency across proposals. They can be shared across subaccounts within an account tree, ensuring consistency while allowing local modifications.
Constant Concepts
- Constants as Placeholders:
- Constants serve as placeholders for values that are commonly used in proposals. These placeholders allow you to apply specific values, such as labor rates or material costs, in a consistent way across multiple proposals.
- Defined at the Proposal Bid Type Level:
- Constants are defined at the Proposal Bid Type level, where they are assigned a name and an enterprise-level value. This enterprise value serves as the default, ensuring that all proposals based on this bid type use the same predefined data for consistency.
- Local Adjustments at the Subaccount Level:
- Although constants are defined at the enterprise level, their values can be updated at the subaccount level to represent local conditions (e.g., regional labor rates). This feature provides flexibility, allowing subaccounts to adjust the constant values without altering the template structure or logic.
Proposal Line Item Use Concepts
- Planning Constant Use:
- It is important to carefully plan how constants will be used in your templates. By predefining critical data points, such as labor rates or sales tax percentages, you ensure that proposals are built with accurate and consistent values.
- Best Practice: Plan out which proposal fields will benefit from constant use and where these constants should apply. Understanding how constants influence calculations will help streamline future proposals and ensure accuracy.
- Using Constants in Formulas:
- A key advantage of constants is their ability to be used in formulas for more complex calculations. For example, you can use constants to calculate labor or material costs based on predefined values, which can then automatically adjust based on other inputs.
- Best Practice: Using constants within formulas (e.g., multiplying a labor rate by the number of hours) provides flexibility and ensures that changes in the constant are reflected automatically in all related calculations.
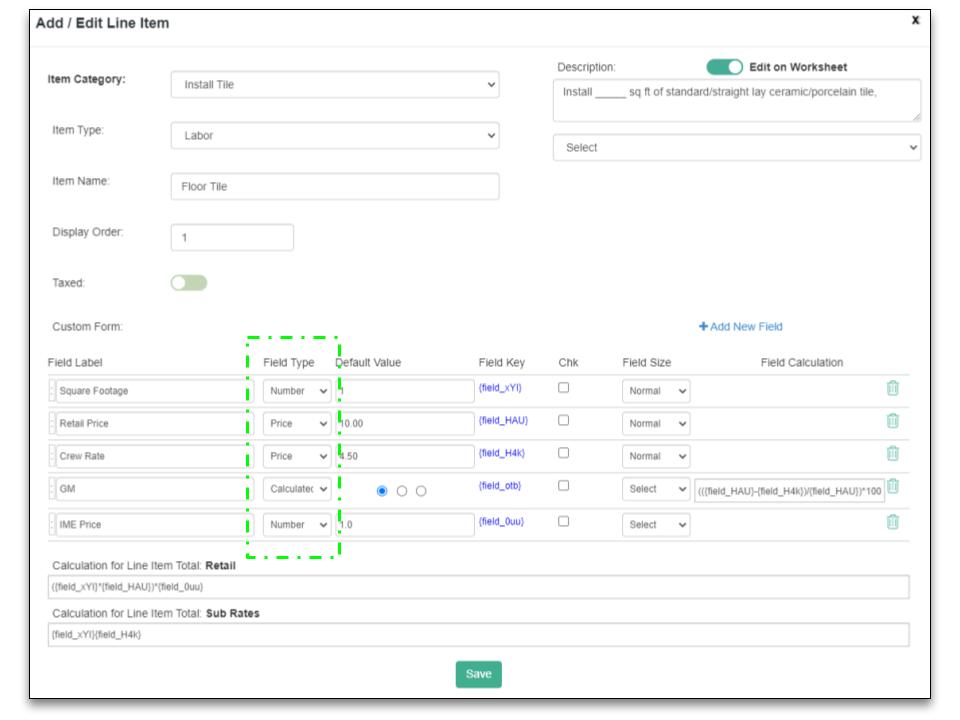
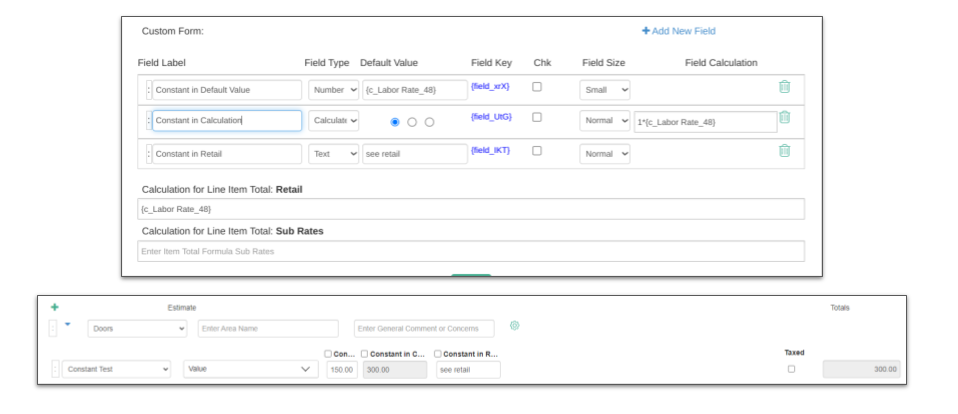
- Avoid Using Constants as Default Values:
- While constants are helpful in calculations, using them as default values for fields can lead to complications when putting a line item on a template. For example, if a constant is set as the default for a specific field and used on a template, the constant is filled with the value when the line item is put on the worksheet. Therefor when the template is saved, the field value is saved not the constant placeholder.
- Best Practice: Avoid setting constants as default values in proposal line items. Instead, use constants for calculations, allowing the system to dynamically apply the correct values based on the context of the proposal.
Using Constants in Templates
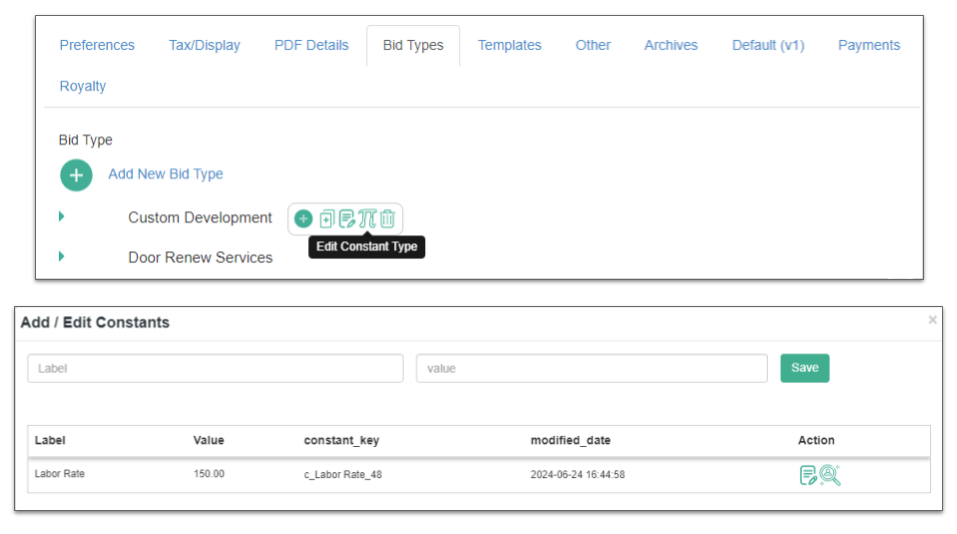
- Defining Constants:
- In the Bid Types tab of Proposal Setting, constants are defined with labels, field types, and default values.
- These constants can be used for default values, calculating totals, material costs, labor rates, and other frequently used values.
- Example:
- Field Label: Constant in Default Value
- Field Value: Number, Calculate, Text
- Constant Key: This is created by the system to guarantee uniqueness
{c_Labor Rate_48}
- Sharing Templates with Subaccounts:
- Once constants are built into a template (visit Proposal Templates), they can be shared with subaccounts. The subaccount will inherit the template but can adjust constant values as needed to reflect their specific circumstances (e.g., local labor rates or taxes).
Advantages of Using Constants in Templates
- Time Efficiency: Predefined constants reduce the need for manual data entry and streamline proposal creation.
- Uniformity: Using constants ensures consistency in calculations, especially when templates are shared across multiple subaccounts.
- Flexibility: Constants can be adjusted at the subaccount level, allowing for local variations without altering the core template.
Carrying Proposal Start & End Dates to Work Orders
September 26, 2024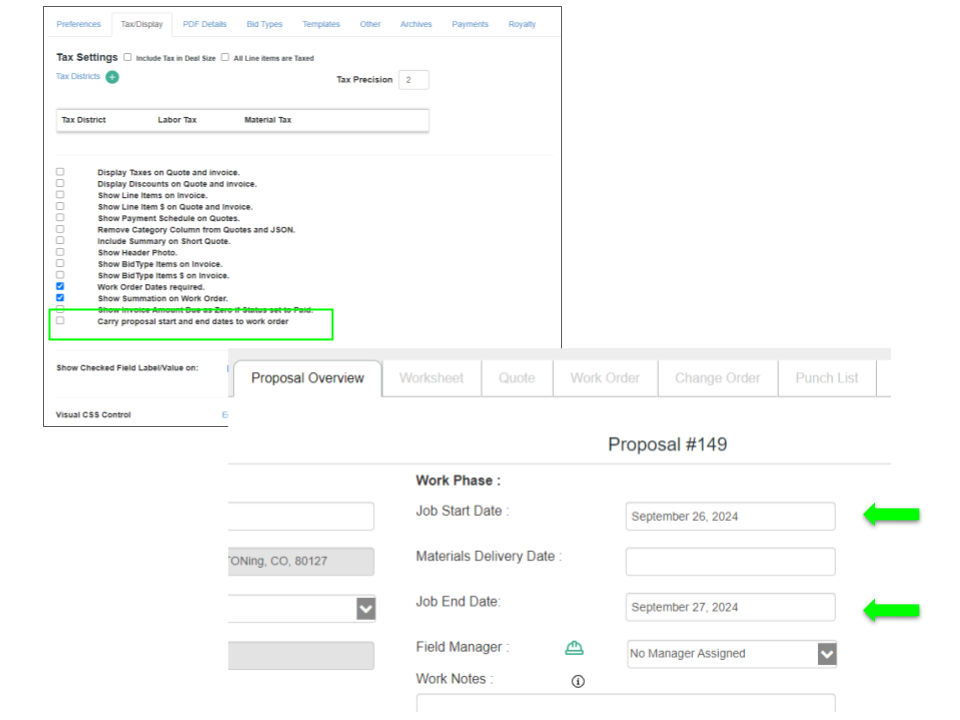
This feature allows you to automatically carry the start and end dates from a proposal to its associated work order, ensuring consistency and reducing the need for duplicate data entry.
Enabling the Feature
- Access Tax/Display Tab in Proposal Settings:
- Navigate to the Display section under Tax Settings.
- Carry Proposal Dates to Work Order:
- Locate the option Carry proposal start and end dates to work order and check the box to enable this feature.
- Once enabled, the Job Start Date and Job End Date from the proposal will automatically populate the corresponding fields in the work order.
Proposal Dates in Work Orders
- Proposal Overview:
- The proposal includes key dates for the project, such as:
- Job Start Date
- Materials Delivery Date
- Job End Date
- The proposal includes key dates for the project, such as:
- Work Order Synchronization:
- When this feature is activated, the Job Start Date and Job End Date from the proposal will be transferred automatically to the work order.
- This synchronization ensures that the work order reflects the same project timeline as outlined in the proposal, reducing errors and manual updates.
Benefits of Date Synchronization
- Time Savings: Automatically carrying the dates eliminates the need for manually entering the same data in both the proposal and work order.
- Consistency: Ensures that the timeline from the proposal is consistently maintained throughout the project lifecycle.
- Reduced Errors: Decreases the likelihood of discrepancies between proposal dates and work orders.
Proposal Print to PDF
July 18, 2024To print a proposal to PDF in your system, please follow these steps:
- Locate the Proposal Quote Tab: Navigate to the Proposal Quote tab in your system.
- View Options: At the bottom of the Proposal Quote tab, you will see two buttons:
- View Short Quote
- View Long Quote
- Select a View: Click on either the “View Short Quote” or “View Long Quote” button. This will open an HTML view that is formatted for 8.5″ x 11″ paper.
- Print the Page: In the top left corner of the HTML view, there is a link labeled “Print this page.” Click on this link to initiate the print process.
- Produce a PDF: Follow the prompts provided by your operating system to print the document. You will have the option to select “Save as PDF” or a similar option, depending on your OS.
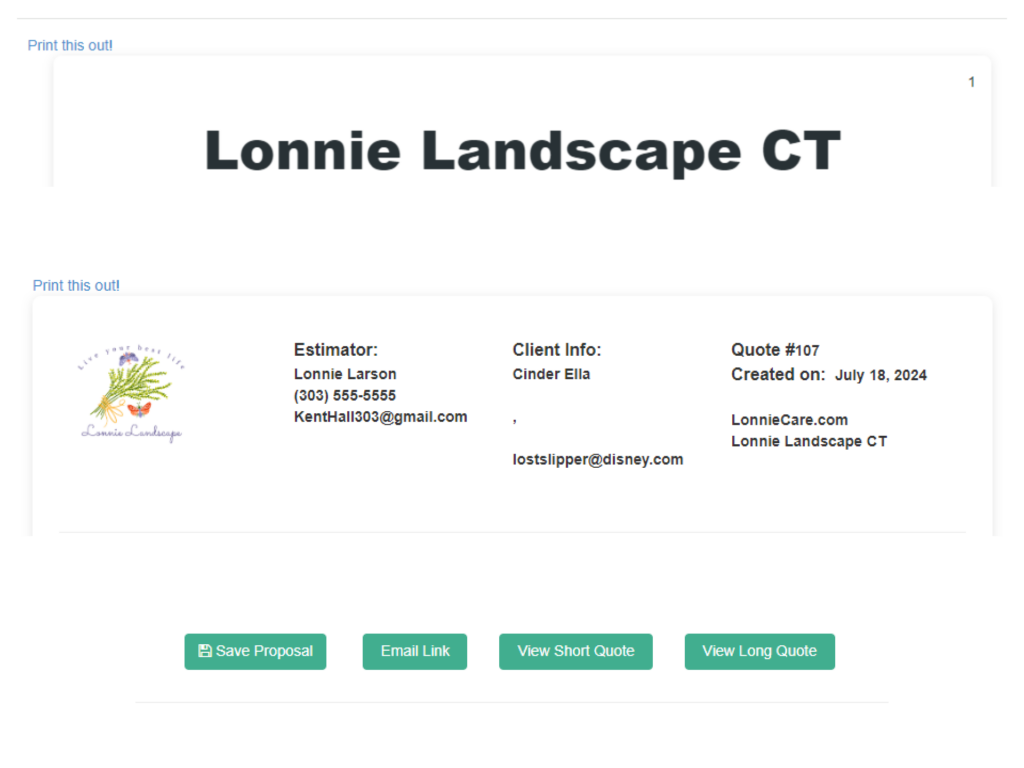
By following these steps, you can easily print your proposal to a PDF document.
Job Boards
March 14, 2024Introduction
The Jobs feature is a dynamic addition for Users who have enabled the Proposal V2 feature on our platform. This tool provides an informative overview of active contacts with proposals to facilitate job management tasks. Below you will find more details on how to utilize the various functionalities of the Jobs feature to streamline your workflow.
Accessing Jobs
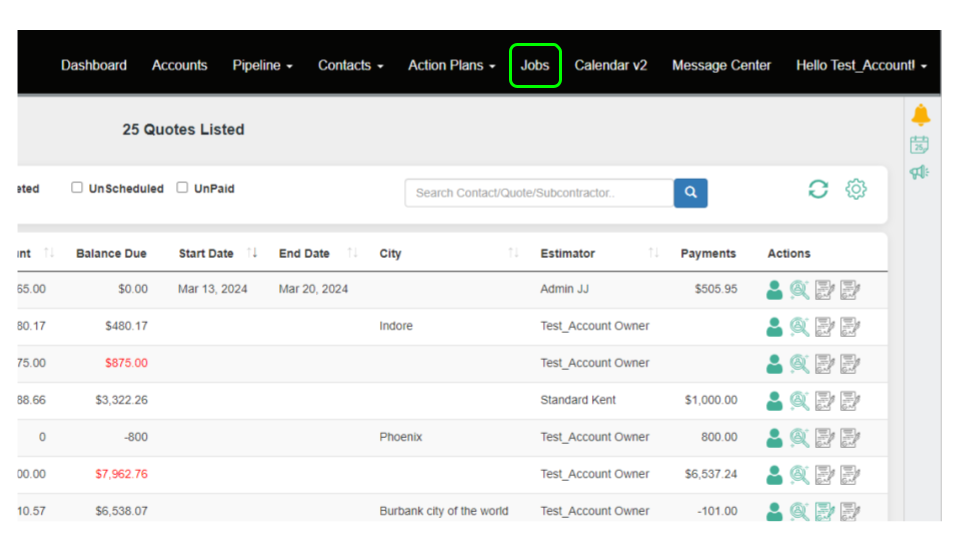
The Jobs feature is located on the main menu of the user interface for those who have the Proposal v2 feature activated. It presents a list of all active contacts with at least one associated proposal.
Utilizing Page Features
Customizing Your View with the Settings Gear

- Click on the Settings Gear icon at the top of the Jobs page.
- From the dialog box, select or deselect the columns you wish to display on your Jobs dashboard. Choices include Quote #, Contact Name, Address, and more.
Applying Filters

The Jobs feature provides filters to help you manage and view your proposals efficiently:
- Sales Cycle Status Filter: Use the toggles at the top to filter proposals by their sales cycle status: Quoted, Closed, or Completed.
- Additional Filters: Utilize additional filter options to show only proposals that are Unscheduled or Unpaid by checking the corresponding boxes.
Sorting Proposals
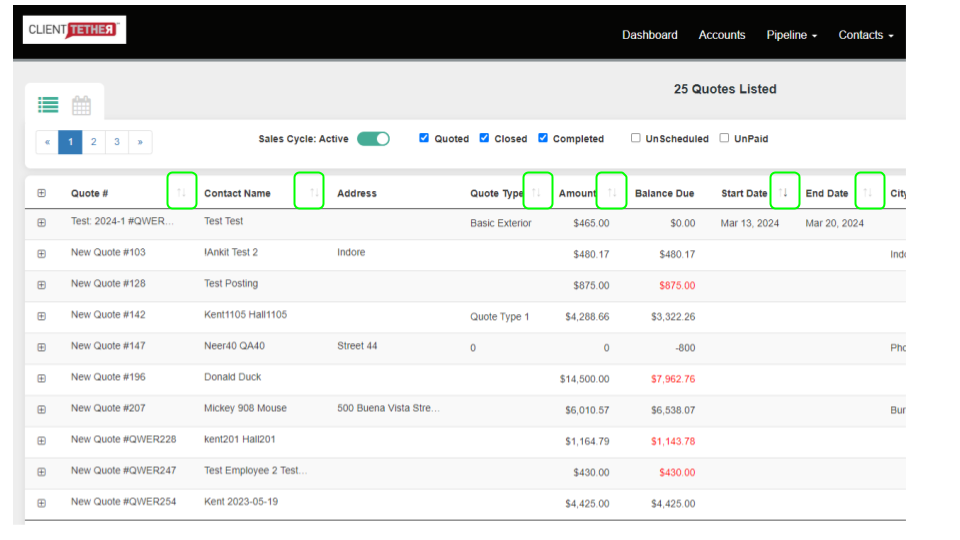
- You can sort the information in most columns by clicking on the column title, which allows for ascending or descending order views.
Managing Proposal Lists over Ten with Pagination
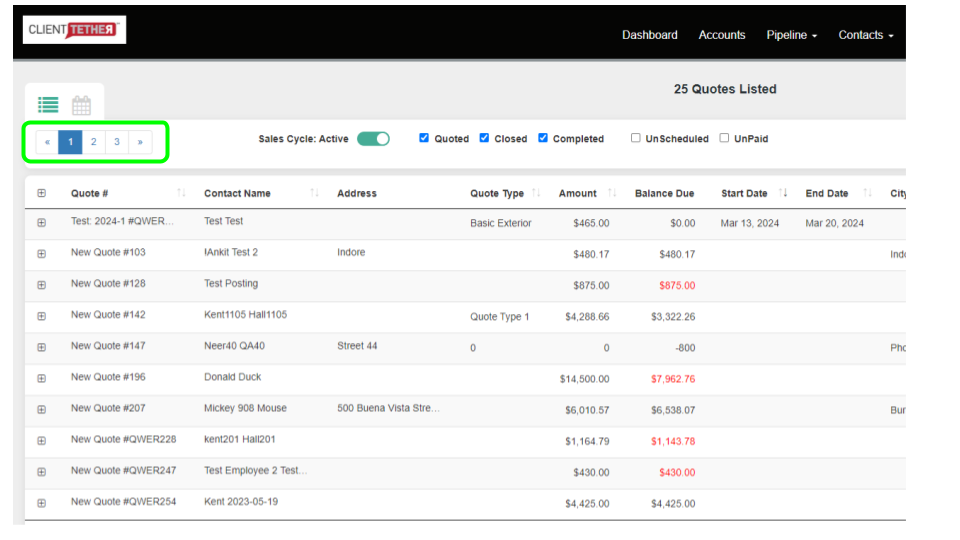
- The pagination feature at the top left of the list allows you to navigate through your proposals efficiently. Lists longer than ten proposals will be divided across multiple pages.
Unpaid
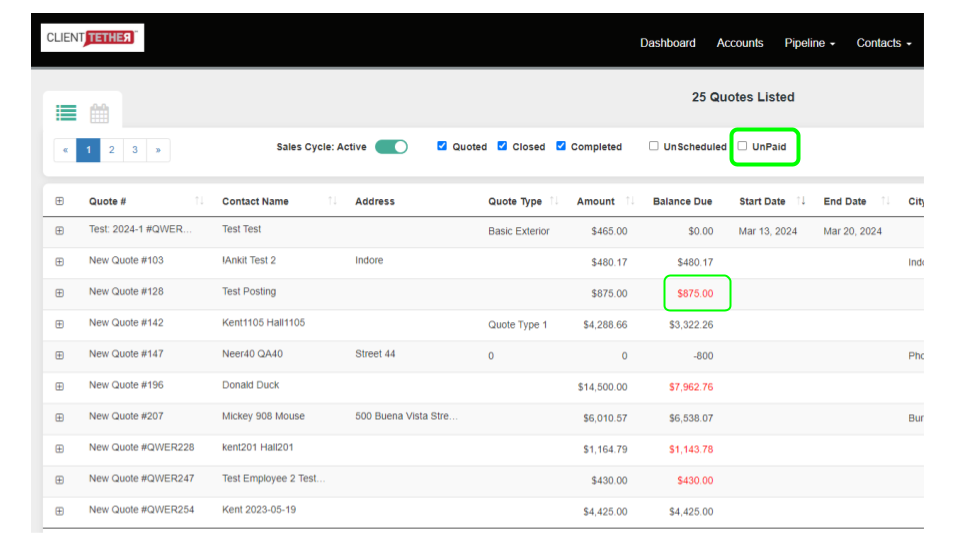
- Unpaid is any proposal with a Balance Due > $0
- Red Balance Due is an Opportunity that is marked as CMPL and a Proposal with a Balance Due
Work Orders Drilldown
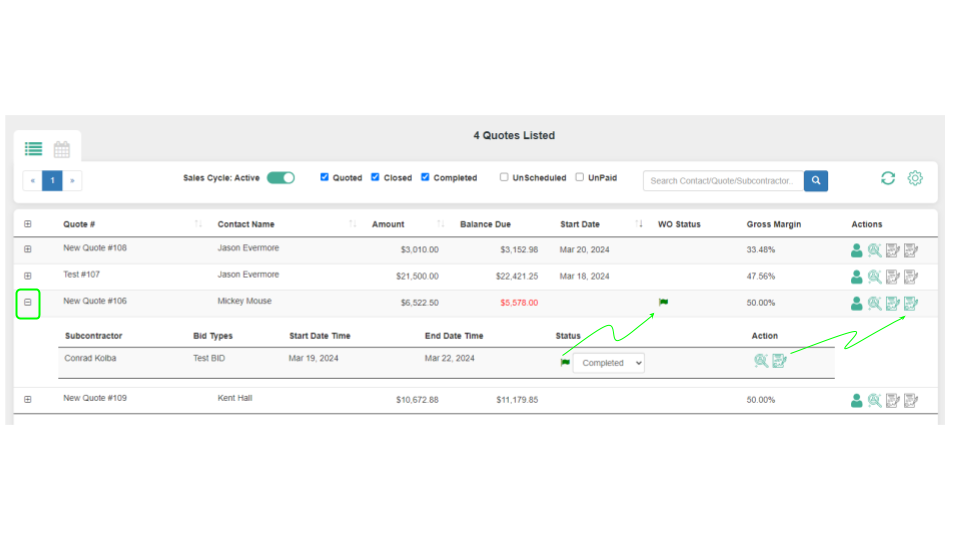
Accessing Work Orders
- If Work Orders are being utilized, you can access them directly from the Jobs dashboard. Click on the associated icon in the “+” icon on the left to open the relevant Work Order Info.
Viewing Work Order Status
- Upon accessing the Work Orders, you will be presented with a list of all work orders assigned to that contact, including each order’s status. This enables quick status assessments and management of multiple work orders.
Accessing Calendar View

Click the Calendar icon in the top left. Then choose the type of User you want to see on the calendar.
- Estimators, Field Managers and Subcontractors are three types of users to select form.
- Proposal Start and End date are assigned to Estimators and Field Managers
- Work Order Start and End Dates are assigned to Subcontractors
Conclusion
The Jobs feature in Proposal V2 is designed to centralize your project management tasks, improve visibility over your sales cycle, and enhance overall operational efficiency. For further assistance or clarification on how to leverage the Jobs feature to its full potential, please reach out to our customer support team.
Proposals Design and Layout
March 14, 2024Introduction
This support document guides you through the process of using the layout and design controls for creating customized Proposal Long Quotes. These controls allow you to tailor the content and appearance of your quotes to match your brand and address your clients’ needs effectively.
Design Control: CSS Properties Interface
Accessing the CSS Properties
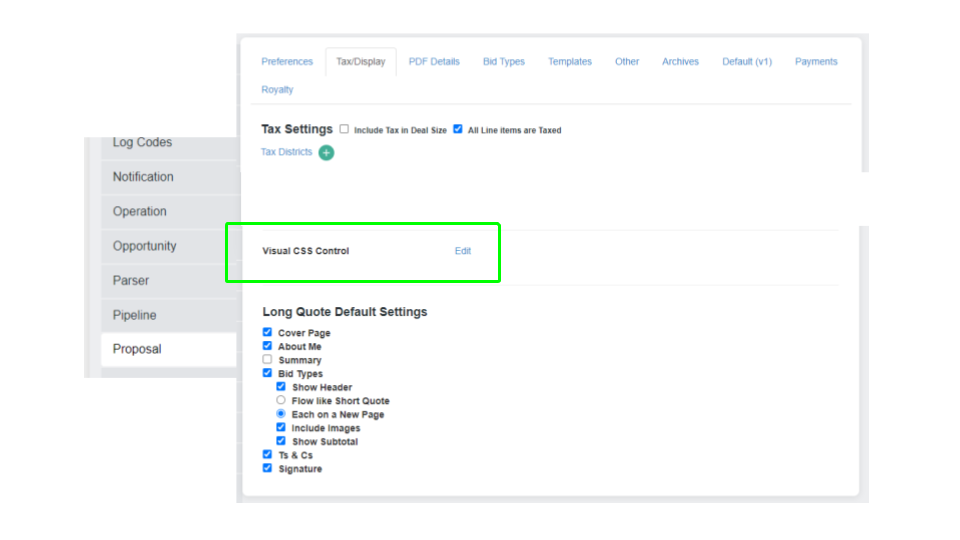
- Go to your Settings > Proposal > Tax/Display
- From here, click on Edit Visual CSS Control.
Modifying Design Elements
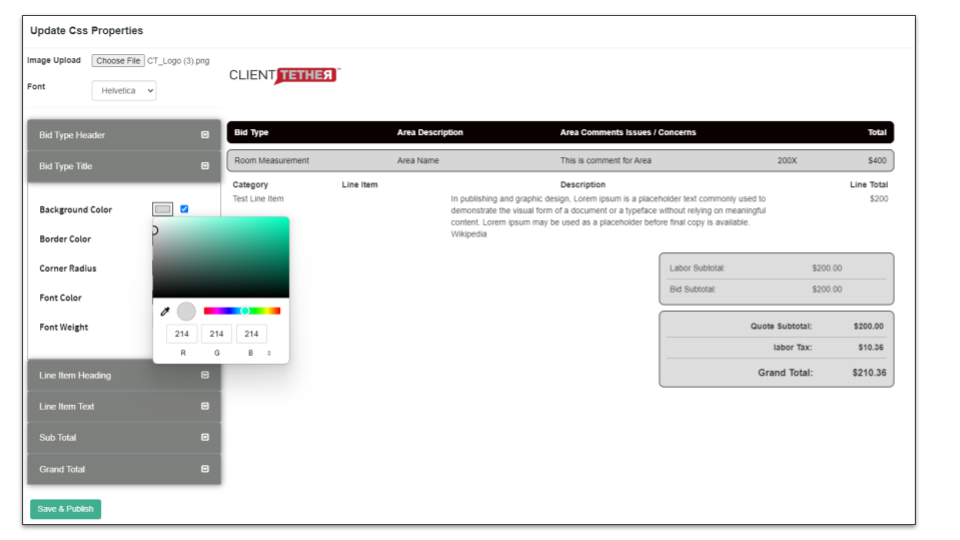
On this page you can do the following:
- Upload an image for the Proposal Header.
- Font: Select your preferred font from the dropdown menu.
- Update the Proposal elements one Section at a time.
- Select Colors and Font Weight to Style the section in your quote.
- Each change will be visible immediately.
Previewing Your Changes
As you adjust design settings, you can preview changes in real-time on the right-hand side of the screen. This immediate feedback ensures your quote looks exactly as intended before saving.
Saving and Publishing
Once you are satisfied with the design:
- Click on Save & Publish.
- Your custom settings will be applied to the entire Long Quote.
Layout Control:
Accessing Selective Page Display
To begin customizing the layout of your Long Quote:
- Go to your Settings > Proposal > Tax/Display
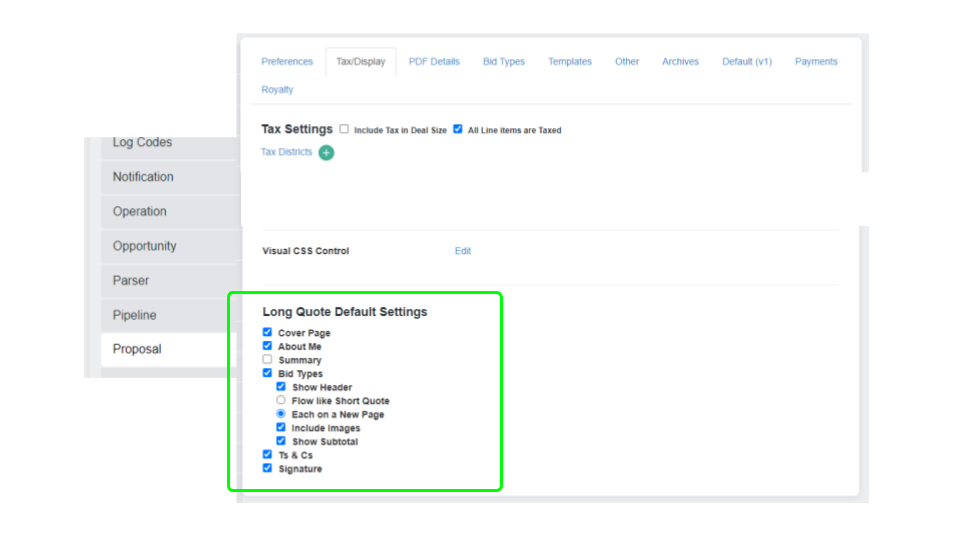
- Near to bottom of the page find Long Quote Default Settings.
Customizing Your Quote Pages Default Display
Setting the Default Display options will affect new proposals only. These default settings are applied to new Proposals. Each proposal has similar feature on the Overview tab for individual control.
- Cover Page: Include a front page for a professional first impression.
- About Me: Share information about yourself or your company.
- Summary: Provide a brief overview of the proposal contents.
- Bid Types: Select to display various bid options.
- Bid Type Flow: The Long Quote starts each Bid Type on a new page. While the Short Quotes starts multiple Bid Types, one right after the other with no page breaks.
- Ts & Cs: Include your terms and conditions.
- Signature: Allow space for signatures.
Check the boxes next to each section to include them in your quote. Making these selections allows you to show the Long Quote the same as the Short Quote.
Conclusion
With these new controls, you can create a Proposal Long Quote that not only delivers your message effectively but also embodies the visual identity of your brand. For any additional questions or support, please contact our customer service team.
Release Notes Jan 2024
January 4, 2024- Bulk Change to a Sales Cycle now updates Milestones
- Action Plan Step – Change Contact Type
- also requires Sales Cycle Setting
- can’t be blank
- Contact Profile – Quarantine Email now shows a reason
- Duplicate lead Accepted now launches Action Plan
- Duplicate leads created from simple lead form has been stopped
- Improvements to Username or Password Reset
- SMTP Settings UX improvement
- Searchable list of Accounts (in more places)
- Searchable list of attachments
- Contact List Search improvements
- Calendars – 2 way sync with new External Calendar Sync
- Franchise Estimate Count Report
- Emailed properly
- Links to raw data
- User Settings
- password changed immediately effects access
- archived user immediately effects access
- Archived User removed from New Lead Email
- Lead Routing – Duplicate Check for Multi-level Accounts to Subaccounts by Round Robin
- Notifications –
- Archive search to include contact name
- View Assigned User in right side panel
- Proposal
- Bid Type Multiplier
- Clear Signature now generates a History Note
- Show more of the Field Header for longer fields
- Block Editor – Cover Page, About Me, Terms and Conditions – Limited Release
- Thumbtack Integration to accept Appointments
- Templates for Notes / Log-a-Call
- Contact Profile
- Quarantine Email – now shows a reason
- Opportunity Count shows above the field
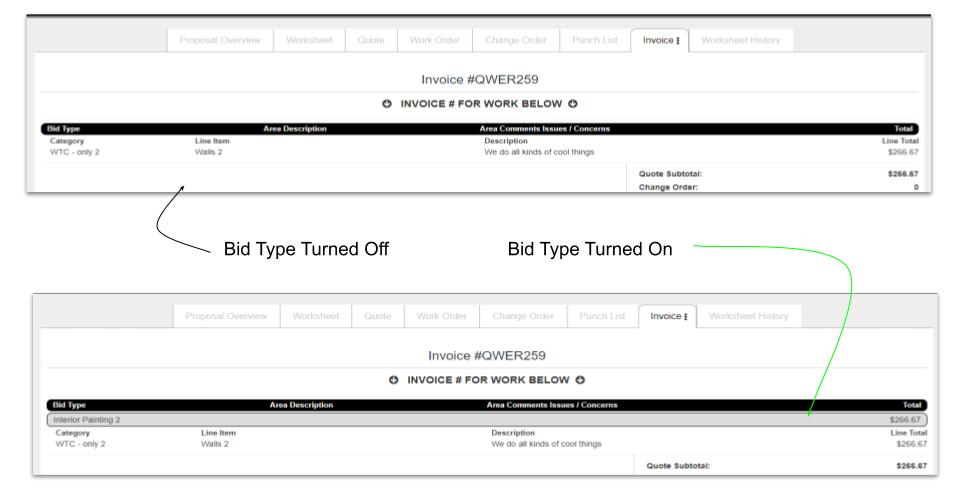
Proposals: show Bid Type on Invoice
July 13, 2023
The Proposal system has customizable controls for what components of a Worksheet show on the quote and Invoice. There two controls highlighted here control whether the Bid Type and Bid Type $ shows on the Invoice.
Tokens in Proposal: Terms and Conditions
July 13, 2023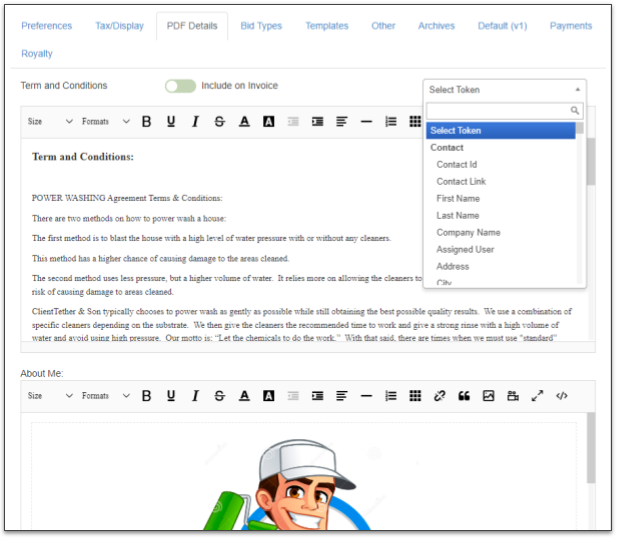
Tokens can be used in Terms and Conditions as well as About Me. This allows you to personalize these components of the Proposal / Invoice.
CompanyCam Integration
June 28, 2023Unlock the power of visual engagement with our seamless integration between CompanyCam and ClientTether! This innovative partnership transforms your contact engagement by allowing you to effortlessly sync and showcase CompanyCam photos directly within ClientTether’s Contact Profiles and Proposals. Elevate your proposals from good to great by embedding critical visual documentation right where you need it, ensuring that every proposal is both informative and visually compelling.
With our integration, you solve the problem of disjointed communication and improve your project’s narrative, making it easy for clients to see the true scope and quality of your work.
Setting up is a breeze—our step-by-step guide will have you enhancing your ClientTether workflow in no time. Experience a new level of professionalism and efficiency as you manage projects and impress clients with a complete, polished look that stands out in today’s competitive market. Dive into this integration and make the most out of your client engagements and proposals today!
Setup
This integration is an Add-On feature and must be activated before the integration tab will be visible. Please visit the Add-On support page to learn how to activate Add-Ons.
Note: You will need to create an Access Token in CompanyCam to complete this activation.
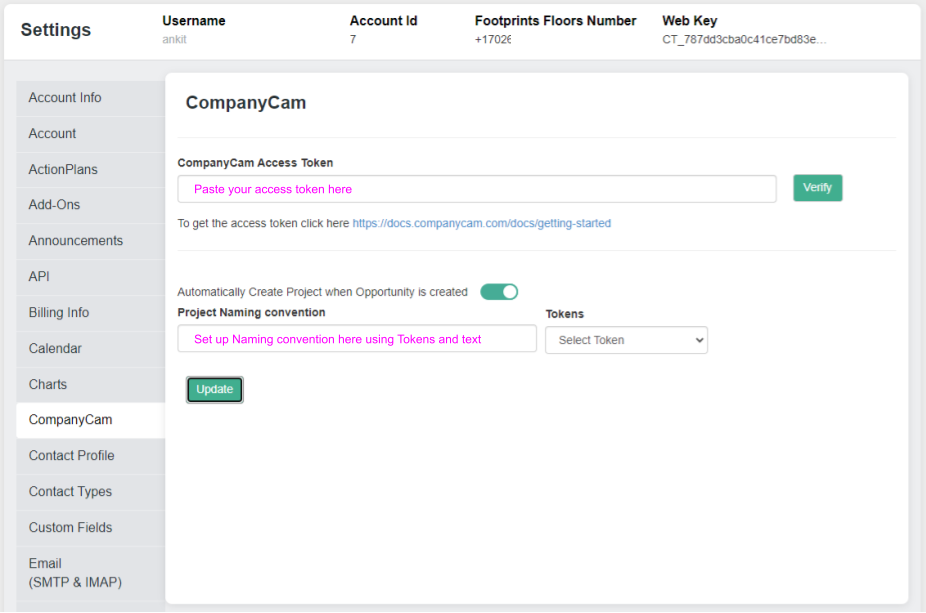
After CompanyCam integration has been activated, a new Settings Tab will become visible. Click on that new tab to continue with the setup process.
There are two fields in the setup.
1. CompanyCam Access Token: this is a token that you create inside of your CompanyCam account. A link is provided to the documentation from CompanyCam on how to create your Access Token. Please contact them if you have questions on this procedure. Once you have created the Access Token simple copy and paste that value into the first field.
2. Project Naming convention: This is an optional field that can be used to auto-generate Project Names if you choose to create a new project from within ClientTether. Use ClientTether Tokens from the dropdown list to the right or type in some text. For example: if I wanted projects that start in ClientTether to be named with the initials of CT_ and then the address of the property where the work would be done and finally followed by today’s date; then in the Project Naming convention field you would enter:
CT_{{client.address}}_{{tokens.today}}. Remember the tokens will come from the Token dropdown menu t the right. When you select the token by name, the value is copied to the clipboard so that all you have to do is paste into the naming convention field.
Using CompanyCam in ClientTether
After the setup is complete, there are two location where the CompanyCam icon will appear:
1. in the Contact Profile
2. in Proposals on the Overview tab
Each location is independent of each other. Below is a video showing this two locations and how to use them. We assume that you already have a CompanyCam account and know how to use it.
Proposal Field Types
April 18, 2023When you build a proposal in ClientTether, you will be using our proposal’s custom form editor to build each Line Item. Each field in the Line Item will declare its field type, giving unique properties to each.
This slide deck will introduce you to the Field Type options.