Setting Tags in Action Steps
September 26, 2024The Tags feature in Action Steps allows you to automatically apply or remove tags to/from contacts as part of an action plan. Tags are useful for categorizing contacts and triggering other automated actions based on their assigned tags.
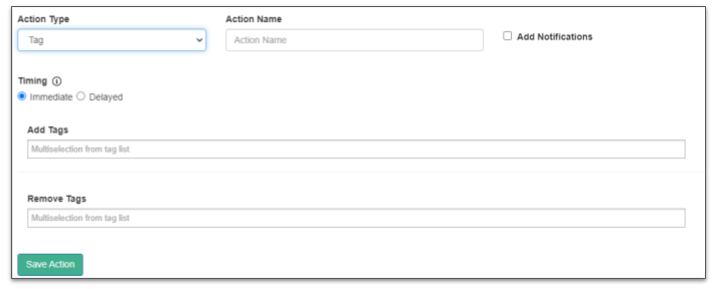
Configuring the Tag Action
- Action Type:
- Select Tag from the dropdown menu to configure tag-related actions. This is essential for adding or removing tags from contacts.
- Action Name:
- Provide a descriptive Action Name. This name should help identify the purpose of the tag action (e.g., “Apply New Lead Tag”).
- Add Notifications:
- Check this box if you would like notifications to be sent when this action occurs. This can be useful for tracking tag changes.
Timing of the Tag Action
- Immediate:
- Choose this option if you want the tags to be added or removed immediately when the action is triggered.
- Delayed:
- If the tag should be applied or removed at a later time, select Delayed and configure the delay settings accordingly (this option will become configurable once selected).
Adding and Removing Tags
- Add Tags:
- In the Add Tags field, select the tags you wish to assign to the contact. This allows you to classify contacts automatically when this action is executed.
- This is a multi-selection field, so you can choose multiple tags from the dropdown.
- Remove Tags:
- Use the Remove Tags field to select tags that should be removed from the contact. This helps keep the contact’s tags updated, removing outdated or irrelevant ones.
- Like the Add Tags field, this also supports multi-selection.
Finalizing the Tag Action
- Once you’ve configured the action type, timing, and tags to add or remove, click Save Action to finalize the step in your action plan.