SMTP Email Authentication Guide
March 15, 2024Introduction
In the digital age, ensuring that your emails consistently reach your clients’ inboxes is vital. That’s why we’re providing this guide—our system offers options to help you achieve the highest level of deliverability. While our standard Email Server Authentication using SPF and DKIM is effective for many, integrating SMTP settings offers another path to enhance the reliability and trustworthiness of your email communications. This guide serves as an alterative to our SPF and DKIM authentication methods, providing you with the flexibility to choose the best solution for your unique email needs.
SMTP Authentication
Why Use SMTP?
Simple Mail Transfer Protocol (SMTP) is an industry standard for sending emails. Unlike default mailing methods, using SMTP authentication can significantly improve your email deliverability. It does this by allowing you to send emails through your own SMTP server, which is already authorized to send your domain’s emails. This not only helps deliverability but also keeps emails out of the spam folder.
Setting up SMTP Authentication
Setting up SMTP authentication involves specifying an SMTP server, port number, and the credentials for the email account from which you’re sending emails. This ensures that your emails are sent securely and are seen as legitimate by email providers.
Step-by-Step Instructions
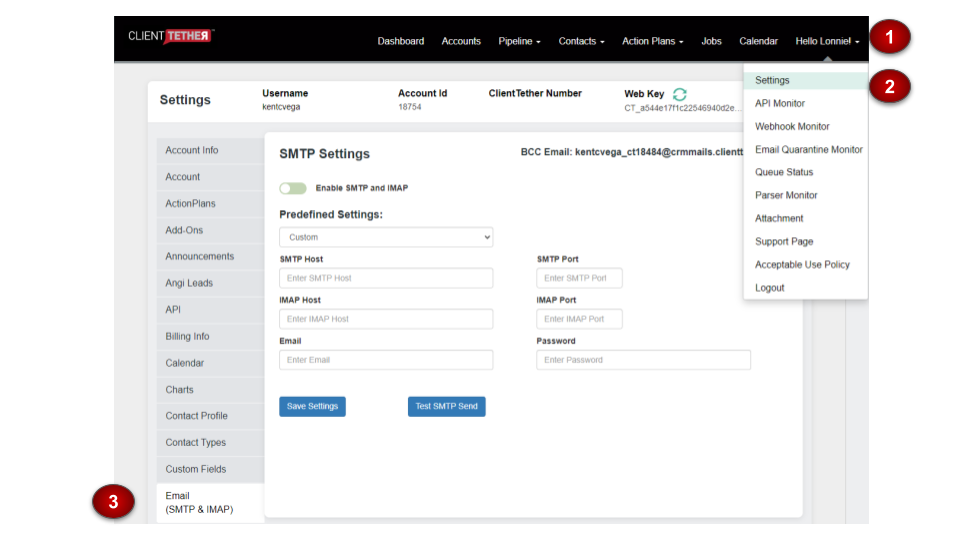
- Access SMTP Settings: Log into your ClientTether Account and navigate to Settings > Email SMTP settings area shown in the images above.
- Predefined Settings: Select a predefined setting if you’re using a common email provider such as Gmail, iCloud, or Outlook. If you have a custom provider or specific SMTP server you wish to use, select “Custom.” If you select Outlook or Gmail, the system will prefill the rest of the information, so all that remains is for you to login to those services. Otherwise…
- Enter Your SMTP Details:
- SMTP Host: Enter the address of your SMTP server.
- SMTP Port: Enter the port number for SMTP (commonly 587 for TLS or 465 for SSL).
- Email: Enter the email address you’re using to send emails.
- Password: Enter the password for your email account.
- IMAP Settings (if applicable):
- IMAP Host: Enter the address of your IMAP server (if different from SMTP).
- IMAP Port: Enter the port number for IMAP (commonly 993).
- Save and Test: After entering your details, click “Save Settings” and then “Test SMTP Send” to ensure everything is set up correctly.
Testing and Verification
Once you’ve saved your SMTP settings, it’s important to verify that emails can be sent and received (if IMAP is set up) correctly. Use the “Test SMTP Send” feature to send a test email to yourself. If it arrives successfully, your SMTP setup is good to go!
Troubleshooting
If you encounter any issues with sending the test email:
- Double-check your SMTP and IMAP settings for any typos.
- Ensure that the email and password are correct and correspond with the SMTP server.
- For Gmail or Outlook make sure you have logged into the correct account.
- Verify that your email provider allows SMTP 3rd party access and that you’ve used the correct server and port.
Conclusion
With SMTP authentication in place, you’re set to achieve reliable email deliverability. This guide complements our SPF and DKIM authentication methods, providing you with comprehensive options to ensure your emails consistently reach their intended targets.
For any additional support or questions, please reach out to your email server provider to verify settings. We are committed to your success and to providing the best tools and support to achieve it.
Email Open Rate
September 13, 2022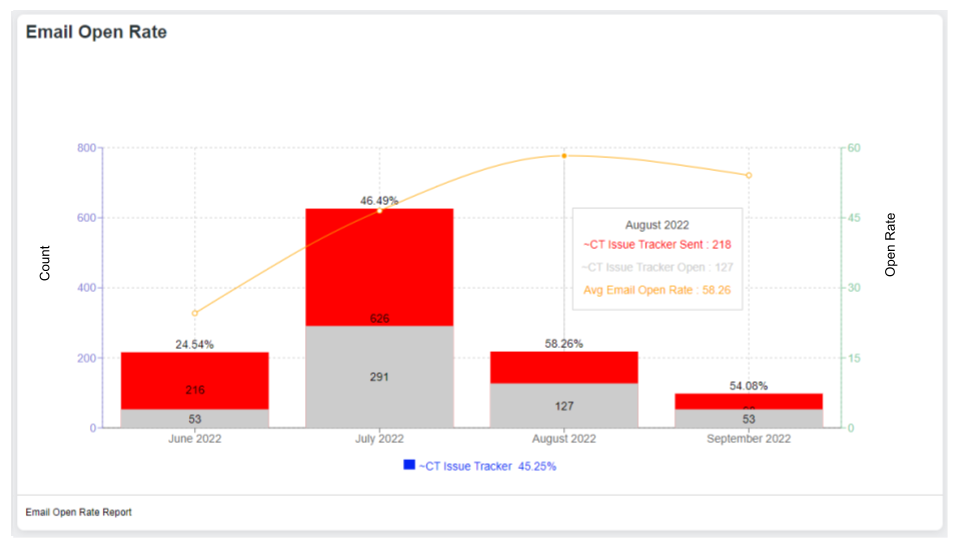
The Chart
An Email Open Rate Chart needs to show 4 things: a Date, Number Sent, Number Opened and the Percentage Opened. We have built all this in one chart. Study the image above.
The dates are shown across the bottom. These dates are sensitive to the date range you set on the Dashboard.
The number sent and opened are measured on the Left Vertical axis.
The open rate is measured against the Right Vertical Axis.
At the bottom center is the total average open rate as calculated for the whole date range.
The Data
Please understand – email open rate is not 100% accurate. However, Email Open Rates provide a good measure of contact engagement over time. The raw data making up the table is provided in the lower left for download. The data is segmented in various ways for self analysis through pivot tables.
Improving Open Rate
Improving email open rate is both a Science and an Art. Much has been written on the subject and is available for you by researching it on the internet. Here are a couple of options:
Verify your email against spam checkers
If you have concerns about your open rate, the first thing everyone should do is check your email against spam filters. One example would be Mailgenius. They will provide you with a temporary (one time use) email address where you can send an email for analysis. Their site will give you a score based on a bunch of factors. Using the titles of those factors you can continue to research each suggestion on the internet. After you have repaired all the suggestions with the email subject and body move on to Server Side improvements
Server Side Improvements
The first step would be to Authenticate our email server or use your own SMTP settings.
A second option for some accounts is having us build a custom email domain setup on our servers.
Check with your Customer Success Manager for more information.