SMTP Email Authentication Guide
March 15, 2024Introduction
In the digital age, ensuring that your emails consistently reach your clients’ inboxes is vital. That’s why we’re providing this guide—our system offers options to help you achieve the highest level of deliverability. While our standard Email Server Authentication using SPF and DKIM is effective for many, integrating SMTP settings offers another path to enhance the reliability and trustworthiness of your email communications. This guide serves as an alterative to our SPF and DKIM authentication methods, providing you with the flexibility to choose the best solution for your unique email needs.
SMTP Authentication
Why Use SMTP?
Simple Mail Transfer Protocol (SMTP) is an industry standard for sending emails. Unlike default mailing methods, using SMTP authentication can significantly improve your email deliverability. It does this by allowing you to send emails through your own SMTP server, which is already authorized to send your domain’s emails. This not only helps deliverability but also keeps emails out of the spam folder.
Setting up SMTP Authentication
Setting up SMTP authentication involves specifying an SMTP server, port number, and the credentials for the email account from which you’re sending emails. This ensures that your emails are sent securely and are seen as legitimate by email providers.
Step-by-Step Instructions
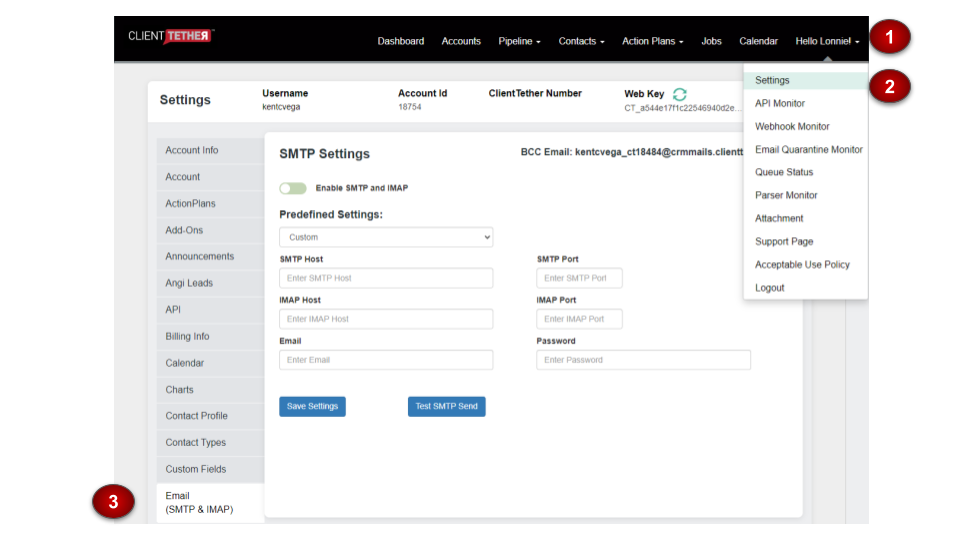
- Access SMTP Settings: Log into your ClientTether Account and navigate to Settings > Email SMTP settings area shown in the images above.
- Predefined Settings: Select a predefined setting if you’re using a common email provider such as Gmail, iCloud, or Outlook. If you have a custom provider or specific SMTP server you wish to use, select “Custom.” If you select Outlook or Gmail, the system will prefill the rest of the information, so all that remains is for you to login to those services. Otherwise…
- Enter Your SMTP Details:
- SMTP Host: Enter the address of your SMTP server.
- SMTP Port: Enter the port number for SMTP (commonly 587 for TLS or 465 for SSL).
- Email: Enter the email address you’re using to send emails.
- Password: Enter the password for your email account.
- IMAP Settings (if applicable):
- IMAP Host: Enter the address of your IMAP server (if different from SMTP).
- IMAP Port: Enter the port number for IMAP (commonly 993).
- Save and Test: After entering your details, click “Save Settings” and then “Test SMTP Send” to ensure everything is set up correctly.
Testing and Verification
Once you’ve saved your SMTP settings, it’s important to verify that emails can be sent and received (if IMAP is set up) correctly. Use the “Test SMTP Send” feature to send a test email to yourself. If it arrives successfully, your SMTP setup is good to go!
Troubleshooting
If you encounter any issues with sending the test email:
- Double-check your SMTP and IMAP settings for any typos.
- Ensure that the email and password are correct and correspond with the SMTP server.
- For Gmail or Outlook make sure you have logged into the correct account.
- Verify that your email provider allows SMTP 3rd party access and that you’ve used the correct server and port.
Conclusion
With SMTP authentication in place, you’re set to achieve reliable email deliverability. This guide complements our SPF and DKIM authentication methods, providing you with comprehensive options to ensure your emails consistently reach their intended targets.
For any additional support or questions, please reach out to your email server provider to verify settings. We are committed to your success and to providing the best tools and support to achieve it.
Email Server Authentication Guide
March 8, 2024Introduction
This guide provides step-by-step instructions on how to authenticate your email server using SPF (Sender Policy Framework) and DKIM (DomainKeys Identified Mail). These authentication methods are crucial for improving email deliverability and protecting your domain from spoofing and phishing attacks. This guide is an alternative to our SMTP Email Authentication Guide to ensure that our customer have the best option to serve their unique needs
Who Should Use this Guide
If you are using ClientTether’s mg3 server to send email on your behalf, this guide is for you. However, this is highly technical in nature and you might need to contact your email support team to have them complete these authentication instructions, especially when combining with other previously implemented authentications.
Preparing for Setup
First, before adding SPF and DKIM records, check if any existing records are set up for your domain. You can use online tools like MXToolBox to check your current SPF and DKIM records.
Second, gaining access to your domain’s DNS management interface is required, typically available in your domain hosting service’s dashboard. If you do not have access to your domain’s DNS management, contact your email support team.
Adding an SPF Record
What is SPF?
SPF allows email servers to verify that incoming mail from a domain was sent from an email server authorized to do so by you. It’s a way to prevent email spoofing.
Format of an SPF Record
An SPF record is added as a TXT record in your DNS settings. For using our email service, the format will look like this:
v=spf1 include:mailgun.org ~all
If you have an existing SPF record, just add include:mailgun.org to it instead of creating a new SPF record. Ensure not to exceed ten DNS lookups in your SPF record ~all
Step-by-Step Instructions
- Log into your domain hosting service.
- Navigate to the DNS management page.
- Look for an option to add a new TXT record.
- In the TXT record, enter @ in the Host field (if applicable) and the following value:
v=spf1 include:mailgun.org ~all - Save your changes.
Adding a DKIM Record
What is DKIM?
DKIM adds a digital signature to email messages. This signature allows the recipient to verify that the email was not altered after it was sent and confirms the sender’s domain.
Obtaining Your DKIM Key
For our email service, the DKIM key is already provided below. You need to add it to your DNS as a separate TXT record.
Step-by-Step Instructions
- Log into your domain hosting service.
- Go to the DNS management section.
- Choose to add a new TXT record.
- For the Host, enter: pic._domainkey
- And for the Value, enter the following:
k=rsa; p=MIIBIjANBgkqhkiG9w0BAQEFAAOCAQ8AMIIBCgKCAQEAlgB1xR40xdzrPaAsYUzes27TgeTrAgTXdjngNAcGgzziBuBNIxeyEZbV36dOgurgvYFytszBnWDdWgDzGkYihjkEGAOeg7E48WhYSADWVirl+59EAxb/Llu+GGPlOu2zvIFl8rUCbOUKYVeqfV4FxOsrDV9jGAXztypwR5wZ6+C+FoL4VJUmplPL648tJ2viW8NcFTdh4VLyv34xaHrWrwvHrLGa1AHBDt0q9FTUrqTfk7ohM++rpS0MiuZopHyf/W4AEmzC/ZzueuJVXwzTwriSGsabt4i5LMIYZEgT5lvCblB7FBb8vtm2A3XMCyZRT6CxGKUSyI+QDNKlsF4aFQIDAQAB - Save your changes.
Testing and Verification
After adding SPF and DKIM records and giving those records time to propagate, use online tools to verify your setup:
- MXToolBox: Can be used to verify both SPF and DKIM records.
- Google Admin Toolbox: Another useful resource for checking your domain’s authentication settings.
If you encounter any issues, ensure the records are correctly entered and propagated, which can take up to 48 hours.
FAQ
Q: How long does it take for the records to propagate?
A: DNS propagation can take up to 48 hours, but it can be quicker depending on your DNS host.
Q: What if I already have an SPF record?
A: If you have an existing SPF record, add include:mailgun.org to it instead of creating a new SPF record. Ensure not to exceed ten DNS lookups in your SPF record.
Additional Support
Here is a video link that gives examples on how to do the steps listed above. These examples are from a GoDaddy DNS management perspective. Your particular DNS provider will be slightly different.
If you need further assistance, you must contact your own email support team and provide them with this document. ClientTether Support can not implement nor validate your implementation.
Remember there is an alternative option in or SMTP Authentication Guide.
Setting Up DMARC for Enhanced Email Authentication
DMARC (Domain-based Message Authentication, Reporting, and Conformance) is a protocol that works alongside SPF and DKIM to protect your domain from unauthorized use and improve email deliverability. It provides visibility into how your emails are handled by recipient servers and ensures your domain complies with authentication policies.
Why is DMARC Important?
- Protects your domain from being used in phishing and spoofing attacks.
- Ensures emails are authenticated with SPF and/or DKIM.
- Provides reports to monitor email activity and detect unauthorized use.
How to Set Up DMARC
To implement DMARC for your domain, follow these steps:
- Create a DMARC Record DMARC is implemented through a DNS TXT record. Contact your DNS provider or access your domain’s DNS management console to add this record.
- Add the DMARC Record
- Host/Name:
_dmarc - Type: TXT
- Value:
v=DMARC1; p=quarantine; rua=mailto:postmaster@yourdomain.com; ruf=mailto:postmaster@yourdomain.com; fo=1 - Explanation of Key Tags:
v=DMARC1: Indicates this is a DMARC record.p=quarantine: Defines the policy for emails failing authentication:none: Monitor only, no action taken.quarantine: Mark as spam/junk.reject: Reject emails failing DMARC checks outright.
rua=mailto:postmaster@yourdomain.com: Specifies the email address where aggregate reports are sent. Replacepostmaster@yourdomain.comwith your preferred reporting address.ruf=mailto:postmaster@yourdomain.com: Specifies the email address for forensic (detailed) failure reports. Optional.fo=1: Requests reports for all authentication failures.
- Host/Name:
- Set the DNS TTL
- Set the TTL (time-to-live) for the record (e.g., 1 hour or 3600 seconds).
- Save and Test
- Save the record in your DNS management console.
- Use a DMARC testing tool like MXToolbox DMARC Checker to validate your setup.
Recommended DMARC Policy Settings
Start with a monitoring policy (p=none) to gather data without impacting email delivery. Once you are confident in your SPF and DKIM setup:
- Gradually move to
p=quarantineto test enforcement. - Finally, implement
p=rejectfor maximum security.
Monitoring and Interpreting DMARC Reports
DMARC reports provide valuable insights into how your domain is used for email. Here’s what to do with the data:
- Aggregate Reports (RUA):
- These reports summarize email authentication results and identify potential issues with SPF, DKIM, or unauthorized use of your domain.
- Use tools like DMARCian or Postmark DMARC to visualize and analyze the reports.
- Failure Reports (RUF):
- These contain detailed data about individual emails that failed DMARC checks.
- Monitor them closely to detect spoofing or misconfigurations.
DMARC Troubleshooting
If your emails fail DMARC checks:
- Verify SPF and DKIM:
- Ensure your SPF and DKIM records are correctly set up and align with the email-sending service you’re using (e.g., Mailgun).
- Check Alignment:
- DMARC requires SPF and/or DKIM to align with the “From” domain in the email header.
- Contact Support:
- If you need help, contact ClientTether Support for guidance.
DMARC FAQs
- What happens if I don’t set up DMARC? Without DMARC, your domain is more vulnerable to spoofing and phishing attacks. Mail providers may also classify your emails as spam.
- Does DMARC guarantee 100% deliverability? No, but it significantly improves deliverability by ensuring your domain complies with authentication standards.
- Can DMARC be used without SPF or DKIM? No, DMARC relies on SPF and/or DKIM for authentication. Ensure these are set up before implementing DMARC.
By implementing DMARC, you’re taking a crucial step toward protecting your domain and ensuring your emails are trusted by recipients.
Adding a CNAME Record for mg3
To ensure proper email tracking for opens, clicks, and unsubscribes when using the mg3 subdomain with ClientTether, you need to configure a CNAME record in your DNS settings. Follow these steps to set it up:
Add the CNAME Record
Create a new CNAME record with the following details:
- Type: CNAME
- Host/Name:
email.mg3.clienttether.com - Value (Points to):
mailgun.org - TTL: Set this to the default value or
3600seconds (1 hour).
Note: Ensure the
Host/Namefield matches exactly as shown (email.mg3.clienttether.com) to avoid configuration errors.
Save the CNAME Record
- Save your changes in the DNS management console.
- DNS propagation may take a few minutes to 48 hours, depending on your provider.
Why is this Important?
Adding this CNAME record allows Mailgun to:
- Track email opens and clicks.
- Manage unsubscribe requests seamlessly.
- Maintain consistent email tracking across all campaigns sent through
mg3.clienttether.com.