Update: SMTP/OAuth Setup is now required to send email from Gmail, Yahoo, Outlook and Other Consumer Addresses
August 19, 2026
We are making an important update to how ClientTether handles email sending for users whose email address is hosted on a consumer email provider, such as Gmail, Yahoo, Outlook/Hotmail, AOL, and similar services.
Email providers have continued to strengthen their requirements around sender authentication and email reputation. To help protect the deliverability of emails sent through ClientTether—and reduce the likelihood of messages being rejected, bounced, or sent to spam—we are updating ClientTether to require users with consumer email addresses to send through their own authenticated email connection.
What is changing? Why did I get this warning?
If your ClientTether user email address uses a consumer email domain and you do not currently have a working SMTP/email connection configured, you may see a message, “You must configure SMTP before sending an email because you have a Consumer Email Domain.”
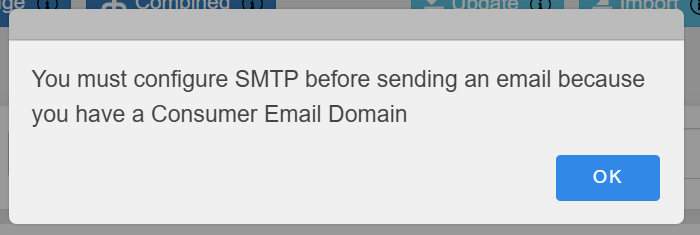
You may see this warning when attempting to send email, send group email, or in other areas where ClientTether needs to send email on behalf of that user. This warning is intentional and is designed to prevent email from being sent through an unauthenticated or inappropriate sending path.
What do I need to do?
If you see this message, connect your email account to ClientTether through your SMTP/Email settings.
Go to:
Settings → Email (SMTP & IMAP)
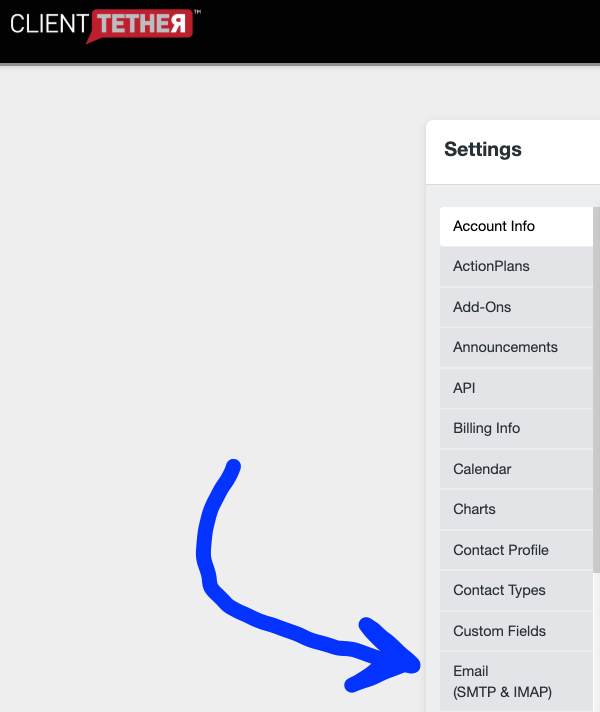
Then select the appropriate email provider from the options in the drop-down list at “Predefined Settings” and complete the connection process.
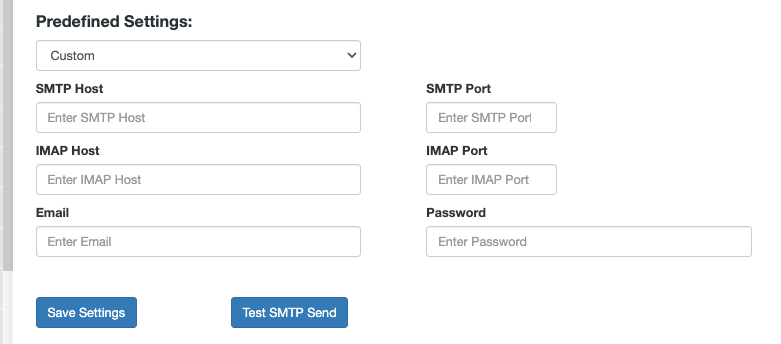
For Microsoft/Outlook accounts, this may include connecting through Microsoft OAuth. Other email providers may require their SMTP settings or other authentication information.
Once your email connection has been successfully configured and verified, ClientTether will allow email to be sent normally from that user again.
Why are we making this change?
Major email providers are placing greater emphasis on authenticated sending and sender reputation. Allowing an email address such as a Gmail or Yahoo address to send through unrelated shared email infrastructure can negatively affect deliverability and may cause messages to be rejected, bounced, or filtered as spam. This update helps ensure that email sent from ClientTether is transmitted through an authenticated sending method associated with the actual sender.
Will everyone see this warning?
No. This primarily affects ClientTether users who:
- Use a consumer email address such as Gmail, Yahoo, Outlook/Hotmail, AOL, or another public email provider, and
- Do not currently have a valid, verified email connection configured in ClientTether.
Users with properly configured email connections should continue sending normally.
If you see the SMTP warning after this update, it does not mean ClientTether email is down. It means ClientTether needs your email account to be connected and authenticated before allowing email to be sent from that address.
If you need assistance configuring your email connection, please contact ClientTether Support
Release Notes – September 1, 2026
July 13, 2026ClientTether Product Release Notes
Release Date: September 1, 2026
This release focuses on improving reliability, streamlining workflows, enhancing customer experiences, and strengthening integrations across the platform. Also note: this Release will provide warnings about email accounts that need to be setup with SMTP: https://support.clienttether.com/email-sending-update-for-gmail-yahoo-outlook-and-other-consumer-email-addresses/
Email & Communication Improvements
We’ve refined email setup, sending, editing, and tracking to create a more dependable communication experience.
What’s New
- Added clearer setup guidance for teams using public email domains, helping users configure reliable sending through supported connections.
- Introduced proactive alerts and instructions when email-domain authentication needs attention.
- Improved email-domain management with registration, verification, secure removal, sending-domain controls, and clearer status visibility.
- Enhanced email tracking configuration after domain verification for more accurate engagement reporting.
- Prevented scheduling options from appearing when users choose to send an email immediately.
- Improved compatibility between email editors for cleaner, more consistent template conversion.
- Eliminated duplicate signatures when editing manually composed emails.
- Strengthened template rendering to prevent formatting from appearing as raw code.
- Added more consistent default notification settings for newly created accounts and users.
Why It Matters
These improvements make email setup easier to manage, reduce sending friction, and give teams greater confidence that customer communications will look and perform as expected.
Scheduling & Calendar Experience
Calendar and scheduling workflows are now faster, clearer, and better aligned with each user’s working context.
What’s New
- Improved calendar loading speed and consistency.
- Refined scheduler wording to make booking steps easier to understand.
- Updated calendar invitations with a cleaner layout, more prominent meeting details, and better separation of internal information.
- Added a dedicated close control to appointment windows, reducing the risk of accidental deletion.
- Improved appointment-date information displayed on pipeline cards.
- Added user-level time-zone support so dates and times appear in each team member’s local time, with sensible account and system fallbacks.
- Expanded scheduler functionality to support a smoother calendar experience.
Why It Matters
Teams can schedule meetings with fewer mistakes, understand appointment information more quickly, and collaborate more effectively across locations and time zones.
Proposal & Sales Experience Enhancements
We’ve improved proposal presentation, opportunity management, and sales workflows to support a more polished customer journey.
What’s New
- Added more flexible proposal-header controls, including improved handling of business names and addresses.
- Cleaned up proposal notes so customers see properly formatted content instead of exposed markup.
- Improved opportunity creation so new records remain connected to the correct account.
- Strengthened opportunity naming to preserve meaningful details and reduce confusion between similar records.
- Improved opportunity-selection controls to protect intended defaults.
- Enhanced room duplication so associated photos remain organized correctly.
- Added support for multiple proposals per customer through connected systems.
- Expanded proposal capabilities for tax-rate handling and room-measurement information.
- Added job classification details to newer proposals, helping businesses carry important reporting context into invoices and payments.
Why It Matters
These updates create cleaner sales workflows, more professional proposals, and more reliable records from the initial opportunity through billing and reporting.
Hosted Pages & Lead Capture
Hosted pages and lead forms now provide greater flexibility while capturing cleaner, more dependable customer information.
What’s New
- Improved hosted-page cloning so page content carries over correctly.
- Prevented duplicate personalized content from appearing on hosted pages.
- Added stronger email validation to custom lead forms.
- Expanded form flexibility by allowing businesses to make email and phone fields optional when appropriate.
- Improved lead routing so newly captured contacts display the correct sales-cycle stage and appear in the expected pipeline location.
Why It Matters
Businesses can build lead experiences that better match their processes while maintaining accurate records and smoother follow-up workflows.
Contact, Pipeline & Workflow Reliability
Several everyday workflows have been strengthened to reduce lost updates and improve record consistency.
What’s New
- Improved note saving so newly entered information is retained reliably.
- Enhanced custom-field ordering for a more predictable user experience.
- Improved custom-field deletion so removed fields no longer remain visible or interrupt the page.
- Strengthened enterprise-managed custom fields so they appear consistently across eligible subaccounts.
- Improved pipeline-card personalization and sales-stage visibility.
- Refined last-login reporting so account activity reflects the users who belong to that specific account.
Why It Matters
More dependable records and cleaner interfaces reduce manual corrections, improve team coordination, and help users trust the information they see.
Admin & User Management
Administrators now have better tools for finding accounts, managing features, and controlling access.
What’s New
- Added account-number search for faster navigation to the correct customer account.
- Restored reliable access to available add-ons in account settings.
- Improved access to signed royalty reports for authorized account users.
- Added an Adminify add-on connection to support streamlined service activation.
- Improved add-on billing behavior for subaccounts using QuickBooks-based billing.
Why It Matters
These enhancements reduce administrative friction, improve control, and make it easier to manage services across growing organizations.
Reporting & Data Accuracy
Reporting updates provide stronger visibility into team performance and operational activity.
What’s New
- Added user and representative details to reason-code and disposition-code reporting.
- Improved email engagement tracking through more consistent domain-level settings.
- Added proposal classification data that can support clearer financial and operational reporting.
- Strengthened activity, lead-stage, and account-login accuracy across customer records.
Why It Matters
More complete and accurate reporting helps leaders understand performance, reinforce accountability, and make better-informed decisions.
QuickBooks Integration Enhancements
The QuickBooks experience now offers better visibility, control, and billing accuracy.
What’s New
- Added clearer QuickBooks status indicators across contacts, proposals, and payment workflows.
- Enabled users to refresh synchronization when updated information is needed.
- Improved proposal-level control over synchronized defaults.
- Added classification support for more detailed financial reporting.
- Corrected add-on subscription handling for subaccounts that manage their own optional-service billing.
Why It Matters
These improvements create a more transparent and dependable connection between ClientTether and QuickBooks while reducing billing and synchronization errors.
Integrations & Platform Connectivity
We’ve strengthened connected workflows across voice, automation, proposals, and external systems.
What’s New
- Improved incoming-call routing for more consistent call handling across accounts and phone numbers.
- Added conditional webhook support for brand-specific workflows.
- Expanded proposal connectivity to support multiple proposals for the same customer.
- Added additional proposal and service information to connected-system responses.
- Introduced Adminify activation support through the ClientTether add-on experience.
Why It Matters
More reliable integrations help teams automate work confidently, maintain consistent customer experiences, and reduce manual intervention between systems.
Platform Stability & Performance
This release includes broader reliability improvements across frequently used areas of the platform.
What’s New
- Improved calendar performance and page responsiveness.
- Strengthened editor, template, and hosted-page reliability.
- Improved saving behavior across notes, fields, proposals, and account settings.
- Enhanced add-on availability and configuration consistency.
- Reduced unexpected behavior across pipeline, communication, and opportunity workflows.
Why It Matters
A faster and more stable platform means fewer interruptions, cleaner workflows, and a smoother experience for both teams and customers.
Release Summary
This release is focused on:
- Making workflows more reliable
- Improving customer-facing experiences
- Reducing friction for admins and teams
- Strengthening integrations and data accuracy
- Enhancing overall platform stability
If you have feedback or questions, our team is always here to help.
ServiceTitan Add-On Training
June 17, 2026For Client Success Managers and Strategic Account Managers
| Audience | Client Success Managers and Strategic Account Managers |
| Purpose | Enable, configure, and validate the ServiceTitan premium add-on for an individual ClientTether account/location. |
| Security | Never document, email, or screenshot live ServiceTitan secrets or keys. Use placeholders or masked values. |
| Primary workflow | Enable the add-on in ClientTether, connect the matching ServiceTitan app, paste values into ClientTether, save, and test before moving to the next account. |
1. What the ServiceTitan add-on does
The ServiceTitan premium add-on enables ClientTether accounts to share contact, opportunity, and job information with ServiceTitan. It is a standalone add-on and is intended to be configured per location/account when a customer needs the ClientTether-to-ServiceTitan workflow.
- ClientTether can push Customer, Location, and Job records to ServiceTitan.
- Users can send data manually from the Contact Profile, and admins can include ServiceTitan send actions in Action Plans when the add-on is available.
- After a successful push, ClientTether stores ServiceTitan record IDs and the manual send control should no longer allow duplicate manual sends for that record.
- The add-on is separate from existing Dispatch and ServiceBridge integrations.
2. Roles, prerequisites, and access
- ClientTether: The add-on and ServiceTitan settings tab are intended for Level 3+ users/admins. CSM/SAM team members should impersonate or log into the correct account/location using approved internal procedures.
- ServiceTitan: You need access to the customer/location-specific ServiceTitan tenant and the ability to open Settings > Integrations > API Application Access and connect the ClientTether app.
- Use one browser tab for ClientTether and one browser tab for ServiceTitan so you can copy values directly without storing them elsewhere.
- Confirm which account/location you are configuring before copying values. Most values differ by location.
xxxxxxxx-xxxx-xxxx-xxxx-xxxxxxxxxxxx or masked values such as ********.3. Visual reference — sanitized example only
Use the visual below to orient yourself. It is a mock training image and intentionally contains no real customer secrets, keys, tenant IDs, or business unit values.
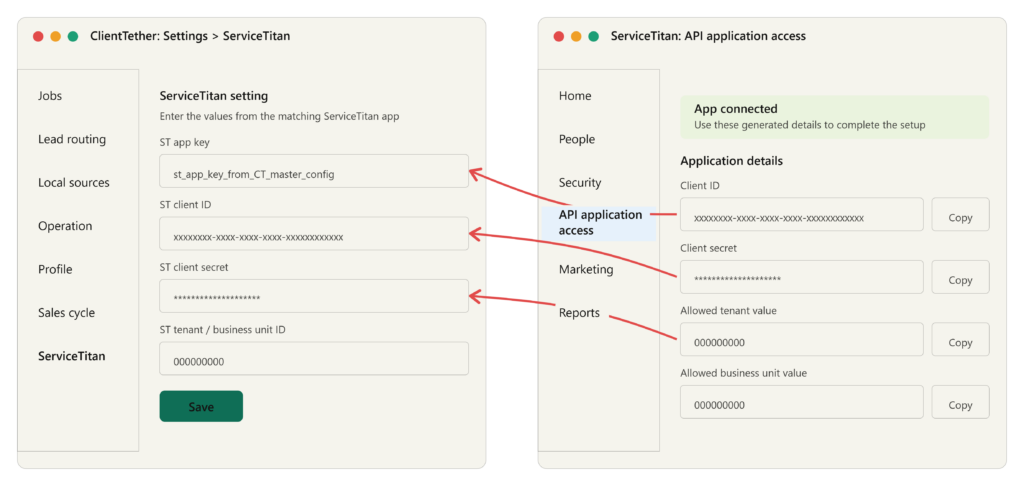
The arrows show which ServiceTitan values populate the ClientTether settings fields.
Phase A — Enable the ServiceTitan Integration add-on
- In ClientTether, open the top menu and go to Accounts.
- Select the target location/account and click Login. Confirm you are in the correct location before continuing.
- Open the user menu in the top navigation: Hello [Name] > Settings.
- Scroll to Add-Ons, open the Premium tab, and click ServiceTitan Integration.
- After activation, confirm ServiceTitan appears as a settings section/tab in the settings navigation.
- Do not move on until the ServiceTitan settings section is visible for the account/location you are configuring.
Phase B — Bridge ServiceTitan and ClientTether
- In ClientTether, stay inside the same location/account and open Settings > ServiceTitan.
- In a second browser tab, open the matching ServiceTitan tenant/location.
- In ServiceTitan, click the gear icon, open Integrations, then API Application Access.
- Connect a new app and select ClientTether. Open the ClientTether integration details once the app is connected.
- Copy the ServiceTitan application values into the corresponding ClientTether ServiceTitan settings fields. Use direct copy/paste only; do not store the values in notes or screenshots.
- Click Save in ClientTether.
- Validate before configuring the next location. A successful test should result in the expected contact/customer/job information appearing in ServiceTitan and the ClientTether record retaining the returned ServiceTitan IDs.
Field mapping cheat sheet
| ClientTether field | ServiceTitan source | Expected value pattern | Notes |
|---|---|---|---|
| ST App Key | ClientTether-provided app key / master config | Do not document live value | May be shared across configured accounts according to internal implementation guidance, but do not publish the actual key in training materials. |
| ST Client ID | ServiceTitan Application Details > Client ID | GUID-like value | Unique to the ServiceTitan app/tenant setup. Copy directly from ServiceTitan. |
| ST Client Secret | ServiceTitan Application Details > Client Secret | Masked/secret value | Treat as a secret. Do not screenshot or paste into documentation. |
| ST Tenant/Business Unit ID | ServiceTitan Application Details allowed tenant/business unit values | Numeric tenant/business unit value | Location-specific. Verify the customer/location before saving. |
7. Testing checklist before moving to the next account
- The ServiceTitan settings section is visible in the correct ClientTether account/location.
- The ServiceTitan app is connected in the correct ServiceTitan tenant/location.
- All required fields save successfully in ClientTether without validation errors.
- A test contact/opportunity/job push succeeds.
- The corresponding record appears in ServiceTitan.
- ClientTether stores the returned ServiceTitan IDs for linkage.
- The manual Send to ServiceTitan button state changes only after a confirmed successful push and does not allow duplicate sends for an already-synced record.
- History notes, Alter-n-Fade messages, or system notifications are checked if a send fails.
Troubleshooting guide
| Issue | Likely cause | What to do |
|---|---|---|
| ServiceTitan settings section is not visible | Add-on not enabled for that account or user lacks sufficient access | Return to Add-Ons > Premium and enable ServiceTitan Integration. Confirm Level 3+ access. |
| Save fails or settings validation fails | Missing or mismatched credentials/tenant values | Re-copy values from ServiceTitan Application Details into ClientTether. Confirm you are using the matching location/tenant. |
| Manual send fails | Incomplete mapping, invalid credentials, API issue, or required field missing | Read the visible error message, check History Notes, and confirm required fields before retrying. |
| Record does not appear in ServiceTitan | Wrong tenant/location or push failed before ST returned IDs | Verify ServiceTitan tenant, search in the correct location, then check ClientTether history/system messages. |
| Manual button is still enabled after a push | ServiceTitan IDs may not have been returned or stored | Do not send repeatedly. Check the record history and escalate with screenshots that mask any secrets. |
| Need help with an unclear account configuration | Customer/location setup is ambiguous | Pause and schedule a working session or escalate to Product/Engineering with sanitized evidence. |
9. Escalation notes for Product/Engineering
- Include the customer/account/location name, the ClientTether account ID if available, and whether the add-on is enabled.
- Describe the step that failed and the exact visible error message. Redact any credentials before sharing.
- Include sanitized screenshots only. Crop or blur any Client ID, Client Secret, tenant ID, business unit ID, app key, and customer-sensitive information.
- For functional defects, note whether the failure happened from an Action Plan send or a manual Contact Profile send.
Mobile App Login Issues
June 8, 2026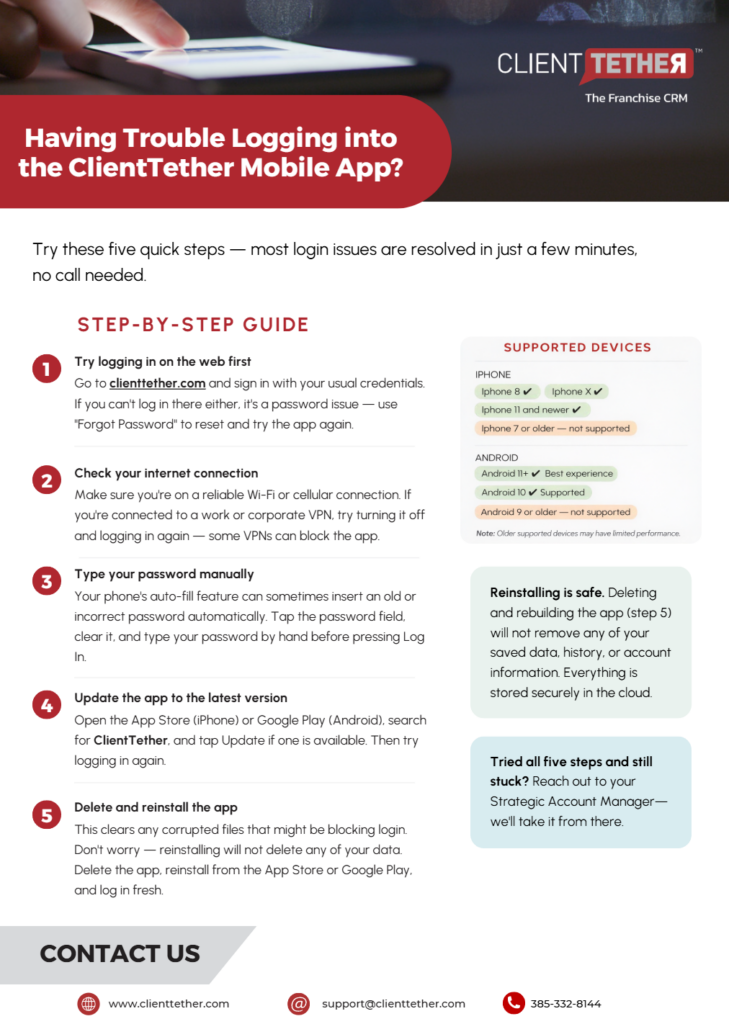
Release Notes – April 30, 2026
April 28, 2026ClientTether Product Release Notes
Release Date: April 30, 2026
This release focuses on improving reliability, streamlining workflows, enhancing customer experiences, and strengthening integrations across the platform.
Proposal & Sales Experience Enhancements
We’ve improved how proposals and sales-related data are displayed and handled to create a more polished and consistent experience.
What’s New
- More accurate formatting for pricing and currency fields across proposals
- Improved proposal generation and printing consistency
- Cleaner formatting for links and rich text content within proposals and editors
Why It Matters
These updates create a more professional and trustworthy sales experience. With cleaner presentation and fewer formatting issues, your team can confidently deliver proposals that reflect your brand and close deals more effectively.
Messaging & Communication Improvements
Messaging tools have been refined to ensure smoother, more reliable communication across channels.
What’s New
- Improved handling of invalid or blocked phone numbers to prevent messaging errors
- More consistent behavior in email templates and communication logs
- Enhanced reliability when sending and managing SMS and email communications
Why It Matters
Stronger messaging reliability means fewer failed communications and less manual cleanup. Your team can communicate with customers more confidently, knowing messages are delivered and tracked correctly.
Hosted Pages & Lead Capture
Enhancements to hosted pages and forms improve both the user experience and the quality of captured data.
What’s New
- More consistent behavior for form fields, including required fields and default selections
- Improved rendering of custom fields across hosted pages and contact profiles
- Better handling of selection inputs like radio buttons and dropdowns
Why It Matters
These improvements ensure cleaner, more accurate data capture while creating a smoother experience for your leads. Better data at the point of entry leads to stronger follow-up and higher conversion rates.
Automation & Workflow Reliability
We’ve strengthened automation tools to ensure workflows run more predictably and efficiently.
What’s New
- Improved reliability of Action Plans, including date handling and sequencing
- More consistent behavior when applying templates within automated workflows
- Enhanced stability when managing reminders and automated follow-ups
Why It Matters
Reliable automation reduces manual work and ensures nothing falls through the cracks. Your team can trust that workflows execute as expected, improving efficiency and customer responsiveness.
Reporting & Data Accuracy
Updates in reporting and filtering provide clearer insights and more dependable data.
What’s New
- Improved accuracy in advanced filters and reporting outputs
- Better alignment of lead data across sales dashboards
- More consistent tracking of lead sources and activity data
Why It Matters
Accurate reporting gives you better visibility into performance and smarter decision-making. These improvements help ensure your data reflects reality, so you can act with confidence.
Integrations & API Enhancements
We’ve enhanced integration reliability to ensure smoother data flow between systems.
What’s New
- Improved lead creation reliability from third-party sources
- More consistent syncing of sales and pipeline data via API
- Better handling of edge cases in external data payloads
Why It Matters
Stronger integrations mean fewer sync issues and cleaner data across platforms. This ensures your systems stay aligned and your team avoids time-consuming manual corrections.
User Experience & Interface Improvements
General interface enhancements make the platform more intuitive and easier to use.
What’s New
- Improved navigation and responsiveness in key areas like calendars and profile views
- Enhanced editor behavior for cleaner content formatting
- More consistent display of notes, whiteboards, and user-generated content
Why It Matters
A smoother interface reduces friction and helps your team move faster. Small improvements across the platform add up to a more efficient and enjoyable daily experience.
Platform Stability & Performance
Behind the scenes, we’ve made important improvements to overall system stability.
What’s New
- Fixes for login and user access issues
- Improved handling of background processes and system performance
- General bug fixes to reduce unexpected errors across workflows
Why It Matters
A more stable platform means fewer interruptions and more dependable performance. Your team can stay focused on serving customers instead of troubleshooting issues.
Release Summary
This release is focused on:
- Making workflows more reliable
- Improving customer-facing experiences
- Reducing friction for admins and teams
- Strengthening integrations and data accuracy
- Enhancing overall platform stability
Release Notes – Friday March 20, 2026
March 17, 2026ClientTether Product Release Notes
Release Date: Friday March 20, 2026
This release focuses on improving reliability, enhancing document workflows, refining user experience, and strengthening integrations across the platform.
CT Sign Document & Signing Experience Improvements
We’ve made key enhancements to ensure clarity, accuracy, and confidence in your document workflows.
What’s new
- Preview attachments before signing
Users can now review all attached documents prior to completing the signing process. - Locked Terms & Conditions at time of signing
Signed documents now permanently retain the exact Terms & Conditions used at the moment of signature, ensuring compliance and audit integrity.
Why it matters
These updates improve transparency, legal consistency, and user confidence in your proposals and agreements.
Proposal & Sales Experience Enhancements
We’ve improved how proposals are displayed and how quickly they load.
What’s new
- Improved proposal layout and ordering
More consistent and polished presentation for customer-facing proposals. - Faster proposal loading (especially with images)
Optimized performance when viewing proposals with rich content.
Why it matters
A smoother, faster, and more professional proposal experience helps improve conversion rates and customer trust.
Messaging & Communication Fixes
Several improvements were made to ensure your communications are reliable and consistent.
What’s new
- Improved email reply handling
Replies from contact history now behave correctly and maintain proper conversation threads. - Resolved email template insertion issues
Templates now consistently populate and render as expected. - Enhanced Message Center consistency
Messaging behavior is now more aligned across the platform.
Why it matters
These updates ensure clean communication history, reliable messaging, and fewer manual corrections.
User Management & Admin Controls
We’ve simplified user management and improved administrative control across the platform.
What’s new
- Improved user selection with checkbox interface
Easily assign multiple users with a more intuitive selection experience. - Removed deleted users from assignment options
Prevents confusion and errors during assignment workflows. - Improved subaccount permission handling
More consistent access control for subaccounts.
Why it matters
These updates reduce friction and improve accuracy in team management and permissions.
Hosted Pages & Lead Capture Improvements
We’ve enhanced hosted pages to improve data capture and reliability.
What’s new
- Improved hosted page display and rendering
- Better mapping between form inputs and custom fields
- More consistent behavior across updated hosted page experiences
Why it matters
These improvements ensure cleaner data capture and a better experience for your leads and customers.
Reporting & Data Accuracy
We’ve addressed issues impacting reporting and data consistency.
What’s new
- Improved CSV export accuracy for reporting
- Fixed missing data issues in settings and configurations
- Enhanced lead source tracking based on contact type
Why it matters
More accurate reporting enables better decision-making and operational visibility.
API & Integration Enhancements
We’ve improved the reliability and capabilities of our API layer.
What’s new
- Fixes to client update API reliability
- New endpoint for retrieving pipeline data
- Improved stability for integrations using client updates
Why it matters
These changes ensure more dependable integrations and cleaner data synchronization.
System Controls & Notifications
We’ve added better control and visibility into system behaviors.
What’s new
- Ability to disable call recording where needed
- Improved password reset notifications
- Better handling of logged-in vs. public page access
Why it matters
These updates improve compliance, security, and user awareness.
Platform Stability & Performance
Behind the scenes, we’ve made several improvements to overall platform performance.
What’s included
- Improved reliability of Action Plans
- Enhanced staging and testing environments
- Fixes to tax settings and configuration persistence
- General bug fixes and stability improvements across workflows
Why it matters
A more stable platform means fewer interruptions, faster workflows, and a better overall experience.
Release Summary
This release is focused on:
- Making workflows more reliable
- Improving customer-facing experiences
- Reducing friction for admins and teams
- Strengthening integrations and data accuracy
If you have feedback or questions, our team is always here to help.
Proposals – Templates and Constants
September 26, 2024The Templates and Constants feature in Proposals allows for predefined values and calculations to be built into proposal templates. These constants can streamline calculations and ensure consistency across proposals. They can be shared across subaccounts within an account tree, ensuring consistency while allowing local modifications.
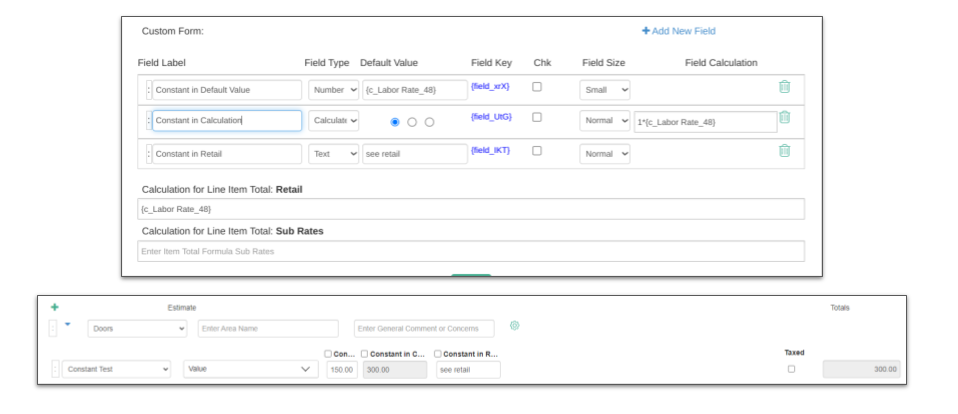
Constant Concepts
- Constants as Placeholders:
- Constants serve as placeholders for values that are commonly used in proposals. These placeholders allow you to apply specific values, such as labor rates or material costs, in a consistent way across multiple proposals.
- Defined at the Proposal Bid Type Level:
- Constants are defined at the Proposal Bid Type level, where they are assigned a name and an enterprise-level value. This enterprise value serves as the default, ensuring that all proposals based on this bid type use the same predefined data for consistency.
- Local Adjustments at the Subaccount Level:
- Although constants are defined at the enterprise level, their values can be updated at the subaccount level to represent local conditions (e.g., regional labor rates). This feature provides flexibility, allowing subaccounts to adjust the constant values without altering the template structure or logic.
Proposal Line Item Use Concepts
- Planning Constant Use:
- It is important to carefully plan how constants will be used in your templates. By predefining critical data points, such as labor rates or sales tax percentages, you ensure that proposals are built with accurate and consistent values.
- Best Practice: Plan out which proposal fields will benefit from constant use and where these constants should apply. Understanding how constants influence calculations will help streamline future proposals and ensure accuracy.
- Using Constants in Formulas:
- A key advantage of constants is their ability to be used in formulas for more complex calculations. For example, you can use constants to calculate labor or material costs based on predefined values, which can then automatically adjust based on other inputs.
- Best Practice: Using constants within formulas (e.g., multiplying a labor rate by the number of hours) provides flexibility and ensures that changes in the constant are reflected automatically in all related calculations.
- Avoid Using Constants as Default Values:
- While constants are helpful in calculations, using them as default values for fields can lead to complications when putting a line item on a template. For example, if a constant is set as the default for a specific field and used on a template, the constant is filled with the value when the line item is put on the worksheet. Therefor when the template is saved, the field value is saved not the constant placeholder.
- Best Practice: Avoid setting constants as default values in proposal line items. Instead, use constants for calculations, allowing the system to dynamically apply the correct values based on the context of the proposal.
Using Constants in Templates
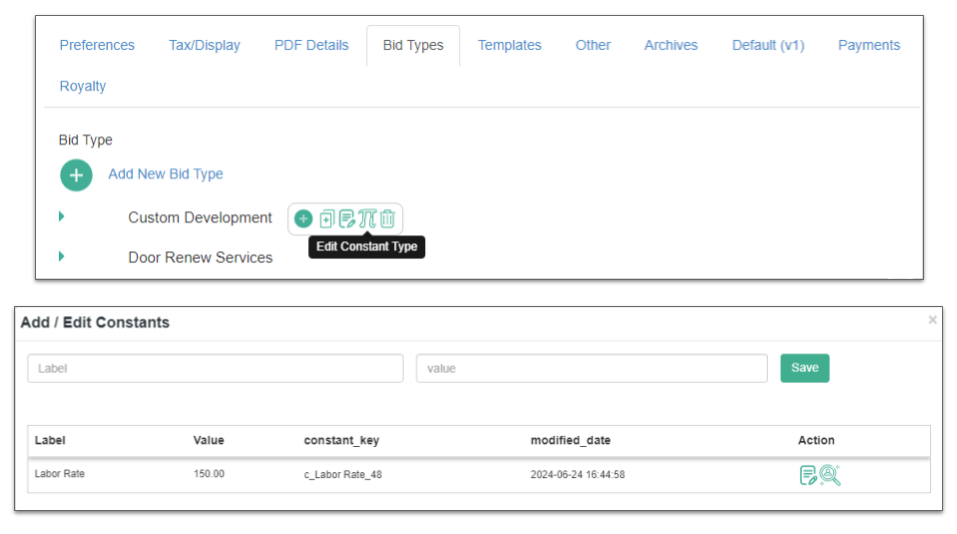
- Defining Constants:
- In the Bid Types tab of Proposal Setting, constants are defined with labels, field types, and default values.
- These constants can be used for default values, calculating totals, material costs, labor rates, and other frequently used values.
- Example:
- Field Label: Constant in Default Value
- Field Value: Number, Calculate, Text
- Constant Key: This is created by the system to guarantee uniqueness
{c_Labor Rate_48}
- Sharing Templates with Subaccounts:
- Once constants are built into a template (visit Proposal Templates), they can be shared with subaccounts. The subaccount will inherit the template but can adjust constant values as needed to reflect their specific circumstances (e.g., local labor rates or taxes).
Advantages of Using Constants in Templates
- Time Efficiency: Predefined constants reduce the need for manual data entry and streamline proposal creation.
- Uniformity: Using constants ensures consistency in calculations, especially when templates are shared across multiple subaccounts.
- Flexibility: Constants can be adjusted at the subaccount level, allowing for local variations without altering the core template.
Carrying Proposal Start & End Dates to Work Orders
September 26, 2024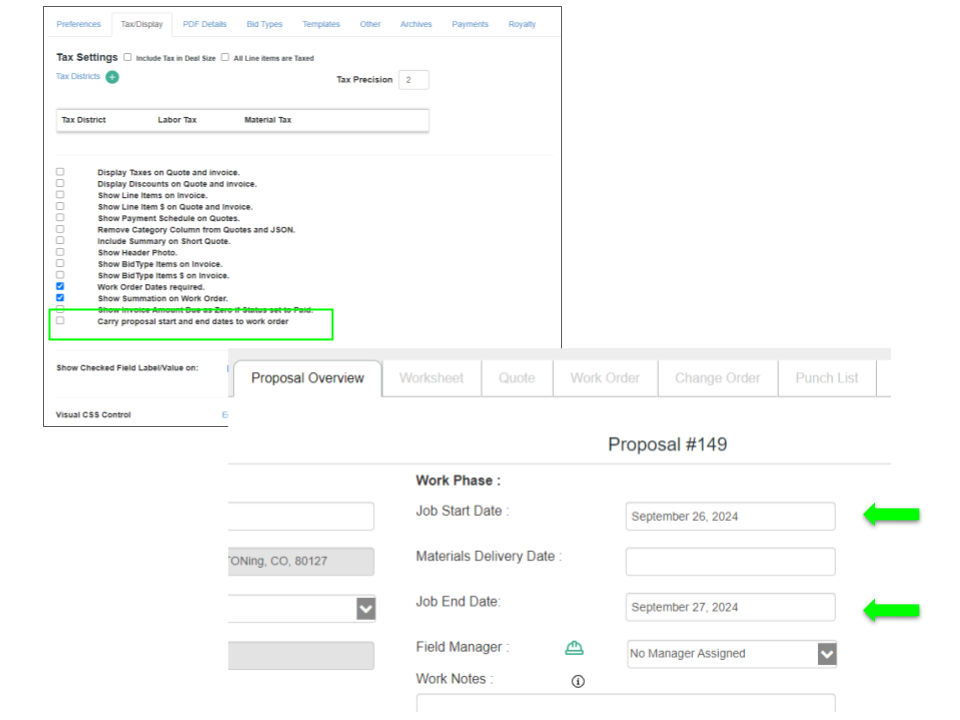
This feature allows you to automatically carry the start and end dates from a proposal to its associated work order, ensuring consistency and reducing the need for duplicate data entry.
Enabling the Feature
- Access Tax/Display Tab in Proposal Settings:
- Navigate to the Display section under Tax Settings.
- Carry Proposal Dates to Work Order:
- Locate the option Carry proposal start and end dates to work order and check the box to enable this feature.
- Once enabled, the Job Start Date and Job End Date from the proposal will automatically populate the corresponding fields in the work order.
Proposal Dates in Work Orders
- Proposal Overview:
- The proposal includes key dates for the project, such as:
- Job Start Date
- Materials Delivery Date
- Job End Date
- The proposal includes key dates for the project, such as:
- Work Order Synchronization:
- When this feature is activated, the Job Start Date and Job End Date from the proposal will be transferred automatically to the work order.
- This synchronization ensures that the work order reflects the same project timeline as outlined in the proposal, reducing errors and manual updates.
Benefits of Date Synchronization
- Time Savings: Automatically carrying the dates eliminates the need for manually entering the same data in both the proposal and work order.
- Consistency: Ensures that the timeline from the proposal is consistently maintained throughout the project lifecycle.
- Reduced Errors: Decreases the likelihood of discrepancies between proposal dates and work orders.
Using Tags as a Trigger Condition
September 26, 2024In this feature, you can create or edit triggers based on specific tags. This enables automatic actions such as sending emails, text messages, or initiating action plans when certain tag conditions are met.
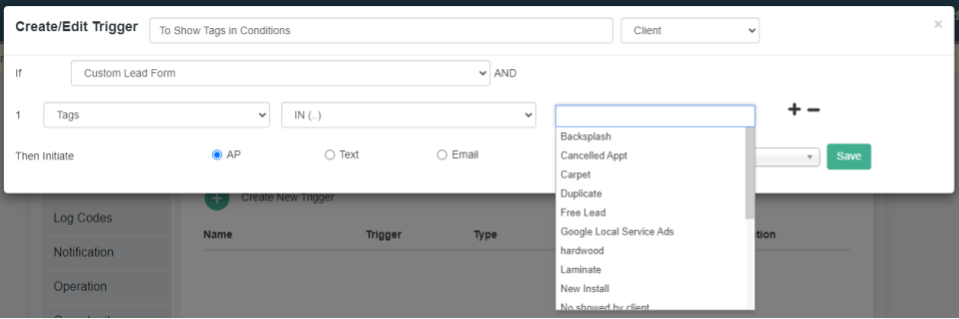
Creating a Tag-Based Trigger
- Trigger Conditions (IF Section)
- The If condition defines when the trigger should fire.
- In the example provided:
- Custom Lead Form is the primary condition.
- You can add additional conditions by clicking the + button or remove conditions using the – button.
- Using Tags in the Trigger
- In the Tags dropdown, you can select one or more tags to serve as conditions for the trigger.
- You can define whether the tags should be IN or NOT IN a contact’s profile using the operator dropdown.
- The tags in the dropdown list represent different types of tags that have been applied to contacts. In this example, tags like Backsplash, Carpet, and Google Local Service Ads can be selected.
Trigger Action (Then Section)
- Then Initiate:
- After the trigger conditions are met, you can choose one of the following actions to initiate:
- AP (Action Plan): Automatically assign a contact to an action plan.
- Text: Send a text message.
- Email: Send an email to the contact.
- After the trigger conditions are met, you can choose one of the following actions to initiate:
Additional Options
- You can add multiple conditions using the + button to create more complex logic.
- If necessary, you can also remove conditions by clicking the – button next to a condition.
This functionality allows you to automate workflows by setting triggers based on specific tags, streamlining how your team interacts with contacts based on their attributes.
Setting Tags in Action Steps
September 26, 2024The Tags feature in Action Steps allows you to automatically apply or remove tags to/from contacts as part of an action plan. Tags are useful for categorizing contacts and triggering other automated actions based on their assigned tags.
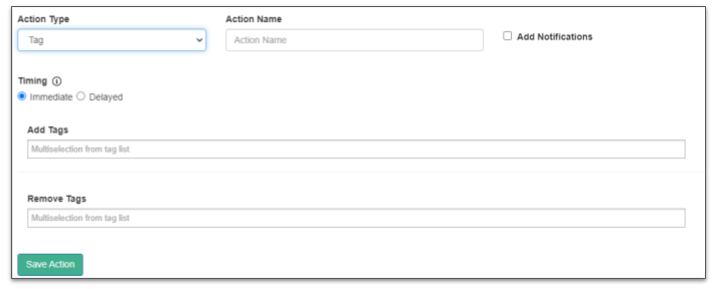
Configuring the Tag Action
- Action Type:
- Select Tag from the dropdown menu to configure tag-related actions. This is essential for adding or removing tags from contacts.
- Action Name:
- Provide a descriptive Action Name. This name should help identify the purpose of the tag action (e.g., “Apply New Lead Tag”).
- Add Notifications:
- Check this box if you would like notifications to be sent when this action occurs. This can be useful for tracking tag changes.
Timing of the Tag Action
- Immediate:
- Choose this option if you want the tags to be added or removed immediately when the action is triggered.
- Delayed:
- If the tag should be applied or removed at a later time, select Delayed and configure the delay settings accordingly (this option will become configurable once selected).
Adding and Removing Tags
- Add Tags:
- In the Add Tags field, select the tags you wish to assign to the contact. This allows you to classify contacts automatically when this action is executed.
- This is a multi-selection field, so you can choose multiple tags from the dropdown.
- Remove Tags:
- Use the Remove Tags field to select tags that should be removed from the contact. This helps keep the contact’s tags updated, removing outdated or irrelevant ones.
- Like the Add Tags field, this also supports multi-selection.
Finalizing the Tag Action
- Once you’ve configured the action type, timing, and tags to add or remove, click Save Action to finalize the step in your action plan.