History Notes Filter and Search
September 26, 2024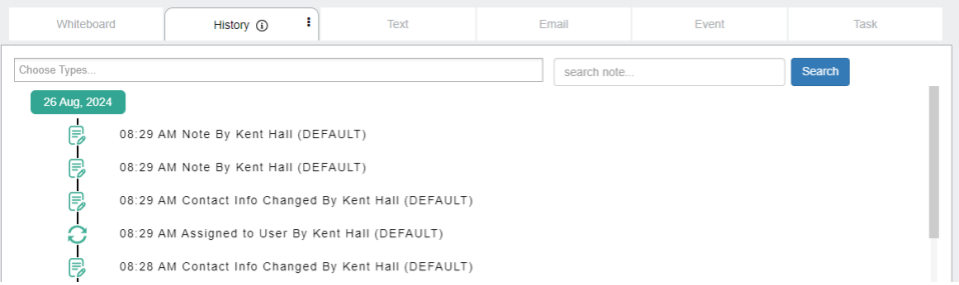
The History Notes section allows you to review interactions and changes associated with a contact. This feature includes filtering and searching tools to help you navigate through the contact’s history effectively.
Filter by Types
- What is it?
- The filter option allows you to choose specific types of history entries to display (e.g., Notes, Contact Info changes, Assignments).
- User-Centric Setting
- The filter is user-specific. This means that once you set a filter, it will persist across other contact profiles you view until you change it. You don’t have to reset your filter preference for each contact, saving time during navigation.
- How to Use It
- Click the “Choose Types” dropdown menu and select the types of history entries you’d like to display. The system will automatically filter the results according to your selection.
Search by Title
- What is it?
- The search feature enables you to quickly find specific history entries by searching their titles. Currently, only titles are searchable in this field.
- Search is Contact-Specific
- The search tool applies only to the currently viewed contact. The results displayed will be limited to this contact’s history.
- How to Use It
- Simply enter your search term in the “Search note…” box located to the right of the filter menu. Once you’ve entered your term, click the blue “Search” button to display the relevant results. Only titles matching your search will appear.
Additional Information
- Interaction Entries: Each entry is timestamped and tagged with the type of change or interaction (e.g., a note being added or contact information being updated).
- Automatic Display: When you open a contact’s history, all entries will be displayed in chronological order unless you apply a filter or search.
This combination of filtering and searching makes it easy to find important details in a contact’s history, whether you’re tracking changes or reviewing past notes.
How to Get a Phone Number to Use for Texting and Calls in Client Tether -Submit Telephony Registration, Brand and Campaign – US Instructions
September 18, 2024Read these instructions thoroughly before starting. We want to help you avoid unnecessary delays. Approval can take anywhere from a few days to several weeks. It is best to start immediately.
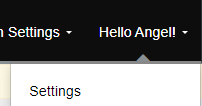
1. Go to Hello (Name)! > Settings and find Telephony in the gray list on the left hand side. (these are in alphabetical order)
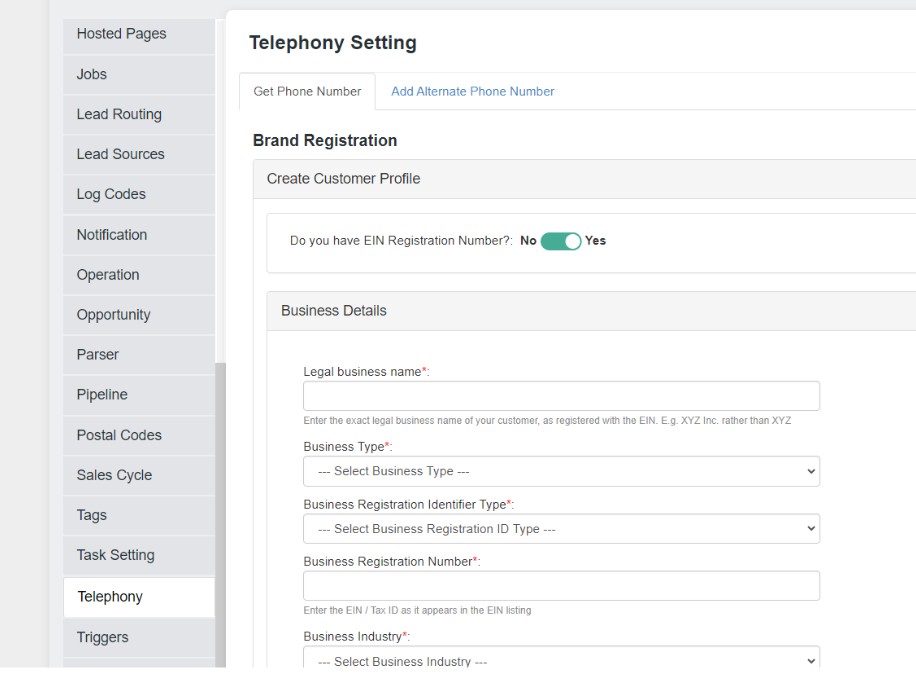
2. If you do not have an EIN, fill out the customer profile (should be self-explanatory but note the instructions for the phone number on step 5 below). Before you submit your brand and campaign, check with your CSP or email support@clienttether for help with these steps. We may need to submit your campaign in the Twilio platform rather than the telephony tab, so be sure to involve us to avoid unnecessary delays.
3. If you have an EIN, be sure to activate the green switch to indicate Yes, then fill out your business details. Your legal business name must match the business name that matches the EIN you have with the IRS.
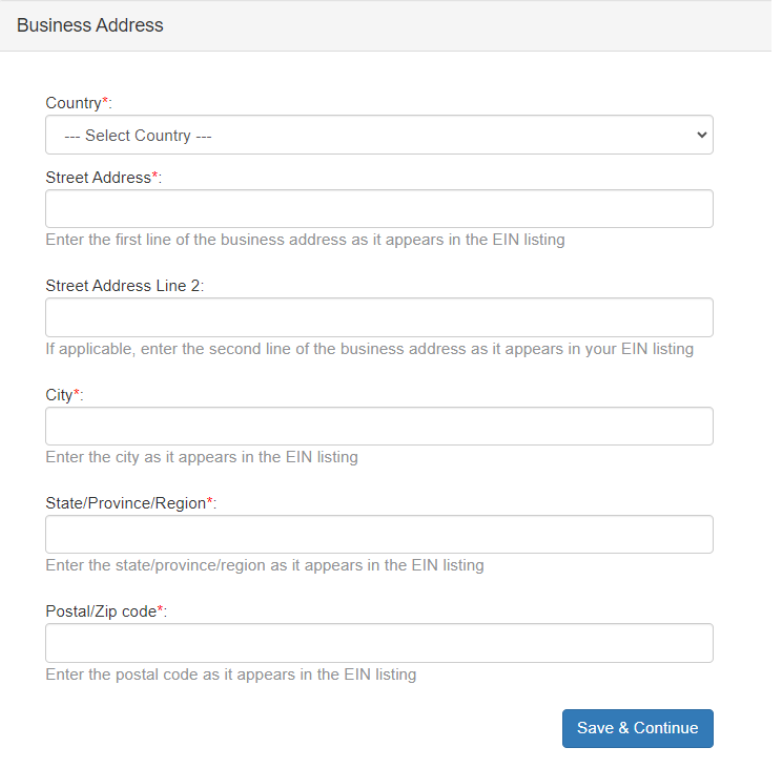
4. Fill in your business address. This must be your current business address.
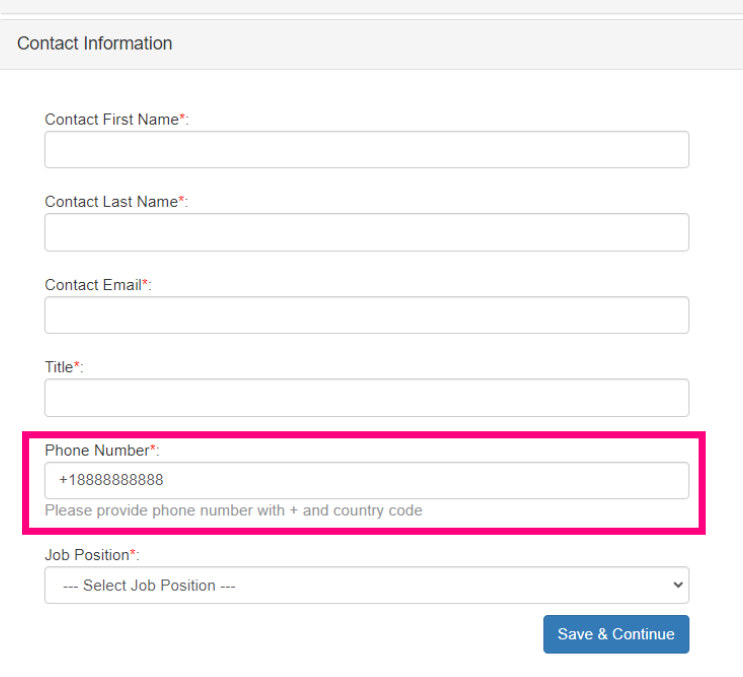
5. Fill out your contact information, Save & then STOP. When entering the phone number, be sure to enter it in this format: +18888888888. 1 is the country code for the United States.
6. STOP HERE. Before Registering your brand and campaign, your website must be compliant:
- Every form on your website must tell people that by filling it out they are opting in to texting and how to opt out, as well as a link to your privacy policy.
- Your website must have a privacy policy that states mobile information will not be shared with third parties for marketing purposes, and gives information on how to opt out of automatic texting.
- Note that you must abide by your privacy policy and information given on your website.
7. Once your website is compliant and your registration is approved, come back to the telephony tab and submit your brand – only submit it once, and wait for approval.
8. Once your brand is approved, click the I accept box to check it, then choose a phone number and submit your campaign.
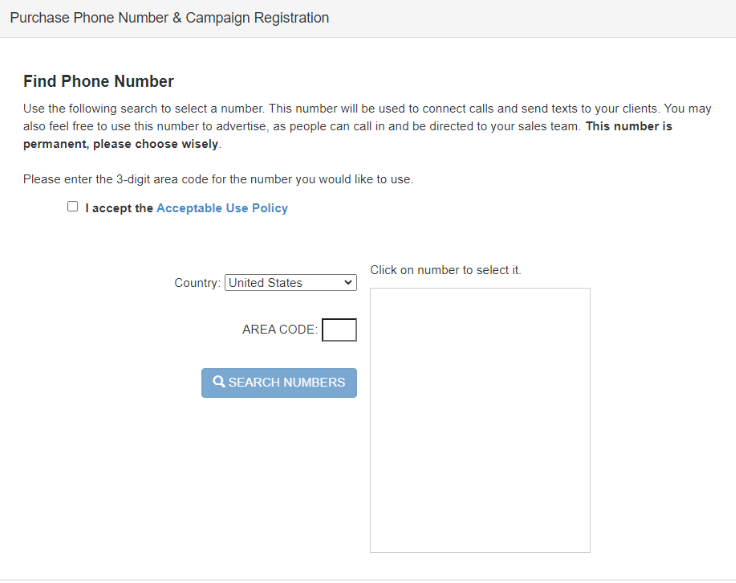
9. If you are denied, review these steps and if there is nothing on your end to fix, reach out to support@clienttether.com
10. Note that phone numbers are bought through a third party vendor, Twilio, and there are government regulations. The registration, brand and campaign approvals are verified by a third party, not Twilio. There are instances where the registration, brand and campaign are not approved and we have to work through Twilio to resolve it. You may be included in this communication, so watch for emails from Twilio and from the folks at ClientTether who are working to help you get these approvals.
11. Approval can take several weeks, even if everything is compliant. We will do our best to help you.
12. For more information about requirements, please view this pdf: https://support.clienttether.com/wp-content/uploads/2024/09/SMS-Registration-Compliance.pdf
How to Connect Leads to ClientTether
September 9, 2024There are multiple ways to connect leads to ClientTether. Work with your lead provider to select the best fit.
- Parser – Connecting leads with a parser is the most common way. Forward a lead email from your lead provider or website to your Client Success Partner, and we can usually build a parser for you.
Ask your lead provider to send the leads in a plain text format, if possible. If they are not able or willing to do this there is a higher chance that the leads will not be able to parse. We can try and let you know, but it is better if they can send them in a plain text email.
Once we build and test the parser, have your lead provider send leads to your parser email. You can find this in Settings on the Parser tab. - API – If your lead provider would like to send your leads via the API, they need the API Details found in Settings on the API tab.
API Details look like this:
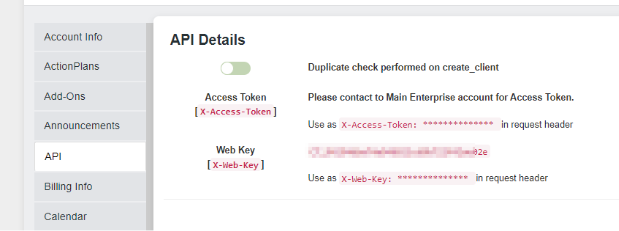
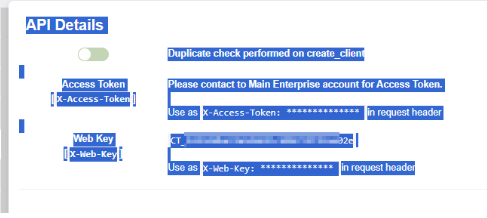
Highlight all the text as shown below, then copy and paste, and send it to your lead provider along with this link to our documentation: https://support.clienttether.com/api-document/clienttether-api-2-0-doc/
Ask your Client Success Partner (CSP) for help by emailing support@clienttether.com
Tip: tell your lead provider to be sure to pay attention to the part in the document about lead notifications.
3. Zapier – Documentation for Zapier is found here: https://support.clienttether.com/zapier/
If your leads will not parse using our parsers and if your lead provider cannot use the API to send leads, you may want to sign up for a Zapier account. Zapier is an outside service and there are fees involved. Please note that your CSP may not be able to help you set up Zaps to bring leads in, so you may need to hire someone to help you do this. Freelance sites like Fiverr can help you find people who are willing to provide this service.
Preparing for New Lead Generation Requirements (Jan 2025)
August 29, 2024As of January 2025, the FCC’s new lead generation requirements will mandate significant changes in how businesses handle consumer consent. The key update is the requirement for express written consent on a seller-by-seller basis, ensuring that each interaction is directly linked to the consumer’s specific inquiry. This move away from batch consents underscores the importance of clear and conspicuous disclosures in all communications.
What This Means for Your Business
- Tailored Consent: Moving forward, businesses must obtain consent that is specific to each seller, rather than relying on blanket consents. This ensures that each interaction is traceable to a clear consumer inquiry, improving transparency and reducing the risk of non-compliance.
- Clear Disclosure: All communications with consumers must include clear and conspicuous disclosures that explicitly state the purpose of the contact and the entity involved. This helps consumers make informed decisions and strengthens the legitimacy of your outreach efforts.
- Record Keeping: Meticulous documentation of all consent records is now more critical than ever. Businesses must implement robust systems for managing and storing consent documentation, ensuring that it is easily accessible for compliance audits and consumer inquiries.
- Vendor Scrutiny: Evaluate your current vendors and partners to ensure they are compliant with the new regulations. This may involve renegotiating contracts, updating service agreements, and ensuring that all third-party activities align with the FCC’s new standards.
Action Steps for ClientTether Users
- Audit Your Processes: Begin by conducting a thorough review of your current lead generation and consent practices. Identify areas where changes are needed to comply with the new regulations.
- Update Consent Forms: Modify your consent forms to ensure they meet the new seller-specific requirements. Clearly outline the nature of the consent being given and the specific entity it pertains to.
- Train Your Team: Ensure that all team members understand the new requirements and their implications. Provide training on how to obtain and document consent in a compliant manner.
- Monitor Compliance: Regularly monitor and review your lead generation activities to ensure ongoing compliance. Consider implementing automated tools within ClientTether to help manage consent records and streamline the compliance process.
Conclusion
The upcoming changes to lead generation requirements are designed to enhance consumer protection and transparency. By taking proactive steps now, businesses can ensure they are fully prepared to meet these new standards, thereby reducing the risk of non-compliance and building stronger, more trustworthy relationships with their customers.
Contact Reminder
August 8, 2024Overview
A contact reminder is intended to call attention to a specific contact profile for the purposes of connecting with that contact on that particular date. Contact reminders can be created manually in the profile or within an action plan for a Client, Employee, Partner, or Vendor.
Topics
- Contact Profile Contact Reminder
- Action Plan Contact Reminder
Creating a Contact Reminder – Contact Profile
No matter the type of contact profile, the process is the same.
- After you’ve opened the profile, click on the Event tab.
- Select event type as “Contact Reminder”.
- Choose a future date to be reminded of this contact.
- Add notes to help you remember why you need to connect with that conact.
- Click “Save Action”.
Creating a Contact Reminder – Action Plan
No matter the type of Action Plan you are editing or creating, the process is the same.
- After you’ve opened the action plan you want to edit, click on “New Action”.
- Select event type as “Contact Reminder”.
- Choose “delay” and enter the amout of time after the action plan is set off for you the be reminded of this contact.
- Click “Save Action”.
How to change how your business name appears on caller ID
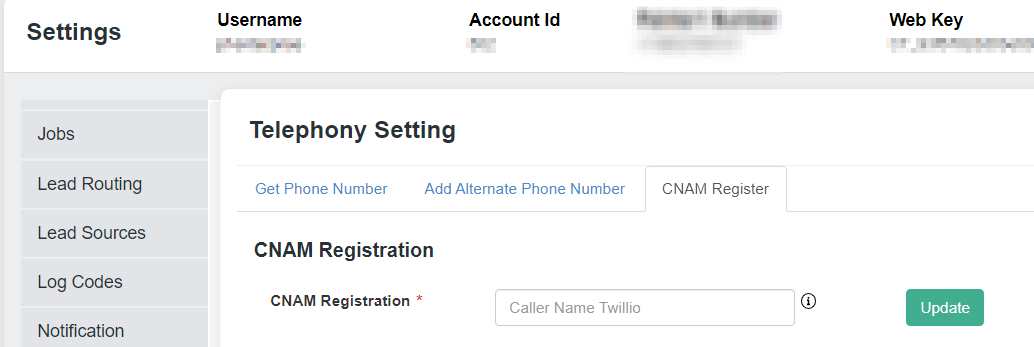
August 4, 2024Hello > Settings > Telephony > CNAM Register
The CNAM Registration field is limited to sixteen characters. Put in your business name and click Update.
You must have a Twilio phone number and A2P registration must be complete and approved – the CNAM tab will not appear before you have met these requirements.
Operations Settings
August 4, 2024At the top of this page you can set operation hours – which sets the times that automated texts and emails can occur. Immediate texts and emails will always go out immediately, but delayed texts and emails and automated calls will only occur in your hours of operation.
Be sure to set your time zone and click the Save Account Information button.
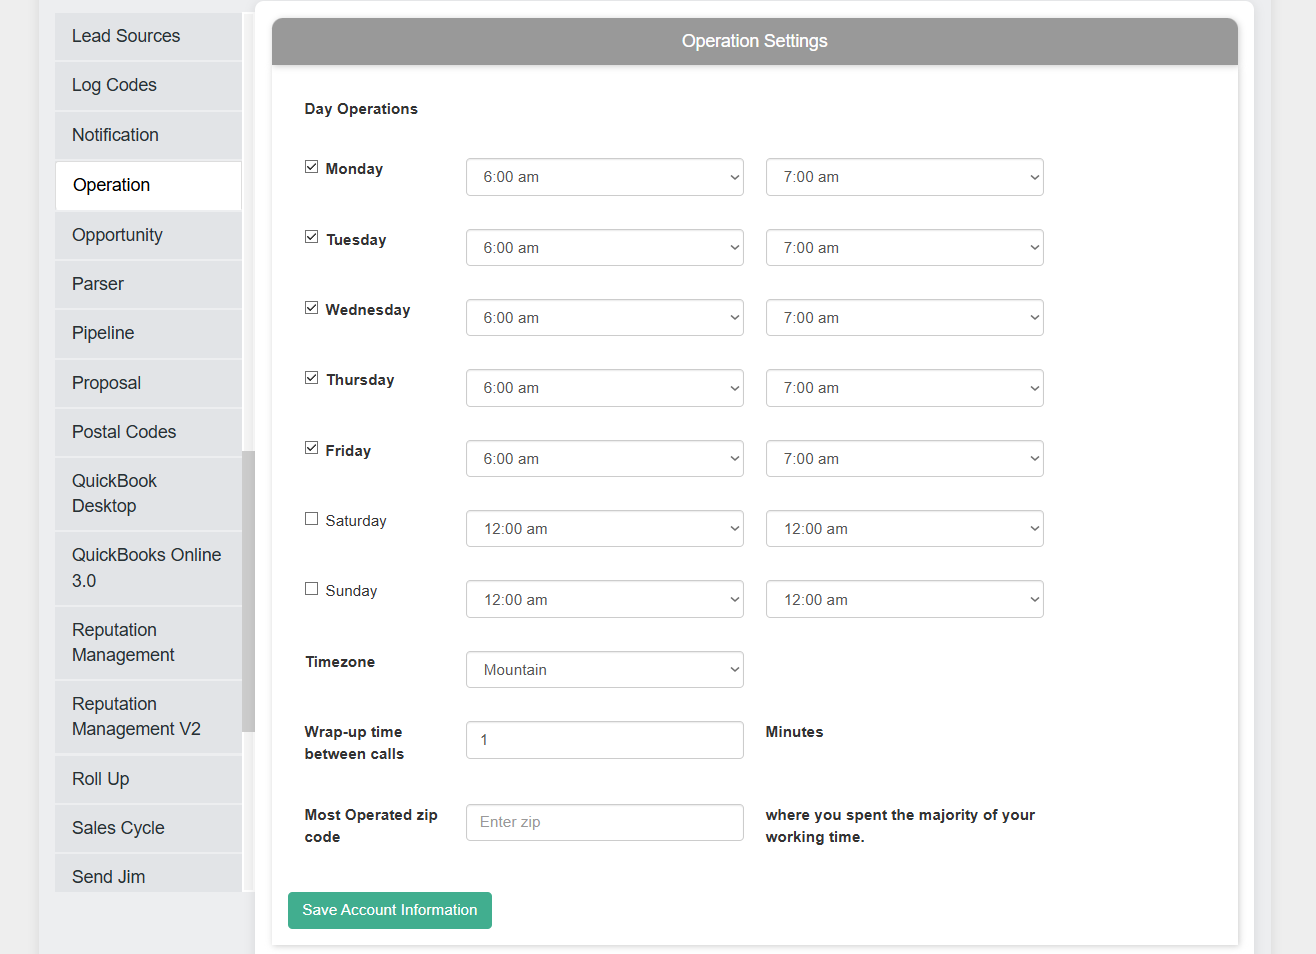
Here is a video to explain the Operations Settings – click to view
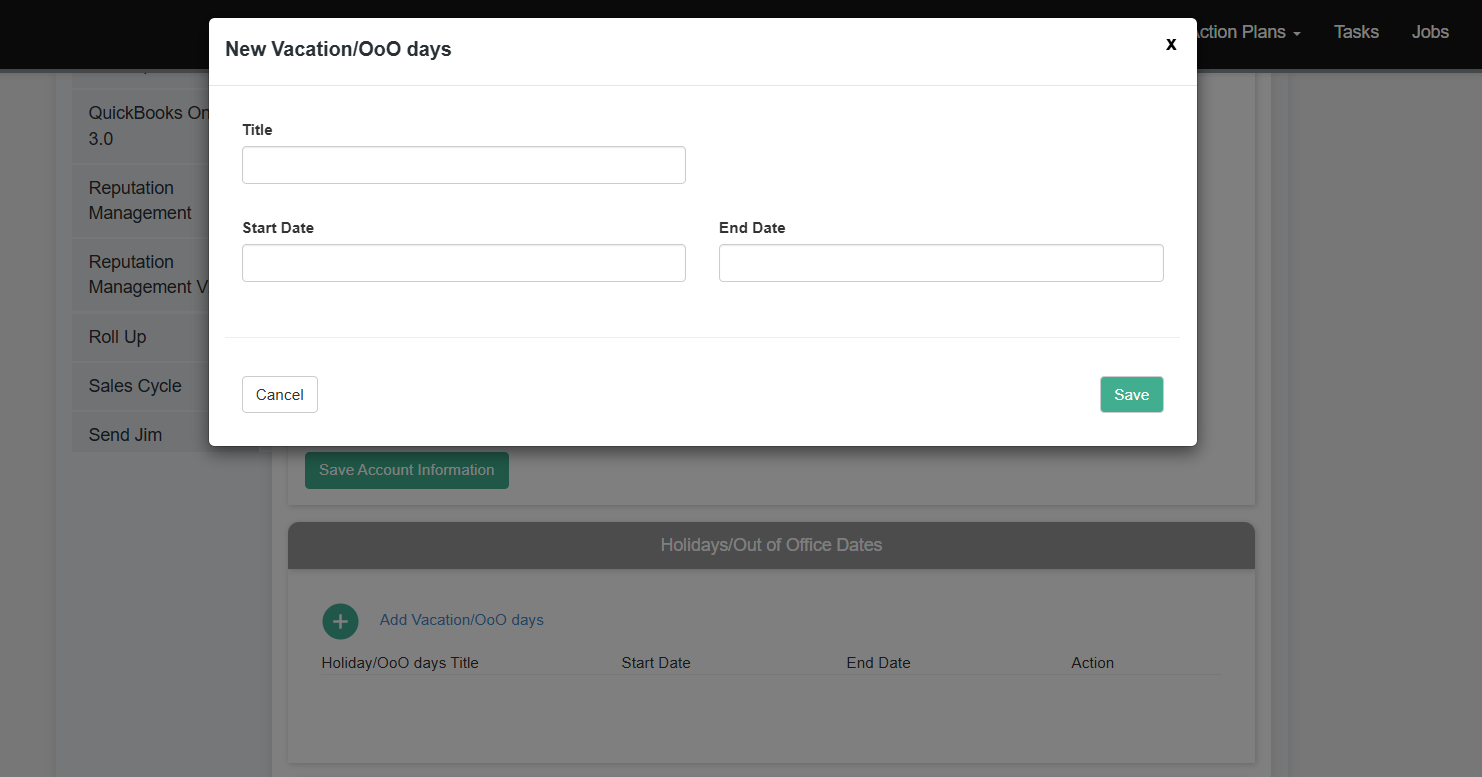
As you scroll down you can set your Holidays/Out of Office Dates by clicking the green plus and choosing your start and end dates, then save.
As we scroll further down we find the Incoming Customer facing Call Say Command. This controls how the system handles calls and is set up for you. You can make changes, note that we use tokens to indicate things like first name, last name, company name, and more.
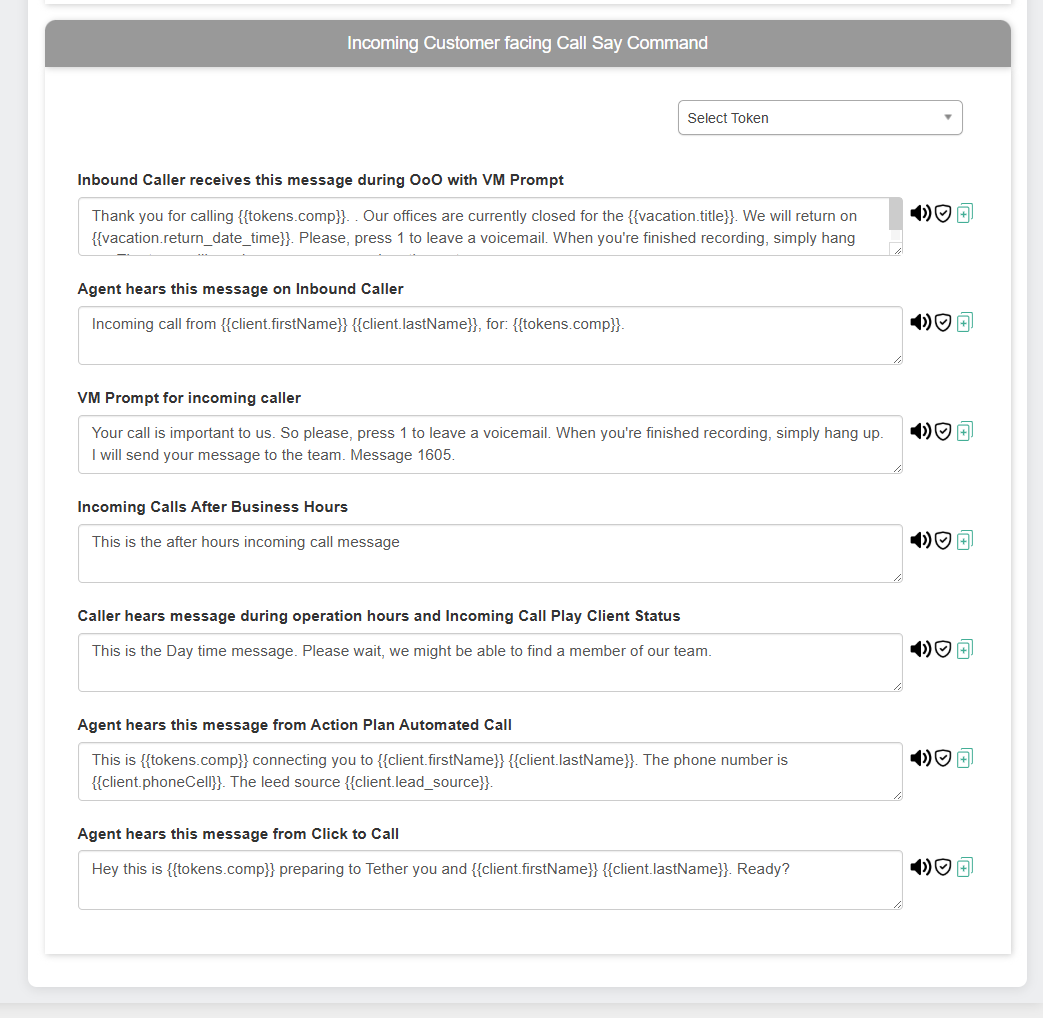
You can select a token from the Select Token dropdown and it will be copied to your clipboard so you can paste it in wherever you want.
Task Settings
July 23, 2024If you have added the Task Management Add-On in Settings > Add-Ons, a task icon will appear on the top right of ClientTether as shown below.

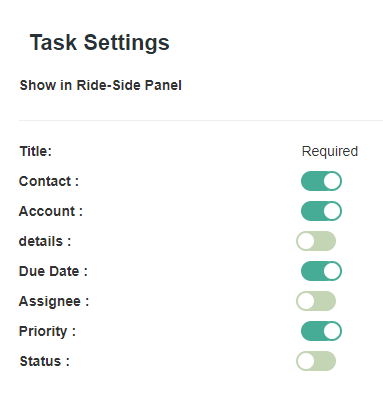
The Task Settings page allows you to control what is shown in this side panel. To see all details of the task, you can click on Tasks on the top of your screen and click on a task.

On the Task Settings page, simply toggle the switches on or off to select which parts of a task show in the side panel.
Twilio A2P Compliance – Telephony
July 23, 2024All items must be compliant in order to enable texting in ClientTether.
Registration:
- US Customers: Information on the telephony tab (business name, address, etc.) must exactly match the name associated with the EIN – not the DBA. If it does not match, Twilio may require the company’s CP 575 EIN and/or form 147c Confirmation Letter from the IRS in order to complete registration.
- Canadian customers’ information must exactly match the information associated with their tax identification number.
- All customers should make sure the information submitted on the telephony tab matches exactly. We recommend getting your sales representative or Client Success Partner to double check in order to avoid unnecessary delays and charges.
Website Requirements:
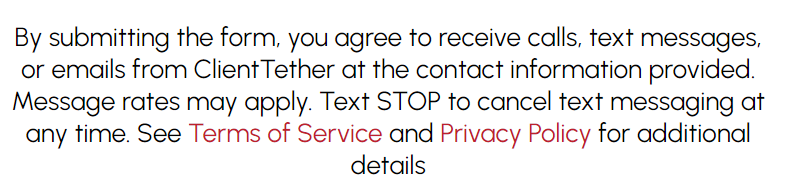
- Every form on your website must have a notice to customers that they are opting in to receive automated texts, as well as information on how they can opt out. Here is an example:
- Privacy Policy:
- A compliant Privacy Policy must state that no mobile information will be shared with third parties/affiliates for marketing/promotional purposes.
- It must also give information on how to opt out of text messaging.
- Please check https://support.clienttether.com/wp-content/uploads/2024/09/SMS-Registration-Compliance.pdf
Twilio Approval:
- Twilio is our contracted vendor for telephony. They provide the numbers and approval has strict requirements according to laws governing texting. Here is a link to the requirements: https://help.twilio.com/articles/11847054539547-A2P-10DLC-Campaign-Approval-Requirements
Chrome Browser Refresh
July 18, 2024On PC (Windows)
- Basic Refresh:
- Keyboard Shortcut: Press
F5orCtrl+R. - Mouse: Click the reload button in the address bar.
- Keyboard Shortcut: Press
- Hard Refresh (Clears Cache for the Page):
- Keyboard Shortcut: Press
Ctrl+F5orCtrl+Shift+R. - Mouse:
- Right-click on the reload button in the address bar.
- Select “Hard Reload” from the context menu.
- Keyboard Shortcut: Press
- Empty Cache and Hard Reload:
- Open Chrome Developer Tools by pressing
Ctrl+Shift+IorF12. - Right-click on the reload button in the address bar.
- Select “Empty Cache and Hard Reload”.
- Open Chrome Developer Tools by pressing
On Mac
- Basic Refresh:
- Keyboard Shortcut: Press
Command+R. - Mouse: Click the reload button in the address bar.
- Keyboard Shortcut: Press
- Hard Refresh (Clears Cache for the Page):
- Keyboard Shortcut: Press
Command+Shift+RorShift+Reload. - Mouse:
- Right-click on the reload button in the address bar.
- Select “Hard Reload” from the context menu.
- Keyboard Shortcut: Press
- Empty Cache and Hard Reload:
- Open Chrome Developer Tools by pressing
Command+Option+I. - Right-click on the reload button in the address bar.
- Select “Empty Cache and Hard Reload”.
- Open Chrome Developer Tools by pressing
On ChromeBook
- Basic Refresh:
- Keyboard Shortcut: Press
Ctrl+R. - Mouse: Click the reload button in the address bar.
- Keyboard Shortcut: Press
- Hard Refresh (Clears Cache for the Page):
- Keyboard Shortcut: Press
Ctrl+Shift+R. - Mouse:
- Right-click on the reload button in the address bar.
- Select “Hard Reload” from the context menu.
- Keyboard Shortcut: Press
- Empty Cache and Hard Reload:
- Open Chrome Developer Tools by pressing
Ctrl+Shift+IorF12. - Right-click on the reload button in the address bar.
- Select “Empty Cache and Hard Reload”.
- Open Chrome Developer Tools by pressing
Notes
- Developer Tools: Opening Developer Tools before performing a hard refresh ensures that the page will reload without using any cached content.
- Right-click Menu: The options to “Hard Reload” and “Empty Cache and Hard Reload” are accessible by right-clicking the reload button while Developer Tools are open.
These steps should cover the most common methods for refreshing the Chrome browser across different platforms.