Proposal Print to PDF
July 18, 2024To print a proposal to PDF in your system, please follow these steps:
- Locate the Proposal Quote Tab: Navigate to the Proposal Quote tab in your system.
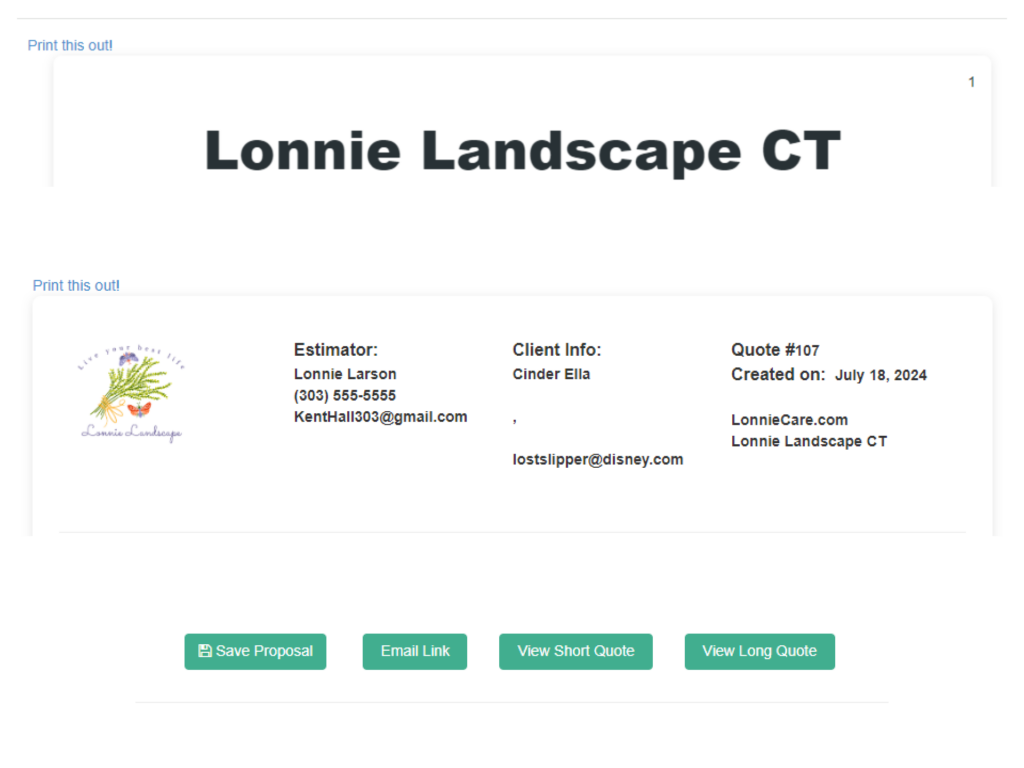
- View Options: At the bottom of the Proposal Quote tab, you will see two buttons:
- View Short Quote
- View Long Quote
- Select a View: Click on either the “View Short Quote” or “View Long Quote” button. This will open an HTML view that is formatted for 8.5″ x 11″ paper.
- Print the Page: In the top left corner of the HTML view, there is a link labeled “Print this page.” Click on this link to initiate the print process.
- Produce a PDF: Follow the prompts provided by your operating system to print the document. You will have the option to select “Save as PDF” or a similar option, depending on your OS.
By following these steps, you can easily print your proposal to a PDF document.
ClientTether Password Policy
July 18, 2024Overview
To ensure the security of our system and protect user data, ClientTether has implemented a comprehensive password policy. This policy outlines the requirements and procedures for creating and managing user passwords.
Password Policy Requirements
- First Login Password Reset
- New accounts and users must reset their password upon their first login.
- Automatic Logout
- Users will be automatically logged out after 30 minutes of inactivity to enhance security.
- Password Expiration
- Passwords must be reset every 180 days or less. This is enforced as an enterprise setting.
- Strong Password Requirements
- Passwords must meet the following criteria to be considered strong:
- Contain at least one uppercase and one lowercase letter.
- Include at least one number.
- Include at least one special character (e.g., !, @, #, $).
- Be at least 8 characters long.
- Passwords must meet the following criteria to be considered strong:
- Password Reuse
- Users cannot reuse the same password for at least 5 password cycles.
- Login Attempts and Captcha Verification
- After 5 failed login attempts, users will be required to complete a captcha verification on their next login attempt.
Implementation
New User Password Setup
When a new user account is created, the user will receive a temporary password. Upon their first login, they will be prompted to change this temporary password to one that meets the above strong password requirements.
Automatic Logout Procedure
The system will monitor user activity. If no activity is detected for 30 minutes, the user will be automatically logged out. Users will need to log in again to continue using the system.
Password Expiration and Reset
Users will receive notifications 15 days before their password is set to expire. They must reset their password by the expiration date. If the password is not reset, users will be prompted to reset it upon their next login attempt.
Managing Login Attempts
The system tracks login attempts. After 5 consecutive failed login attempts, the user will be required to complete a captcha verification to ensure they are not a bot. This measure helps to prevent unauthorized access.
Best Practices
- Users are encouraged to use unique passwords for different accounts.
- Avoid using easily guessable information, such as birthdates or common words.
- Regularly update passwords and avoid sharing them with others.
By adhering to these guidelines, users can help maintain the security and integrity of ClientTether’s systems.
For any questions or assistance with password-related issues, please contact our support team.
Notes / Log-a-Call Templates
July 16, 2024Feature Overview:
The Notes / Log-a-Call Templates feature in ClientTether CRM allows users to create and manage templates for repetitive communications. This functionality is designed to streamline the process of capturing and documenting interactions within a contact’s record, ensuring consistency and efficiency.
Accessing Notes / Log-a-Call Templates:
- Navigate to Action Plans / Template:
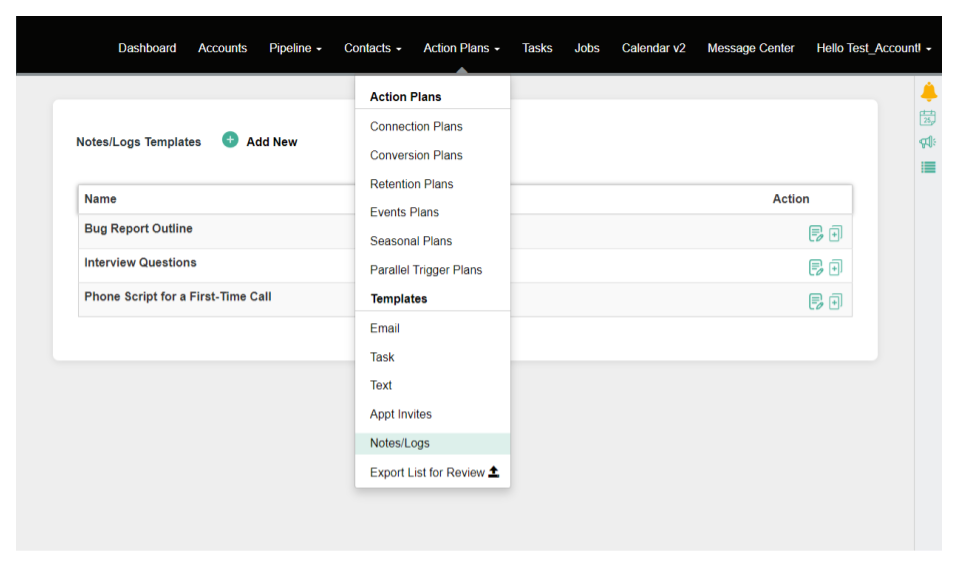
- From the main navigation menu at the top, mouse over the “Action Plans (Template)” item.
- In the dropdown menu, scroll down to the “Templates” section and select the desired Template “Notes/Logs”.
- Viewing and Managing Templates:
- The “Notes/Logs Templates” page displays a list of existing templates.
- You can view the names of the templates and perform actions such as editing or deleting them.
- To add a new template, click on the “+ Add New” button.
Creating or Editing a Notes Template:
- Initiate Template Creation or Editing:
- Click on the “+ Add New” button to create a new template.
- To edit an existing template, click on the edit icon next to the template name.
- Template Editor:
- In the “Edit Notes/Logs Template” dialog, enter a name for the template in the “Name” field.
- Use the rich text editor to format the template content. The editor supports various text formatting options such as font size, bold, italics, lists, and more.
- Example of a template structure for a “Bug Report Outline”:
- Report Header:
- Title: A brief, descriptive title that summarizes the issue.
- Reported By: Names of the persons reporting the bug. Include Account Name and CSM Name.
- Date Reported: When the bug was first noticed and reported (YYYY-MM-DD).
- Priority and Severity: Define the urgency and impact of the bug (Low, Medium, High).
- Environment and Configuration:
- Browser Name and Version: The version of the software where the bug was found.
- Operating System: OS details including the version.
- Report Header:
- Save or Delete Template:
- After entering the template content, click on the “Save Template” button to save your changes.
- To delete the template, click on the “Delete Template” button.
Using Notes Templates in Contact Records:
- Accessing Contact Records:
- Go to the “Contact” tab in the main navigation menu and select a contact from the list.
- Click on the Contact’s Name to open the Contact Profile.
- Applying a Template:
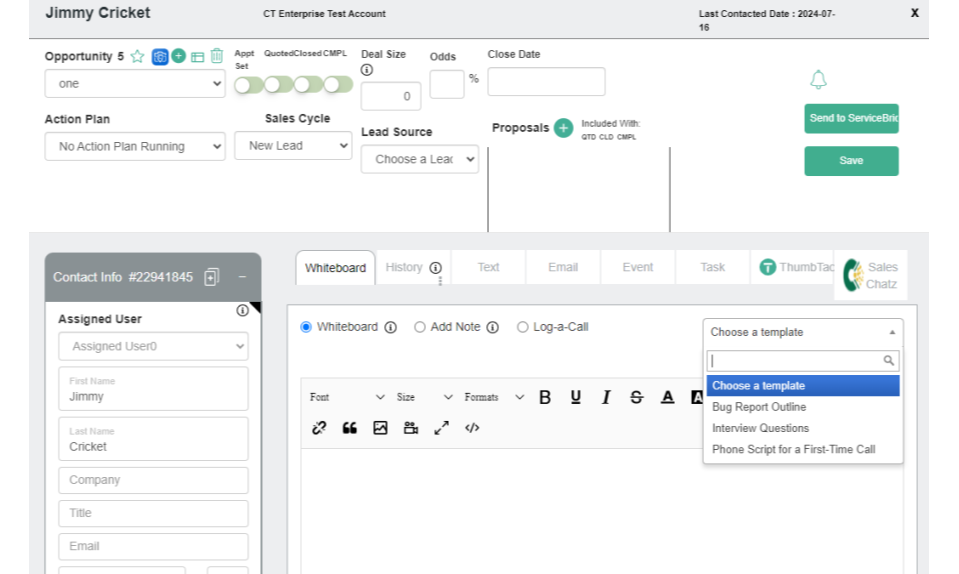
- In the contact’s record, navigate to the “Whiteboard” section.
- Select the “Add Note” or “Log-a-Call” option.
- Click on the “Choose a template” dropdown menu and select the desired template.
- Appending Template Content:
- The content of the selected template will be appended to the editor field.
- You can further customize the content as needed before saving it to the contact’s record.
By utilizing the Notes / Log-a-Call Templates feature, users can ensure that their communications are standardized, comprehensive, and efficient, thereby enhancing the overall productivity and consistency of their CRM interactions.
Filtering Contact Lists
July 16, 2024Overview
ClientTether CRM provides robust filtering options to help users manage and organize their contact lists effectively. This guide will walk you through the steps to apply filters to your contact lists, enhancing your ability to find specific contacts based on various criteria.
Accessing the Filter Options
- Navigate to the Contact List Page
- Log in to your ClientTether account.
- Click on the
Contactsmenu to navigate to your contact list.
- Open the Filter Panel
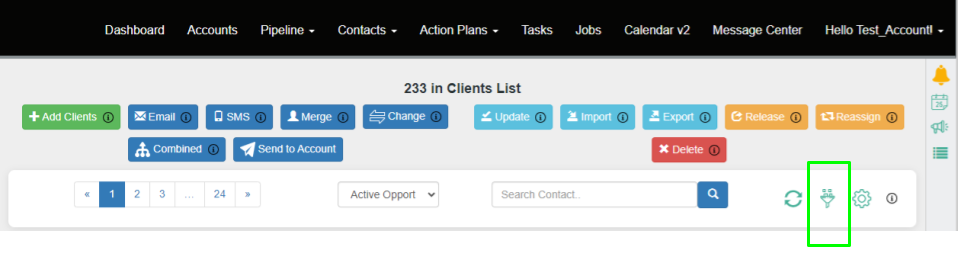
- Locate the filter icon near the top right of the page (as shown in Image 2).
- Click on the filter icon to open the filtering options.
Applying Filters
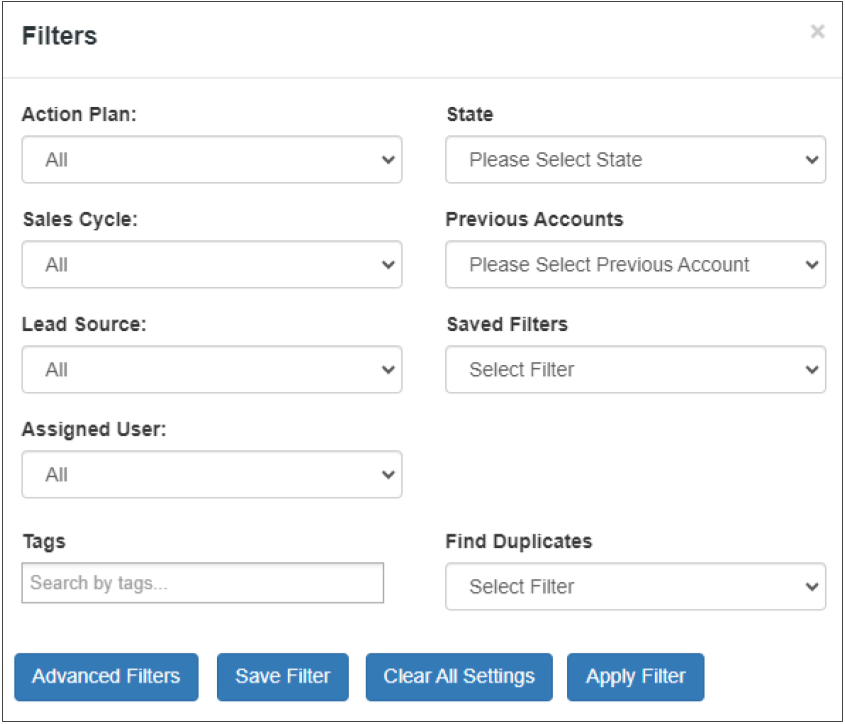
Once the filter panel is open, you will see various filtering options (as shown in Images 1 and 3). You can apply one or multiple filters based on the following criteria:
- Action Plan
- Select an action plan from the dropdown menu to filter contacts associated with a specific action plan.
- State
- Choose the desired state to filter contacts based on their location.
- Sales Cycle
- Filter contacts by selecting a specific stage in the sales cycle.
- Previous Accounts
- Select a previous account to filter contacts linked to that account.
- Lead Source
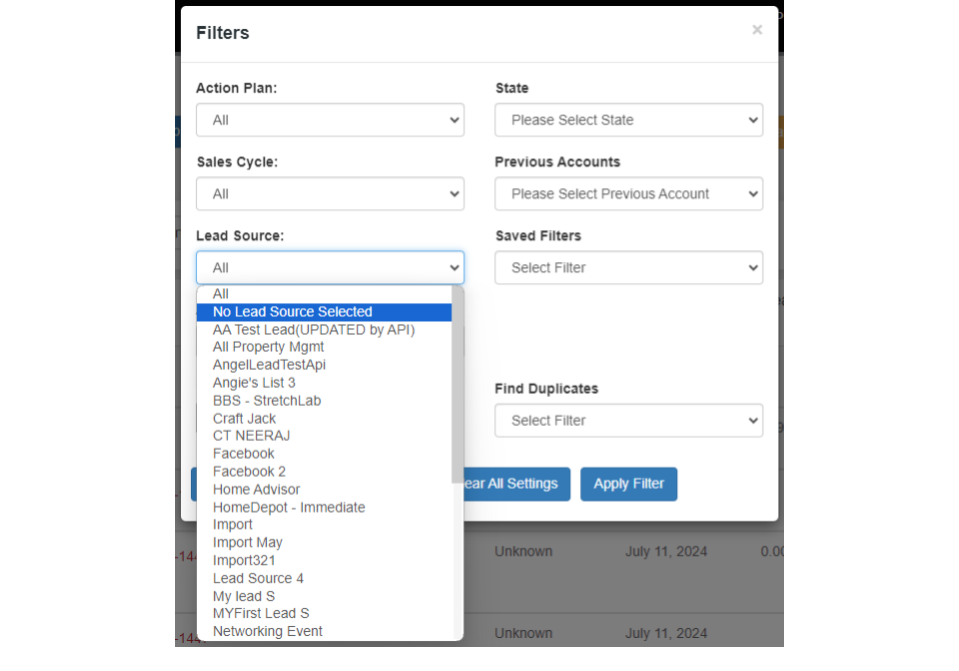
- Use the dropdown menu to choose a lead source. This allows you to filter contacts based on how they were sourced (e.g., Facebook, Home Advisor, etc.).
- Assigned User
- Select an assigned user to filter contacts managed by a specific team member.
- Tags
- Enter tags to filter contacts associated with specific tags.
- Saved Filters
- Choose from your saved filters to quickly apply pre-defined filter settings.
- Find Duplicates
- Use this option to identify and filter duplicate contacts based on selected criteria.
Saving and Applying Filters
- Save Filter
- After setting your desired filters, click on the
Save Filterbutton to save the current filter settings for future use.
- After setting your desired filters, click on the
- Clear All Settings
- To reset all filter settings, click the
Clear All Settingsbutton.
- To reset all filter settings, click the
- Apply Filter
- Click on the
Apply Filterbutton to apply the selected filters to your contact list.
- Click on the
Example
Step-by-Step Example of Applying a Lead Source Filter
- Open the Filter Panel
- Click on the filter icon near the top right of the contact list page.
- Select Lead Source
- In the filter panel, locate the
Lead Sourcedropdown menu. - Click on the dropdown menu and select a lead source (e.g., Facebook).
- In the filter panel, locate the
- Apply the Filter
- Click on the
Apply Filterbutton to view the contacts filtered by the selected lead source.
- Click on the
Filter By Lead Source (unassigned)
Choosing No Lead Source Selected will show leads that do not have any lead source assigned and leads that have a lead source that belongs to another account.
4o
Contact Relationships (linking)
July 16, 2024ClientTether: Contact Relationships or Linking: Users can effortlessly connect various contacts to other contact, creating a unified and comprehensive view of relationships and networks within their CRM. This enhancement simplifies managing and visualizing intricate connections, ensuring that all relevant information is at your fingertips.
How to Access and Use the Linked Contacts Feature in ClientTether
The Linked Contacts feature in ClientTether allows users to create and manage custom relationships between various contacts. This guide will walk you through accessing and utilizing this feature effectively.
Accessing the Linked Contacts Feature
- Navigate to any Contact List:
- There are many contact lists in ClientTether from the Dashboard, Pipeline or the Contact List from “Contacts” tab at the top menu.
- Open a Contact’s Profile:
- Click on the name of the contact you wish to link with another contact. This action will open the Contact Profile, displaying various tabs such as Contact Info, Whiteboard, History Notes, Text, Email, Event, and more.
Using the Linked Contacts Feature
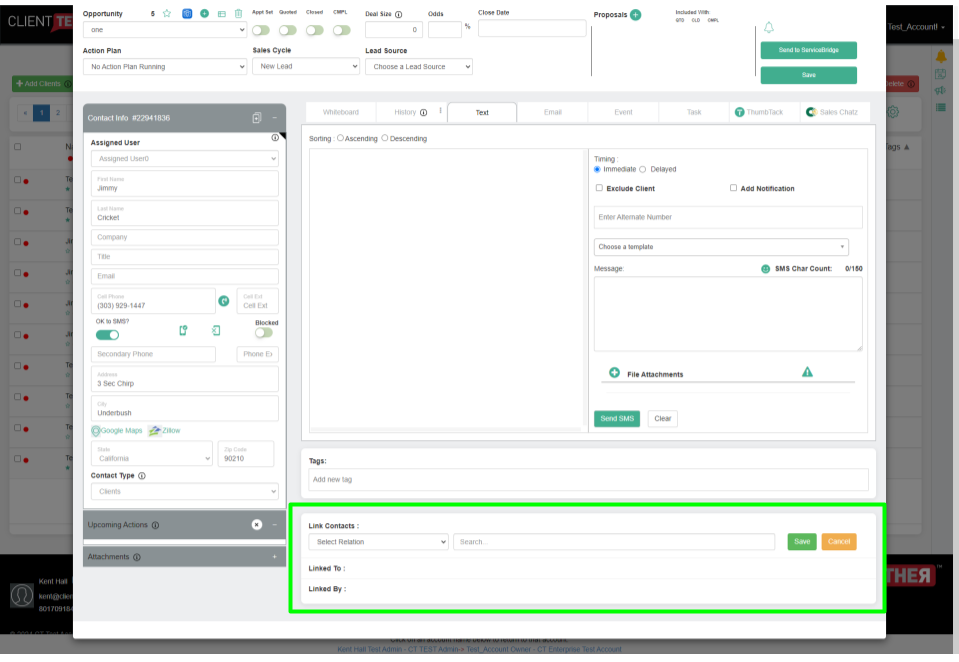
- Locate the Linked Contacts Section:
- Scroll down within the Contact Profile to find the “Link Contacts” section at the bottom of the page.
- Create a Custom Relationship:
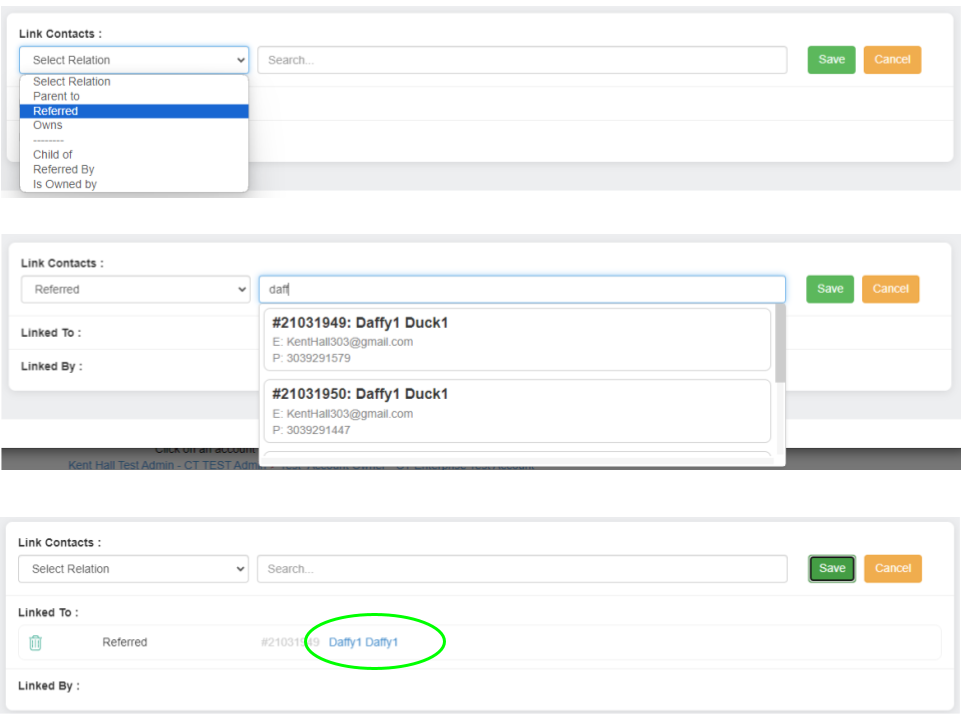
- In the “Link Contacts” section, click on the “Select Relation” dropdown menu to see the available relationship types (e.g., Parent to, Referred, Owns, Child of, Referred By, Is Owned by).
- Search for a Contact to Link:
- In the search bar next to the relationship dropdown, start typing the name of the contact you wish to link. The type-ahead feature will display matching contacts for quick selection.
- Select and Save the Linked Contact:
- Once you find the desired contact, click on their name to select them.
- Click the “Save” button to establish the relationship. The linked contact will now appear in the “Linked To” or “Linked By” field, depending on the type of relationship created.
Managing Linked Contacts
- To follow the linked contact, click on the Contact’s name to open its Profile.
- To delete a linked contact, click the trash icon next to the linked contact entry.
By following these steps, you can effectively utilize the Linked Contacts feature in ClientTether to create, manage, and visualize the relationships within your contact network, enhancing your overall CRM experience.
Creating Custom Linked Types in ClientTether
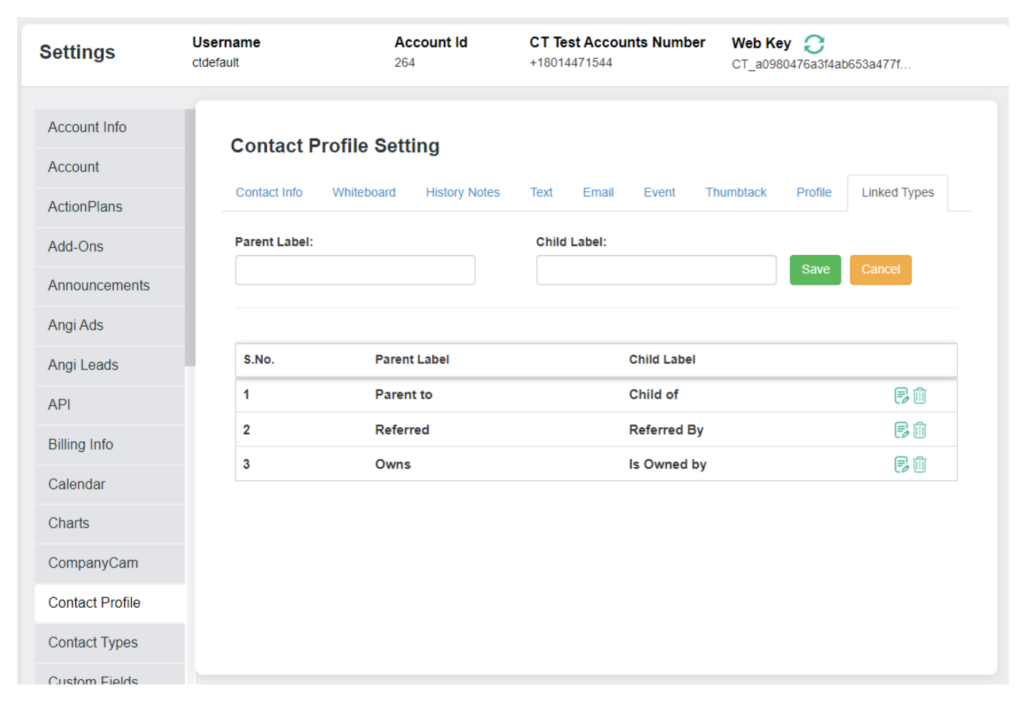
The Linked Types feature in ClientTether allows users to create custom relationships between contacts, tailoring the CRM to match their unique business needs. Follow these steps to create and manage custom linked types.
Accessing the Linked Types Feature
- Navigate to Settings:
- From the ClientTether main menu, mouse over the Hello item in the top right, then click on “Settings”.
- Open Contact Profile Settings:
- In the Settings menu, select “Contact Profile.” This will open the Contact Profile Settings page.
- Go to Linked Types:
- Click on the “Linked Types” tab within the Contact Profile Settings page.
Creating a Custom Linked Type
- Enter Parent and Child Labels:
- In the Linked Types section, you will see two input fields labeled “Parent Label” and “Child Label.”
- Enter the desired relationship type in the “Parent Label” field (e.g., “Parent to”).
- Enter the corresponding relationship type in the “Child Label” field (e.g., “Child of”).
- Save the Custom Relationship:
- Once you have entered the parent and child labels, click the green “Save” button to create the custom linked type.
- If you need to cancel the operation, click the orange “Cancel” button.
Managing Existing Linked Types
- View Custom Linked Types:
- After saving, the custom linked types will appear in a list format below the input fields. Each entry will display the parent and child labels along with options to edit or delete the relationship.
- Edit a Linked Type:
- To edit an existing linked type, click the pencil icon next to the relationship entry. Update the labels as needed and save the changes.
- Delete a Linked Type:
- To delete a linked type, click the trash icon next to the relationship entry. Confirm the deletion if prompted.
By following these steps, you can effectively create and manage custom linked types in ClientTether, enhancing your contact management capabilities and tailoring the CRM to your specific business requirements.
Task Management
July 2, 2024Task Management Basics
- Create a Task for specific Contact
- Include instructions and resources
- Assign a due date
- Assign the task to a User
- Enter a Priority 1 – 5
Tasks extends existing features of ClientTether like Templates and Action Plan Steps, which you should already familiar with. Review those topics if necessary. Let’s start with Templates as a way to assign a common task…
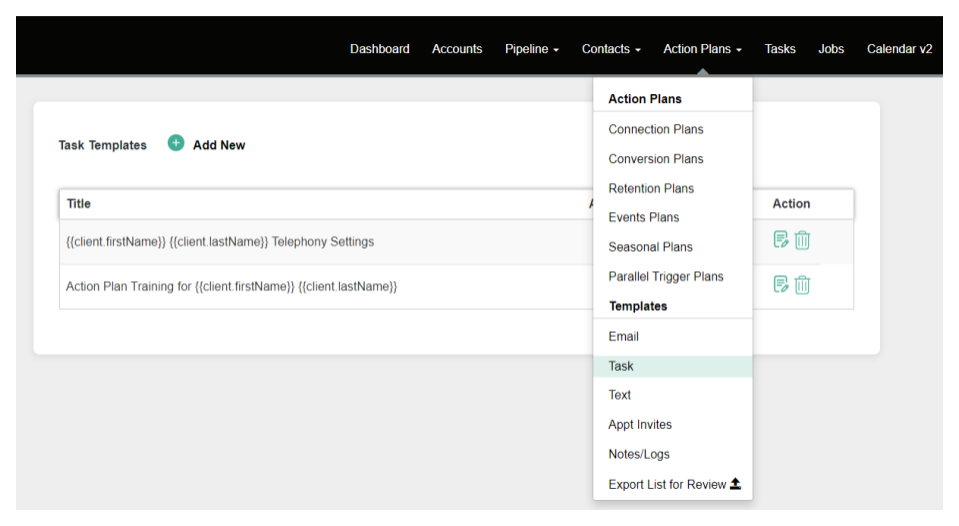
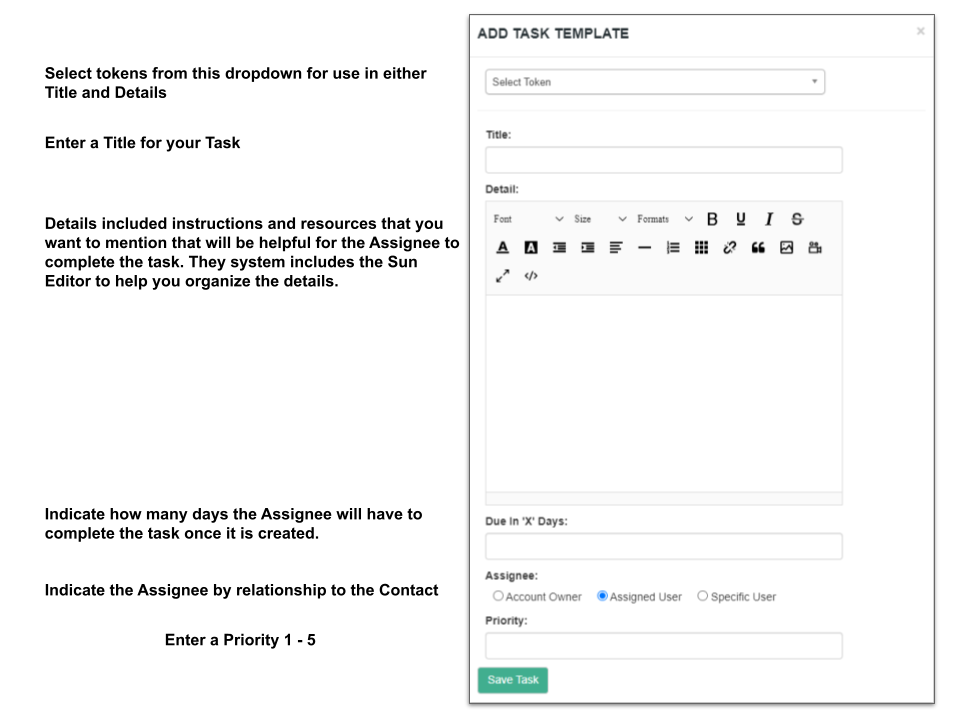
Creating a Task for a Contact
Open any Contact Profile and select the Task Tab (1). Then click on Add New Task (2)
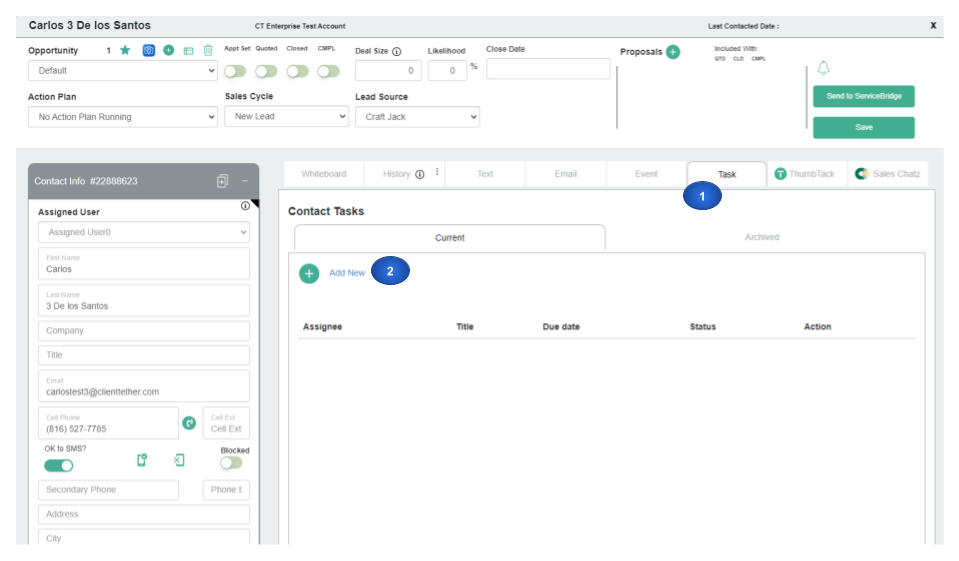
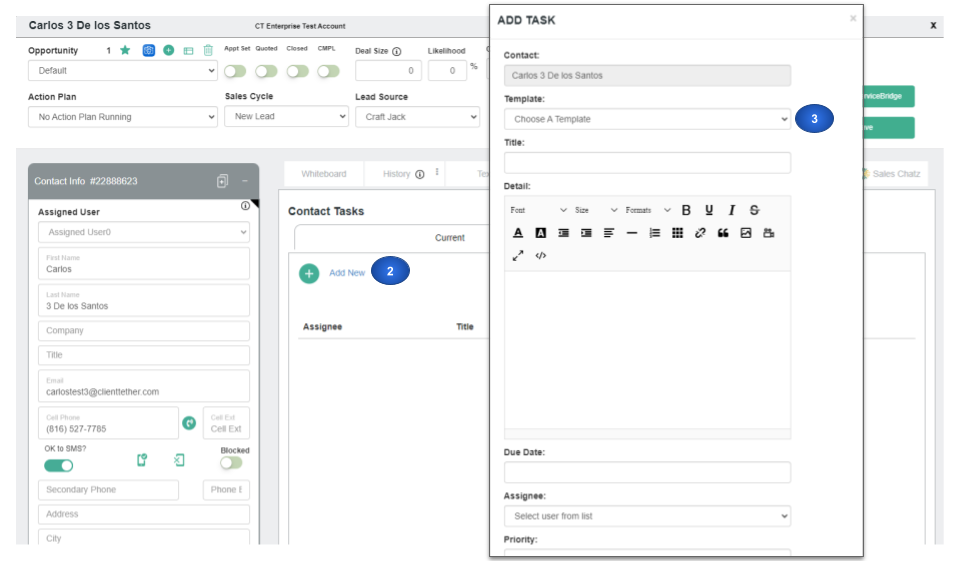
Now you are ready to manually create a unique task or use the Template option to assign a common task.
Create a Task via Action Plans
Action Plans has an Action Step that is very similar to creating a Template. If you are familiar with the Template process the Action Plan Step will be very easy. Action Plans allow the Task step to be auto-assigned and scheduled as needed.
How to Fix: Cannot Make or Receive Calls
June 24, 2024Issue
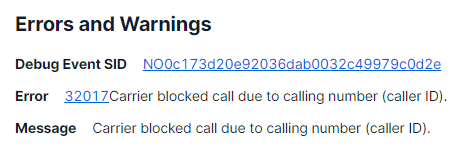
When experiencing issues with making or receiving calls, the error might be related to the carrier blocking the call due to the calling number (caller ID). One common error code associated with this issue is:
Error Code: 32017
Error Description: Carrier blocked call due to calling number (caller ID).
Steps to Verify the Error on Twilio
To verify if the error you’re encountering is this specific one, follow these detailed steps to access the call logs on Twilio:
1- Log In to Twilio
- Open your web browser and navigate to Twilio.
- Log in with your Twilio account credentials.
2- Navigate to the Subaccounts
- Once logged in, click on Accounts from the main dashboard.
- Then, click on Subaccounts to view the list of subaccounts associated with your main account.
3- Filter by Account SID
- Locate the SID of the account experiencing the issue.
- Enter the SID in the search/filter field and click on the Filter button.

4- Access the Specific Account
- Click on the account that appears from the filter results.
5- Navigate to Monitor Section
- In the left-hand sidebar, you will see different tabs such as Develop and Monitor.
- Click on the Monitor tab.
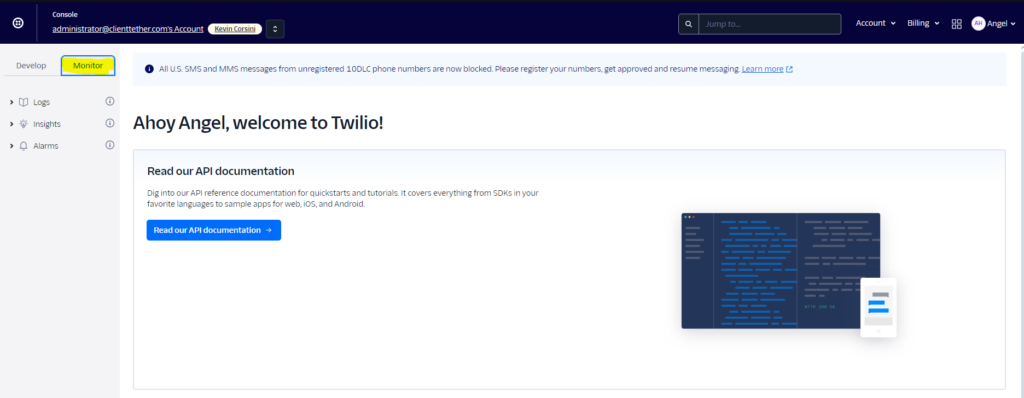
6- Select Logs
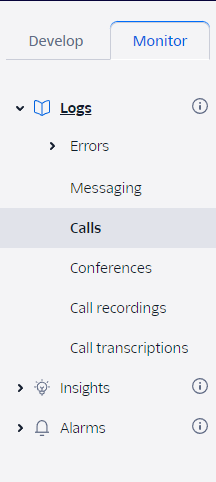
- Under the Monitor tab, you will see three options: Logs, Insights, and Alarms.
- Expand the Logs menu.
7- View Call Logs
- Click on Calls to view all call logs.
- Here, you will see records of all calls, including both successful and failed ones.

8- Identify the Failed Call
- Find a failed call or the specific call you want to inspect.
- Click on the call record to view detailed information.
9- Check Error Details
- On the call detail page, you will see the error code and description if the call failed.
- Look for the error code 32017 which indicates that the carrier blocked the call due to the calling number (caller ID).
By following these steps, you can accurately identify if the issue you’re experiencing is due to the carrier blocking the call. This documentation will help you and your colleagues troubleshoot and address the problem efficiently.
Release Notes May 2024
May 28, 2024- Task Manager
- Block Editor for Email Templates
- Proposal
- Unified Message Center
- Trigger/Condition
- Export using a saved configuration
- Templates
- Log a Call tool tip and save
- BI Reporting Tool
- Files>Replace UI
- Custom Fields: Rank, Hide
- Webhook on Contact Profile Save
- Setting to include History Notes on Duplicate Contact
- Distinct Postal Codes list
- Custom Lead Form end Action Plan and launch a new one
Video Link: Overview
Video Link: Task Management
Video Link: Block Editor Intro
Slide Deck Link: Overview
Share data with AccuLynx
May 2, 2024ClientTether can share Contact data with AccuLynx (and many other endpoints) via webhooks found in Action Plans. In order to create a webhook in ClientTether and send data to AccuLynx you will need an endpoint (required), Authentication Headers (required) and form data to send (required). AccuLynx has published the following in their documentation:
All API Calls [to AccuLynx] require authentication via an API Key. An API Key must be sent with every request. Each individual location within a company needs its own API key.
Obtaining an AccuLynx API Key
Get your API key from your AccuLynx API page. (https://my.acculynx.com/apikeys)
Authorization
Key: authorization
Value: Bearer <your API key>
Use this endpoint for ClientTether webhook https://api.acculynx.com/api/v1/leads
Body Schema JSON
| firstName | string [ 0 .. 50 ] characters First name of the primary contact. Required |
| lastName | string or null [ 0 .. 50 ] characters Last name of the primary contact. |
| companyName | string or null [ 0 .. 100 ] characters Company name for the primary contact. |
| phoneNumber1 | string or null <tel> [ 0 .. 30 ] characters Primary phone number for the primary contact. Phone Cell from CT |
| phoneExtension1 | string or null [ 0 .. 100 ] characters Primary phone extension for the primary contact. Not Included |
| phoneType1 | string (ContactFieldDescription) Enum: “Home” “Mobile” “Work” |
| phoneNumber2 | string or null <tel> [ 0 .. 30 ] characters Additional phone number for the primary contact. Phone Home from CT |
| phoneExtension2 | string or null [ 0 .. 100 ] characters Additional phone extension for the primary contact. Not included |
| phoneType2 | string (ContactFieldDescription) Enum: “Home” “Mobile” “Work” |
| phoneNumber3 | string or null <tel> [ 0 .. 30 ] characters Additional phone number for the primary contact. NA |
| phoneExtension3 | string or null [ 0 .. 100 ] characters Additional phone extension for the primary contact. NA |
| phoneType3 | string (ContactFieldDescription) Enum: “Home” “Mobile” “Work” NA |
| emailAddress | string or null <email> [ 0 .. 100 ] characters Primary email address for the primary contact. Email from CT |
| crossReference | string or null [ 0 .. 250 ] characters Cross reference identifier for the primary contact. NA |
| jobCategory | string (JobCategory)Enum: “Residential” “Repair” “Property Management” jobCategory custom field control. |
| workType | string (WorkType)Enum: “Insurance” “Repair” “Retail” “Warranty” “New” “Inspection” “Service” workType custom field control |
| street | string or null [ 0 .. 250 ] characters Street address of the lead/job. Address from CT |
| street2 | string or null [ 0 .. 50 ] characters Apartment/Suite/Unit/Building of the lead/job. NA |
| city | string or null [ 0 .. 50 ] characters City of the lead/job. City from CT |
| state | string or null [ 0 .. 50 ] characters State, County, Province, or Region of the lead/job. State from CT |
| zip | string or null [ 0 .. 50 ] characters Zip code or postal code of the lead/job.Zip_code from CT |
| country | string or null [ 0 .. 50 ] characters Country of the lead/job. Hard coded US |
| priority | string (JobPriority) Enum: “Normal” “High” “Urgent” jobPriority Custom field control |
| notes | string or null [ 0 .. 1000 ] characters Notes are saved as a comment on the message board of the lead/job.job Notes Custom field control Whiteboard Token |
| salesPerson | string or null <email> [ 0 .. 100 ] characters Login email address of the active user the lead/job should be assigned to. If no email address is provided, the lead will be unassigned. Need some help here for Mapping or should we leave it blank? Leave it blank |
initialAppointmentDate | string or null <date> Date and time of the initial appointment. If no timezone is provided it will default to the Company timezone. If there is an initial Appointment Date and there is no sales Person, the appointment time will be added to the Notes field.Next Appointment date/time. Ours is Z, Format?Wait until after assignments “MAY” be added in CT |
Webhook in ClientTether
Build a Webhook in ClientTether to send data to AccuLynx on demand.
Text Segments – GSM vs non-GSM Characters
April 23, 2024Let’s dive into how SMS messaging works with ClientTether, focusing on GSM vs. Non-GSM characters. Understanding this will help you manage your messages more effectively and enhance the experience for your recipients.
GSM Characters in ClientTether For most of your messaging needs within ClientTether, sticking with GSM characters is your best bet. Here’s why:
- A single SMS can hold up to 150 characters. If your message exceeds this limit, it’s split into chunks of 150 characters each. For instance, a message with 161 characters would be sent as one segment of 150 characters and another with just 11 characters.
- The SMS segments are counted in increments of about 150 characters:
- Up to 150 characters = 1 SMS Segment
- Up to 300 characters = 2 SMS Segments
- Up to 450 characters = 3 SMS Segments
- …and so on.
- Curious about which characters are GSM? Check out this list of GSM characters!
Non-GSM Characters in ClientTether Non-GSM characters are a bit trickier but still supported:
- The character limit per SMS segment drops to 65 characters. Not all devices or networks handle these well, and they might appear as separate messages.
- Here’s how SMS credits tally up with Non-GSM characters:
- 65 characters = 1 SMS Segment
- 150 characters = 2 SMS Segments
- 195 characters = 3 SMS Segments
- …and so on.
- To help you avoid unintentionally using Non-GSM characters, here’s a tool to identify them.
Detecting Non-GSM Characters Great news! ClientTether automatically alerts you if there are Non-GSM characters in your message. If Non-GSM characters are detected, the outline of the text box turns red, the character count adjusts, and an info bubble pops up next to the Message Label with a quick explanation.
If you want to double-check your message for Non-GSM characters before sending, try this recommended Non-GSM Detector and Segment Calculator.
Just so you know, the character counts mentioned include space for headers that specify the encoding system used. Our reporting on character splits gives you a conservative estimate to help you plan your SMS segments effectively.
Happy messaging!