SMTP Email Authentication Guide
March 15, 2024Introduction
In the digital age, ensuring that your emails consistently reach your clients’ inboxes is vital. That’s why we’re providing this guide—our system offers options to help you achieve the highest level of deliverability. While our standard Email Server Authentication using SPF and DKIM is effective for many, integrating SMTP settings offers another path to enhance the reliability and trustworthiness of your email communications. This guide serves as an alterative to our SPF and DKIM authentication methods, providing you with the flexibility to choose the best solution for your unique email needs.
SMTP Authentication
Why Use SMTP?
Simple Mail Transfer Protocol (SMTP) is an industry standard for sending emails. Unlike default mailing methods, using SMTP authentication can significantly improve your email deliverability. It does this by allowing you to send emails through your own SMTP server, which is already authorized to send your domain’s emails. This not only helps deliverability but also keeps emails out of the spam folder.
Setting up SMTP Authentication
Setting up SMTP authentication involves specifying an SMTP server, port number, and the credentials for the email account from which you’re sending emails. This ensures that your emails are sent securely and are seen as legitimate by email providers.
Step-by-Step Instructions
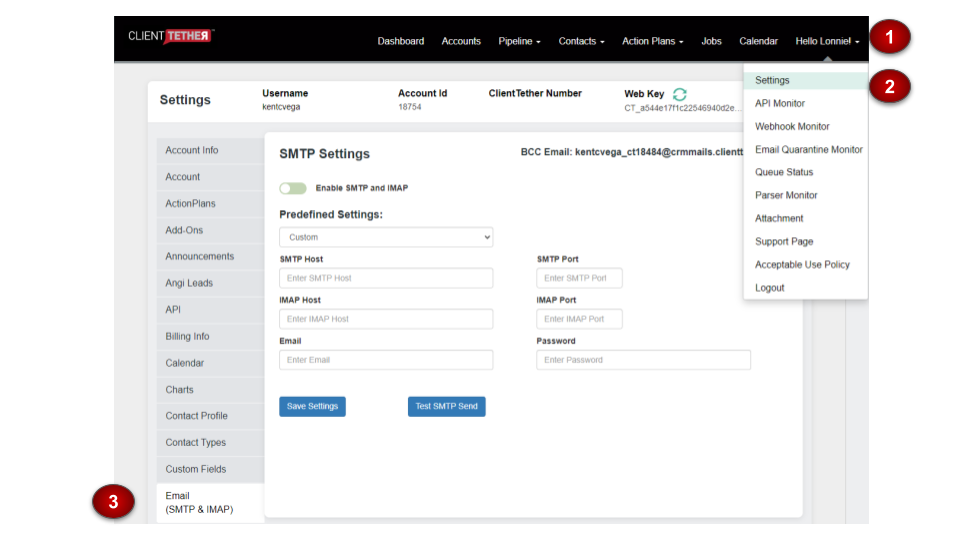
- Access SMTP Settings: Log into your ClientTether Account and navigate to Settings > Email SMTP settings area shown in the images above.
- Predefined Settings: Select a predefined setting if you’re using a common email provider such as Gmail, iCloud, or Outlook. If you have a custom provider or specific SMTP server you wish to use, select “Custom.” If you select Outlook or Gmail, the system will prefill the rest of the information, so all that remains is for you to login to those services. Otherwise…
- Enter Your SMTP Details:
- SMTP Host: Enter the address of your SMTP server.
- SMTP Port: Enter the port number for SMTP (commonly 587 for TLS or 465 for SSL).
- Email: Enter the email address you’re using to send emails.
- Password: Enter the password for your email account.
- IMAP Settings (if applicable):
- IMAP Host: Enter the address of your IMAP server (if different from SMTP).
- IMAP Port: Enter the port number for IMAP (commonly 993).
- Save and Test: After entering your details, click “Save Settings” and then “Test SMTP Send” to ensure everything is set up correctly.
Testing and Verification
Once you’ve saved your SMTP settings, it’s important to verify that emails can be sent and received (if IMAP is set up) correctly. Use the “Test SMTP Send” feature to send a test email to yourself. If it arrives successfully, your SMTP setup is good to go!
Troubleshooting
If you encounter any issues with sending the test email:
- Double-check your SMTP and IMAP settings for any typos.
- Ensure that the email and password are correct and correspond with the SMTP server.
- For Gmail or Outlook make sure you have logged into the correct account.
- Verify that your email provider allows SMTP 3rd party access and that you’ve used the correct server and port.
Conclusion
With SMTP authentication in place, you’re set to achieve reliable email deliverability. This guide complements our SPF and DKIM authentication methods, providing you with comprehensive options to ensure your emails consistently reach their intended targets.
For any additional support or questions, please reach out to your email server provider to verify settings. We are committed to your success and to providing the best tools and support to achieve it.
Job Boards
March 14, 2024Introduction
The Jobs feature is a dynamic addition for Users who have enabled the Proposal V2 feature on our platform. This tool provides an informative overview of active contacts with proposals to facilitate job management tasks. Below you will find more details on how to utilize the various functionalities of the Jobs feature to streamline your workflow.
Accessing Jobs
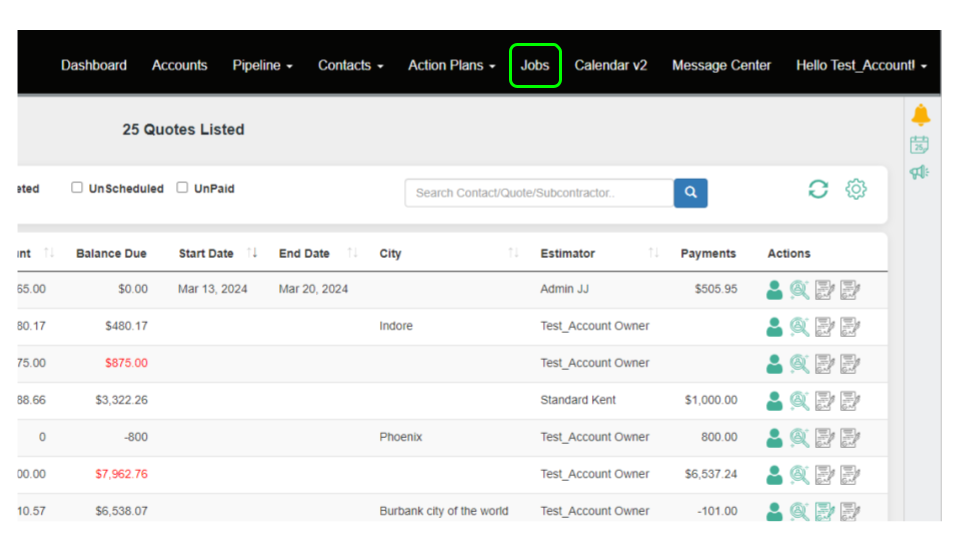
The Jobs feature is located on the main menu of the user interface for those who have the Proposal v2 feature activated. It presents a list of all active contacts with at least one associated proposal.
Utilizing Page Features
Customizing Your View with the Settings Gear
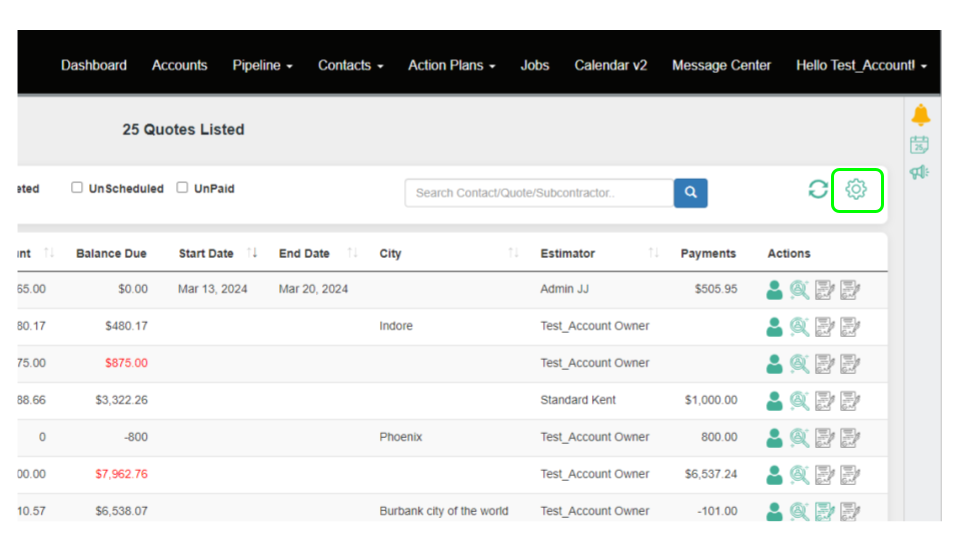
- Click on the Settings Gear icon at the top of the Jobs page.
- From the dialog box, select or deselect the columns you wish to display on your Jobs dashboard. Choices include Quote #, Contact Name, Address, and more.
Applying Filters
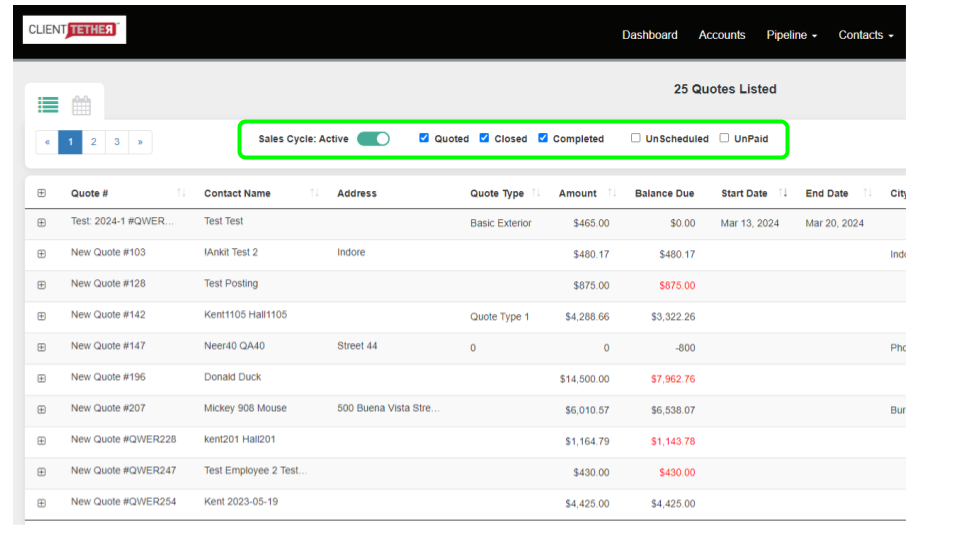
The Jobs feature provides filters to help you manage and view your proposals efficiently:
- Sales Cycle Status Filter: Use the toggles at the top to filter proposals by their sales cycle status: Quoted, Closed, or Completed.
- Additional Filters: Utilize additional filter options to show only proposals that are Unscheduled or Unpaid by checking the corresponding boxes.
Sorting Proposals
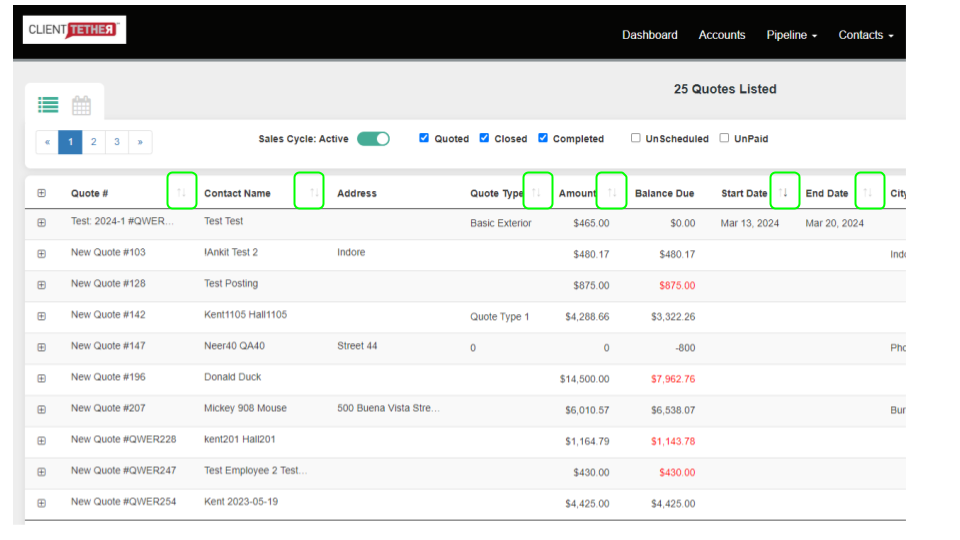
- You can sort the information in most columns by clicking on the column title, which allows for ascending or descending order views.
Managing Proposal Lists over Ten with Pagination
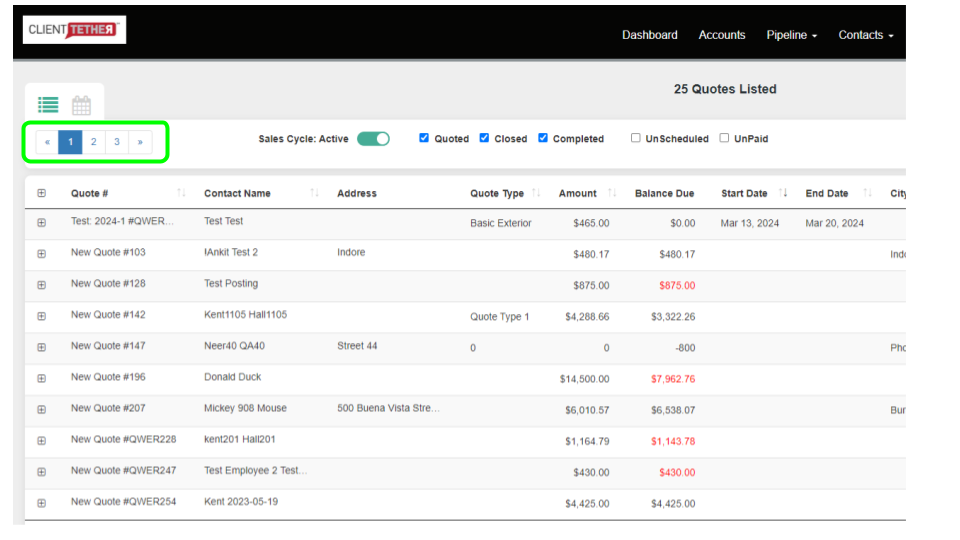
- The pagination feature at the top left of the list allows you to navigate through your proposals efficiently. Lists longer than ten proposals will be divided across multiple pages.
Unpaid
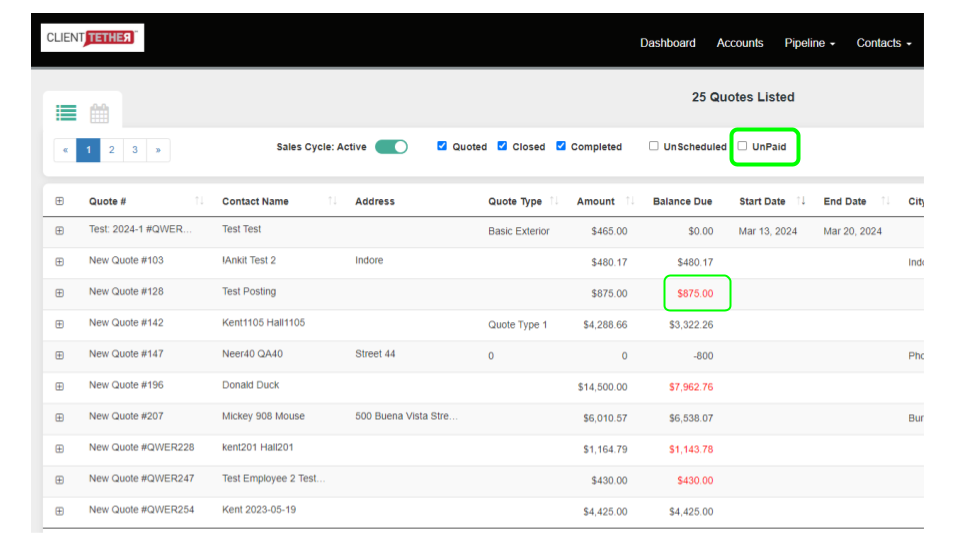
- Unpaid is any proposal with a Balance Due > $0
- Red Balance Due is an Opportunity that is marked as CMPL and a Proposal with a Balance Due
Work Orders Drilldown
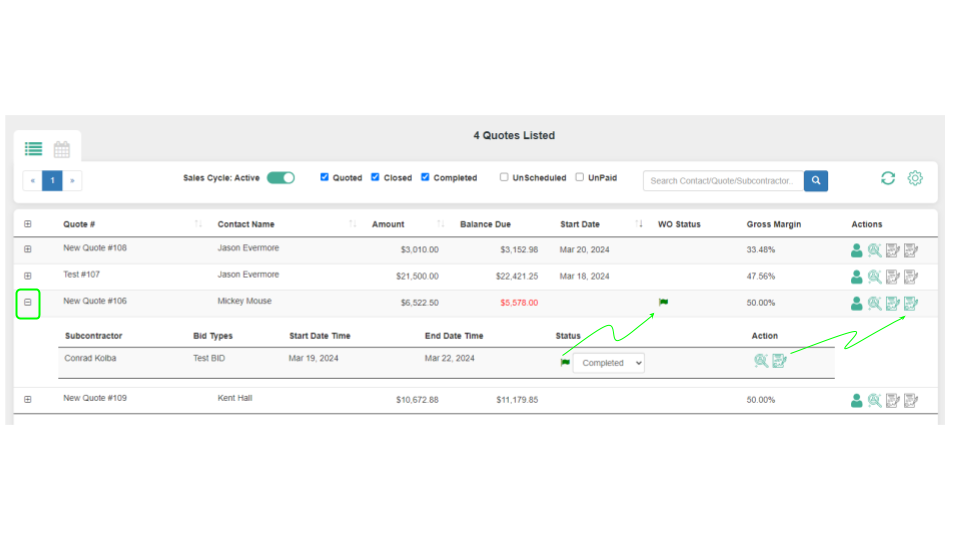
Accessing Work Orders
- If Work Orders are being utilized, you can access them directly from the Jobs dashboard. Click on the associated icon in the “+” icon on the left to open the relevant Work Order Info.
Viewing Work Order Status
- Upon accessing the Work Orders, you will be presented with a list of all work orders assigned to that contact, including each order’s status. This enables quick status assessments and management of multiple work orders.
Accessing Calendar View
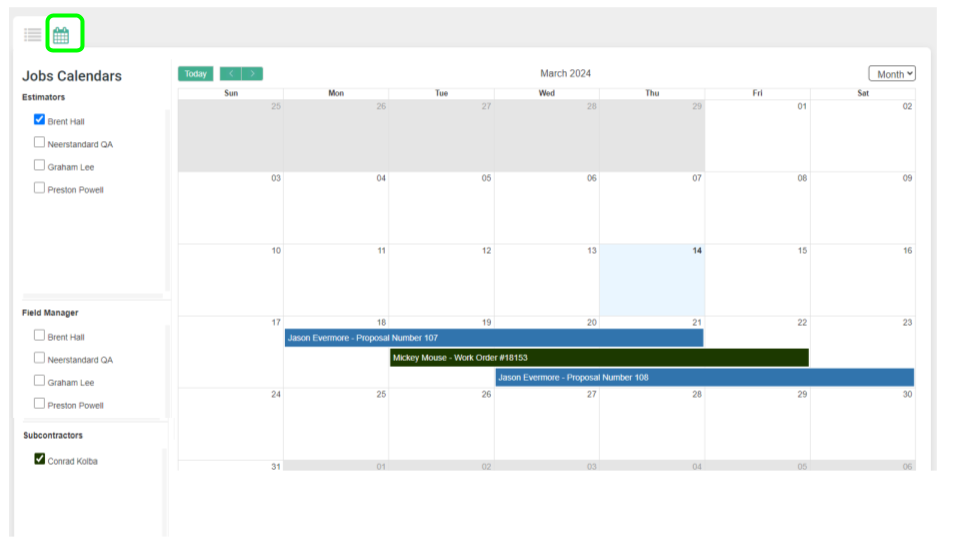
Click the Calendar icon in the top left. Then choose the type of User you want to see on the calendar.
- Estimators, Field Managers and Subcontractors are three types of users to select form.
- Proposal Start and End date are assigned to Estimators and Field Managers
- Work Order Start and End Dates are assigned to Subcontractors
Conclusion
The Jobs feature in Proposal V2 is designed to centralize your project management tasks, improve visibility over your sales cycle, and enhance overall operational efficiency. For further assistance or clarification on how to leverage the Jobs feature to its full potential, please reach out to our customer support team.
Proposals Design and Layout
March 14, 2024Introduction
This support document guides you through the process of using the layout and design controls for creating customized Proposal Long Quotes. These controls allow you to tailor the content and appearance of your quotes to match your brand and address your clients’ needs effectively.
Design Control: CSS Properties Interface
Accessing the CSS Properties
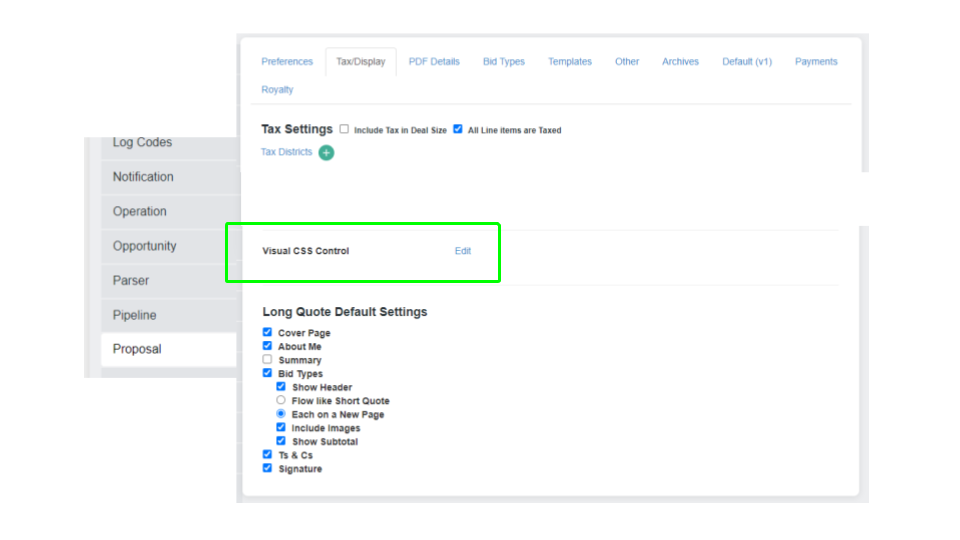
- Go to your Settings > Proposal > Tax/Display
- From here, click on Edit Visual CSS Control.
Modifying Design Elements
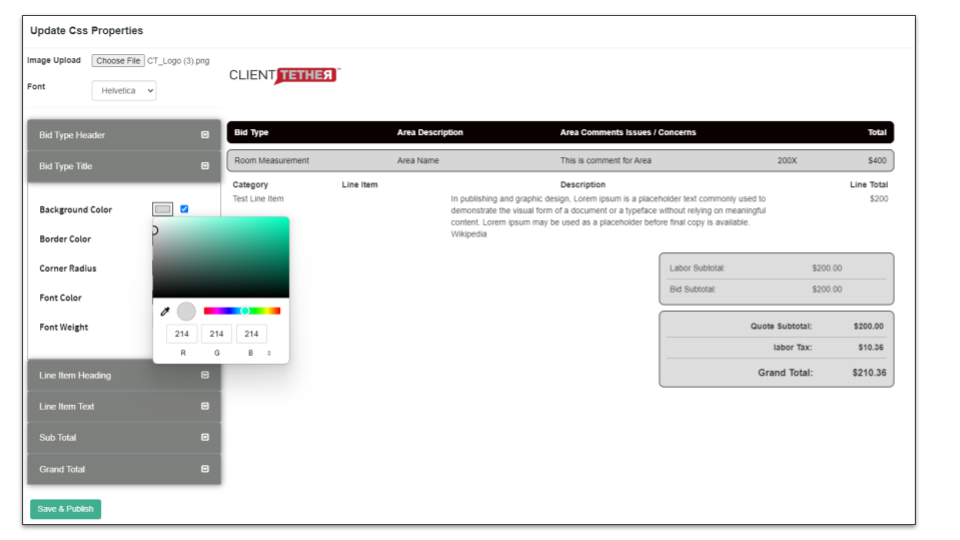
On this page you can do the following:
- Upload an image for the Proposal Header.
- Font: Select your preferred font from the dropdown menu.
- Update the Proposal elements one Section at a time.
- Select Colors and Font Weight to Style the section in your quote.
- Each change will be visible immediately.
Previewing Your Changes
As you adjust design settings, you can preview changes in real-time on the right-hand side of the screen. This immediate feedback ensures your quote looks exactly as intended before saving.
Saving and Publishing
Once you are satisfied with the design:
- Click on Save & Publish.
- Your custom settings will be applied to the entire Long Quote.
Layout Control:
Accessing Selective Page Display
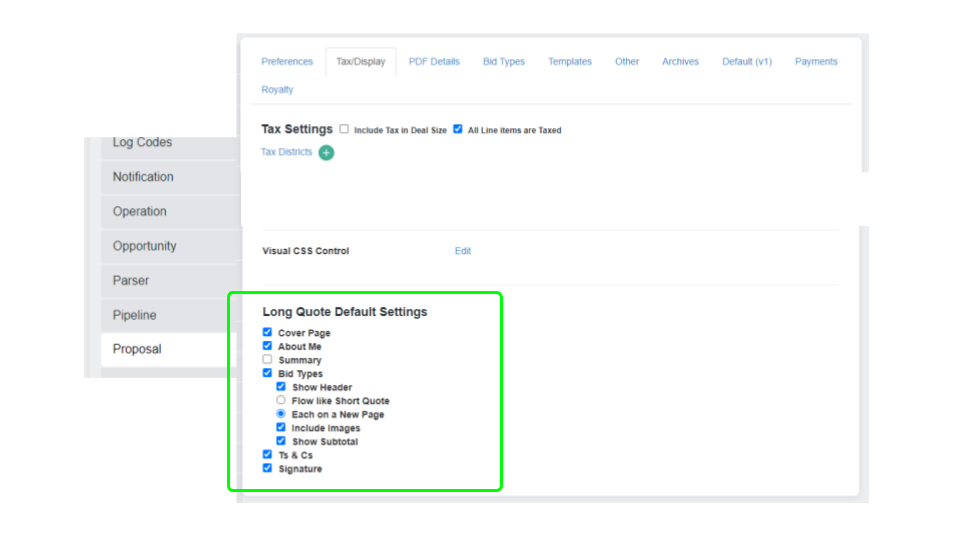
To begin customizing the layout of your Long Quote:
- Go to your Settings > Proposal > Tax/Display
- Near to bottom of the page find Long Quote Default Settings.
Customizing Your Quote Pages Default Display
Setting the Default Display options will affect new proposals only. These default settings are applied to new Proposals. Each proposal has similar feature on the Overview tab for individual control.
- Cover Page: Include a front page for a professional first impression.
- About Me: Share information about yourself or your company.
- Summary: Provide a brief overview of the proposal contents.
- Bid Types: Select to display various bid options.
- Bid Type Flow: The Long Quote starts each Bid Type on a new page. While the Short Quotes starts multiple Bid Types, one right after the other with no page breaks.
- Ts & Cs: Include your terms and conditions.
- Signature: Allow space for signatures.
Check the boxes next to each section to include them in your quote. Making these selections allows you to show the Long Quote the same as the Short Quote.
Conclusion
With these new controls, you can create a Proposal Long Quote that not only delivers your message effectively but also embodies the visual identity of your brand. For any additional questions or support, please contact our customer service team.
Email Server Authentication Guide
March 8, 2024Introduction
This guide provides step-by-step instructions on how to authenticate your email server using SPF (Sender Policy Framework) and DKIM (DomainKeys Identified Mail). These authentication methods are crucial for improving email deliverability and protecting your domain from spoofing and phishing attacks. This guide is an alternative to our SMTP Email Authentication Guide to ensure that our customer have the best option to serve their unique needs
Who Should Use this Guide
If you are using ClientTether’s mg3 server to send email on your behalf, this guide is for you. However, this is highly technical in nature and you might need to contact your email support team to have them complete these authentication instructions, especially when combining with other previously implemented authentications.
Preparing for Setup
First, before adding SPF and DKIM records, check if any existing records are set up for your domain. You can use online tools like MXToolBox to check your current SPF and DKIM records.
Second, gaining access to your domain’s DNS management interface is required, typically available in your domain hosting service’s dashboard. If you do not have access to your domain’s DNS management, contact your email support team.
Adding an SPF Record
What is SPF?
SPF allows email servers to verify that incoming mail from a domain was sent from an email server authorized to do so by you. It’s a way to prevent email spoofing.
Format of an SPF Record
An SPF record is added as a TXT record in your DNS settings. For using our email service, the format will look like this:
v=spf1 include:mailgun.org ~all
If you have an existing SPF record, just add include:mailgun.org to it instead of creating a new SPF record. Ensure not to exceed ten DNS lookups in your SPF record ~all
Step-by-Step Instructions
- Log into your domain hosting service.
- Navigate to the DNS management page.
- Look for an option to add a new TXT record.
- In the TXT record, enter @ in the Host field (if applicable) and the following value:
v=spf1 include:mailgun.org ~all - Save your changes.
Adding a DKIM Record
What is DKIM?
DKIM adds a digital signature to email messages. This signature allows the recipient to verify that the email was not altered after it was sent and confirms the sender’s domain.
Obtaining Your DKIM Key
For our email service, the DKIM key is already provided below. You need to add it to your DNS as a separate TXT record.
Step-by-Step Instructions
- Log into your domain hosting service.
- Go to the DNS management section.
- Choose to add a new TXT record.
- For the Host, enter: pic._domainkey
- And for the Value, enter the following:
k=rsa; p=MIIBIjANBgkqhkiG9w0BAQEFAAOCAQ8AMIIBCgKCAQEAlgB1xR40xdzrPaAsYUzes27TgeTrAgTXdjngNAcGgzziBuBNIxeyEZbV36dOgurgvYFytszBnWDdWgDzGkYihjkEGAOeg7E48WhYSADWVirl+59EAxb/Llu+GGPlOu2zvIFl8rUCbOUKYVeqfV4FxOsrDV9jGAXztypwR5wZ6+C+FoL4VJUmplPL648tJ2viW8NcFTdh4VLyv34xaHrWrwvHrLGa1AHBDt0q9FTUrqTfk7ohM++rpS0MiuZopHyf/W4AEmzC/ZzueuJVXwzTwriSGsabt4i5LMIYZEgT5lvCblB7FBb8vtm2A3XMCyZRT6CxGKUSyI+QDNKlsF4aFQIDAQAB - Save your changes.
Testing and Verification
After adding SPF and DKIM records and giving those records time to propagate, use online tools to verify your setup:
- MXToolBox: Can be used to verify both SPF and DKIM records.
- Google Admin Toolbox: Another useful resource for checking your domain’s authentication settings.
If you encounter any issues, ensure the records are correctly entered and propagated, which can take up to 48 hours.
FAQ
Q: How long does it take for the records to propagate?
A: DNS propagation can take up to 48 hours, but it can be quicker depending on your DNS host.
Q: What if I already have an SPF record?
A: If you have an existing SPF record, add include:mailgun.org to it instead of creating a new SPF record. Ensure not to exceed ten DNS lookups in your SPF record.
Additional Support
Here is a video link that gives examples on how to do the steps listed above. These examples are from a GoDaddy DNS management perspective. Your particular DNS provider will be slightly different.
If you need further assistance, you must contact your own email support team and provide them with this document. ClientTether Support can not implement nor validate your implementation.
Remember there is an alternative option in or SMTP Authentication Guide.
Setting Up DMARC for Enhanced Email Authentication
DMARC (Domain-based Message Authentication, Reporting, and Conformance) is a protocol that works alongside SPF and DKIM to protect your domain from unauthorized use and improve email deliverability. It provides visibility into how your emails are handled by recipient servers and ensures your domain complies with authentication policies.
Why is DMARC Important?
- Protects your domain from being used in phishing and spoofing attacks.
- Ensures emails are authenticated with SPF and/or DKIM.
- Provides reports to monitor email activity and detect unauthorized use.
How to Set Up DMARC
To implement DMARC for your domain, follow these steps:
- Create a DMARC Record DMARC is implemented through a DNS TXT record. Contact your DNS provider or access your domain’s DNS management console to add this record.
- Add the DMARC Record
- Host/Name:
_dmarc - Type: TXT
- Value:
v=DMARC1; p=quarantine; rua=mailto:postmaster@yourdomain.com; ruf=mailto:postmaster@yourdomain.com; fo=1 - Explanation of Key Tags:
v=DMARC1: Indicates this is a DMARC record.p=quarantine: Defines the policy for emails failing authentication:none: Monitor only, no action taken.quarantine: Mark as spam/junk.reject: Reject emails failing DMARC checks outright.
rua=mailto:postmaster@yourdomain.com: Specifies the email address where aggregate reports are sent. Replacepostmaster@yourdomain.comwith your preferred reporting address.ruf=mailto:postmaster@yourdomain.com: Specifies the email address for forensic (detailed) failure reports. Optional.fo=1: Requests reports for all authentication failures.
- Host/Name:
- Set the DNS TTL
- Set the TTL (time-to-live) for the record (e.g., 1 hour or 3600 seconds).
- Save and Test
- Save the record in your DNS management console.
- Use a DMARC testing tool like MXToolbox DMARC Checker to validate your setup.
Recommended DMARC Policy Settings
Start with a monitoring policy (p=none) to gather data without impacting email delivery. Once you are confident in your SPF and DKIM setup:
- Gradually move to
p=quarantineto test enforcement. - Finally, implement
p=rejectfor maximum security.
Monitoring and Interpreting DMARC Reports
DMARC reports provide valuable insights into how your domain is used for email. Here’s what to do with the data:
- Aggregate Reports (RUA):
- These reports summarize email authentication results and identify potential issues with SPF, DKIM, or unauthorized use of your domain.
- Use tools like DMARCian or Postmark DMARC to visualize and analyze the reports.
- Failure Reports (RUF):
- These contain detailed data about individual emails that failed DMARC checks.
- Monitor them closely to detect spoofing or misconfigurations.
DMARC Troubleshooting
If your emails fail DMARC checks:
- Verify SPF and DKIM:
- Ensure your SPF and DKIM records are correctly set up and align with the email-sending service you’re using (e.g., Mailgun).
- Check Alignment:
- DMARC requires SPF and/or DKIM to align with the “From” domain in the email header.
- Contact Support:
- If you need help, contact ClientTether Support for guidance.
DMARC FAQs
- What happens if I don’t set up DMARC? Without DMARC, your domain is more vulnerable to spoofing and phishing attacks. Mail providers may also classify your emails as spam.
- Does DMARC guarantee 100% deliverability? No, but it significantly improves deliverability by ensuring your domain complies with authentication standards.
- Can DMARC be used without SPF or DKIM? No, DMARC relies on SPF and/or DKIM for authentication. Ensure these are set up before implementing DMARC.
By implementing DMARC, you’re taking a crucial step toward protecting your domain and ensuring your emails are trusted by recipients.
Adding a CNAME Record for mg3
To ensure proper email tracking for opens, clicks, and unsubscribes when using the mg3 subdomain with ClientTether, you need to configure a CNAME record in your DNS settings. Follow these steps to set it up:
Add the CNAME Record
Create a new CNAME record with the following details:
- Type: CNAME
- Host/Name:
email.mg3.clienttether.com - Value (Points to):
mailgun.org - TTL: Set this to the default value or
3600seconds (1 hour).
Note: Ensure the
Host/Namefield matches exactly as shown (email.mg3.clienttether.com) to avoid configuration errors.
Save the CNAME Record
- Save your changes in the DNS management console.
- DNS propagation may take a few minutes to 48 hours, depending on your provider.
Why is this Important?
Adding this CNAME record allows Mailgun to:
- Track email opens and clicks.
- Manage unsubscribe requests seamlessly.
- Maintain consistent email tracking across all campaigns sent through
mg3.clienttether.com.
Triggers with Conditions
January 13, 2024Release Notes Jan 2024
January 4, 2024- Bulk Change to a Sales Cycle now updates Milestones
- Action Plan Step – Change Contact Type
- also requires Sales Cycle Setting
- can’t be blank
- Contact Profile – Quarantine Email now shows a reason
- Duplicate lead Accepted now launches Action Plan
- Duplicate leads created from simple lead form has been stopped
- Improvements to Username or Password Reset
- SMTP Settings UX improvement
- Searchable list of Accounts (in more places)
- Searchable list of attachments
- Contact List Search improvements
- Calendars – 2 way sync with new External Calendar Sync
- Franchise Estimate Count Report
- Emailed properly
- Links to raw data
- User Settings
- password changed immediately effects access
- archived user immediately effects access
- Archived User removed from New Lead Email
- Lead Routing – Duplicate Check for Multi-level Accounts to Subaccounts by Round Robin
- Notifications –
- Archive search to include contact name
- View Assigned User in right side panel
- Proposal
- Bid Type Multiplier
- Clear Signature now generates a History Note
- Show more of the Field Header for longer fields
- Block Editor – Cover Page, About Me, Terms and Conditions – Limited Release
- Thumbtack Integration to accept Appointments
- Templates for Notes / Log-a-Call
- Contact Profile
- Quarantine Email – now shows a reason
- Opportunity Count shows above the field
Guideline for Submitting Ideas
January 1, 20241. Ticket Title and Identification
- Title: Concise yet descriptive. Begin with the major area in the ClientTether System that is affected and follow it with a few words to describe the feature.
- Date: Date of creation (YYYY-MM-DD0
2. Overview of the Idea
- Brief Description: A clear summary of what the ides is all about.
- Purpose: Why this idea necessary?
- Scope: Define the boundaries of the change (what is and isn’t included). Is this for “all accounts” or uniquely for your account?
3. System and User Settings
- New Settings: Describe any new settings required. Remember the system is already being used by someone as is. Changing the system most likely introduces a required Setting.
- Modification to Existing Settings: Detail changes to current settings. Where will the Setting be placed.
- User Impact: Explain how users will interact with these settings. Is the setting based on a User or Account level? Is the setting locked at the enterprise and forced up on the Accounts? Is the setting copied to subaccounts?
4. Data Collection and Usage
- Data Fields: What new data will be collected? What type of data is being collected? In what format is the data stored and displayed?
- Justification: Explain the need for this data.
- Usage: How the data will be used (e.g., reporting, system decisions).
- Privacy Compliance: Ensure adherence to data protection laws.
The Idea Journey
January 1, 2024You may have questions about how the Ideas section operates here in the ClientTether community, so we’ve put together a few helpful articles:
How to Create a Great Post in FOUR Easy Steps
The Idea Journey
For this one, let’s take a closer look at The Idea Journey—or how an idea reaches the internal teams here at ClientTether.
First, a visual representation:
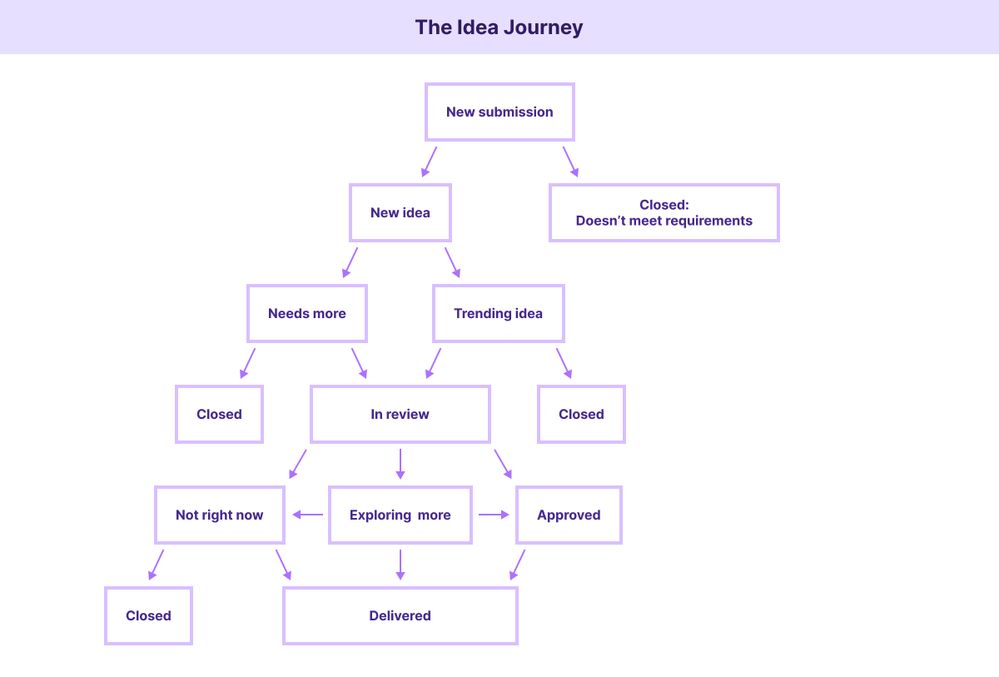
Now let’s break down each of the idea statuses and their definitions.
| Status | Definition |
| New idea | This idea is open to the community for voting and discussion. Every new idea that meets the community requirements is given this status. |
| Closed | This idea doesn’t meet the community requirements. For a refresher on those requirements, click here. |
| Trending idea | This idea has received a great deal of support (a combination of votes and comments) in a short period of time. |
| Needs more | This idea needs more votes before being brought to the team at ClientTether. Consider this a nudge. |
| In review | The ClientTether team is reviewing this idea for potential adoption. Stay tuned for updates. |
| In development | This idea has been approved by the ClientTether team and added to the current roadmap. |
| Exploring more | This idea has been reviewed by the product team, and we want to explore it further (more research and data collection) before deciding next steps. |
| Not right now | This idea is not a fit for us right now, but we will review it again down the road and update the status if accepted. |
| Delivered | Great job all around! This idea has now been delivered. |
But wait, is this the only way my idea will reach the right people? Great question, you! And the answer is, of course not. ClientTether employees will regularly review ideas/feedback based on specific labels & keywords (hint, hint, don’t forget to use those when submitting your ideas).
We hope this clears things up a bit and look forward to hearing more from you 
-The Community Team
Idea Guidelines
January 1, 2024**Heads up: all incoming ideas require initial moderation to make sure they follow these guidelines. Therefore, your idea may not be visible to the community for up to 24-48 hours after posting.**
**Another heads up: if you edit your idea at any time after it has been posted, it will again go through the moderation process before becoming visible. But no worries, all votes and kudos will be restored during that process.**
Welcome to Ideas
A space for sharing, discussing, and voting for ideas to improve ClientTether CRM tools and features.
Ideas will be regularly reviewed by the team at ClientTether for potential adoption. (How? Read this.)
In addition to the Community Guidelines, here are the requirements for submitting to Ideas plus additional information for participating:
Always search first.
Hey, great minds really do think alike! If a similar idea already exists, you can rally around the idea by adding your vote and joining the discussion. That will help your favorite ideas reach the amount of votes needed to be reviewed by ClientTether.
No bug reports or support requests.
Let’s get those to the proper place right away so they can be quickly resolved. Reporting a bug? Go to Bugzilla. Seeking support for performance issues? Visit our Help Center.
One idea per post.
We know you have plenty of great ideas and we want to hear them all! But be sure to submit your ideas individually so they each idea gets the proper attention from other community members and ultimately the internal teams at ClientTether.
Be clear and detailed.
Give your idea a clear title and then provide the necessary details—feel free to also use supporting images and/or videos to explain your feature request. The more information, the better!
Labels are your best friend.
Use labels to clearly categorize your idea. Be specific. If it’s for desktop, select the desktop label. Or if it’s for mobile, select the mobile label and appropriate operating system. You get the picture. Product teams receive reports based on specific labels, so use this step to make your idea easier to find and get in front of the right people.
Please post your ideas in English.
While we recognize that our users speak many languages, English is the official language of the community and also how we communicate internally. As the community grows, we will explore localization efforts.
Note: Submissions that don’t meet the above requirements will be closed to the community.
Bonus Tips
Remember the Idea Journey begins once you submit your idea. Follow along for potential status updates and be ready to respond to comments from other community members.
Kudos equals votes. If you like an idea that has already been posted, give it a kudos ( ) and add your input in the comment section for that idea.
Ready, set, share!
Reload Attachments
December 12, 2023Here are instructions on how to reattach files to your ClientTether account