Proposals: show Bid Type on Invoice
July 13, 2023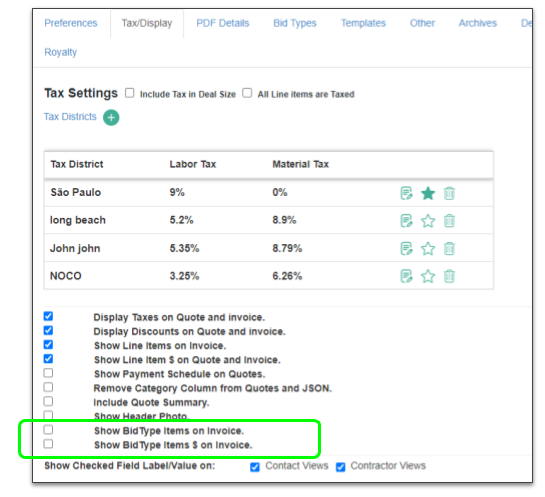
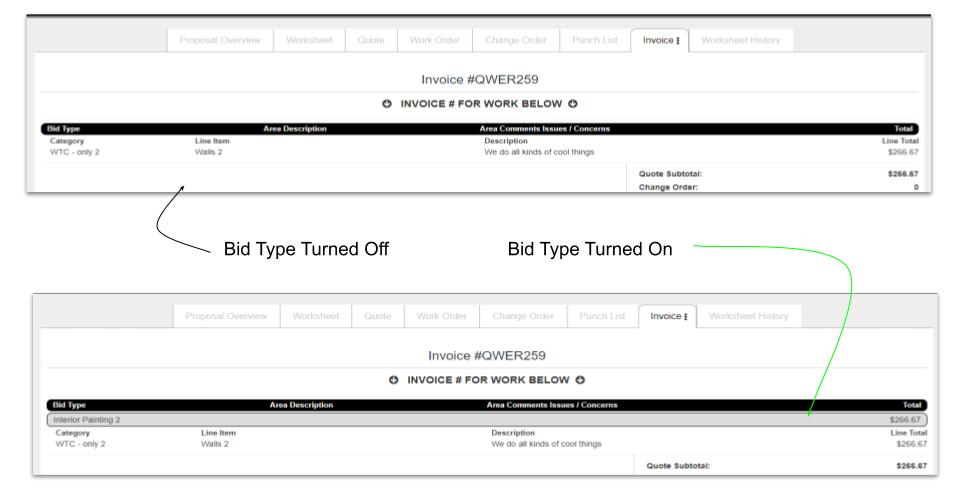
The Proposal system has customizable controls for what components of a Worksheet show on the quote and Invoice. There two controls highlighted here control whether the Bid Type and Bid Type $ shows on the Invoice.
Tokens in Proposal: Terms and Conditions
July 13, 2023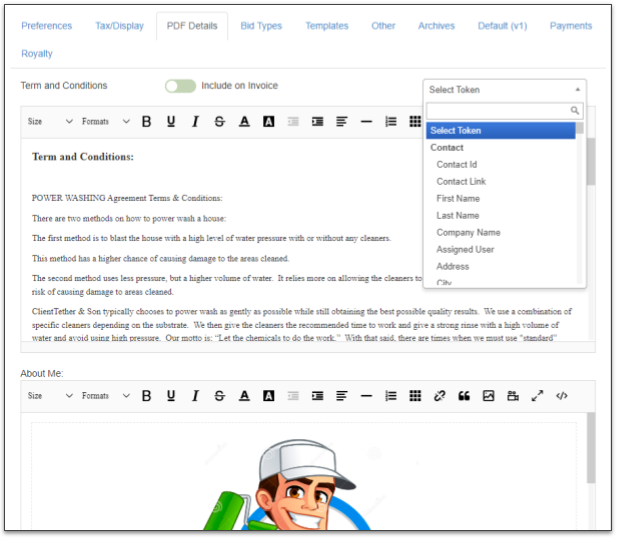
Tokens can be used in Terms and Conditions as well as About Me. This allows you to personalize these components of the Proposal / Invoice.
Multiple Users in one Contact Profile
July 13, 2023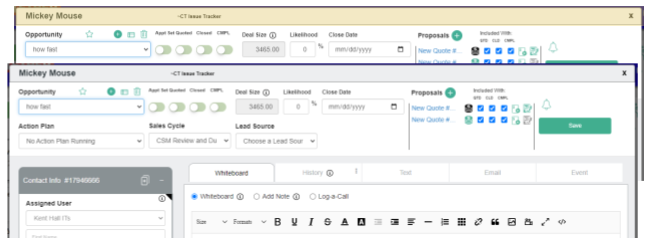
Contact Profile header color will change if multiple Users are in the same one.
Notifications associated with an open Contact Profile will also change color.
In the image example above, the gray header color is normal and the yellow-ish color is the warning that two or more Users have opened the same Contact Profile.
Notifications on Contact Profile
June 29, 2023Accessing Notifications for a specific Contact is easy with the Notification Icon found on the Contact Profile. Please watch this short video
Advanced Filters
June 29, 2023There are many features associated with Advanced Filters… more details needed
Common Custom Fields
ServiceBridge
June 29, 2023Our integration allows you to send Contact data one-way to ServiceBridge on demand from the Contact Profile with the click of a button that shows after this Add-On has been activated. Follow this link to learn how to Activate Add-Ons.

This feature assumes that you already have an account and are familiar with ServiceBridge features. If you have support questions about ServiceBridge, please contact them.
Setup
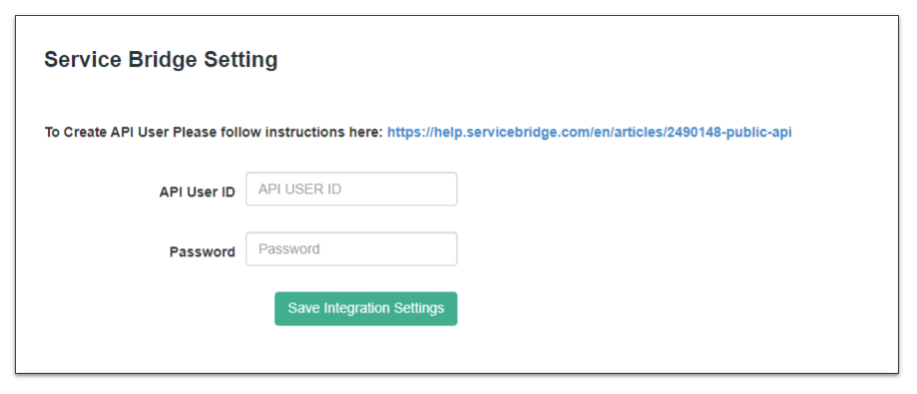
After activating the ServiceBridge Add-On, a new Settings Tab will be made available. Click on that tab and enter the necessary credentials. There is a link included on that page with instructions from ServiceBridge.
CompanyCam Integration
June 28, 2023Unlock the power of visual engagement with our seamless integration between CompanyCam and ClientTether! This innovative partnership transforms your contact engagement by allowing you to effortlessly sync and showcase CompanyCam photos directly within ClientTether’s Contact Profiles and Proposals. Elevate your proposals from good to great by embedding critical visual documentation right where you need it, ensuring that every proposal is both informative and visually compelling.
With our integration, you solve the problem of disjointed communication and improve your project’s narrative, making it easy for clients to see the true scope and quality of your work.
Setting up is a breeze—our step-by-step guide will have you enhancing your ClientTether workflow in no time. Experience a new level of professionalism and efficiency as you manage projects and impress clients with a complete, polished look that stands out in today’s competitive market. Dive into this integration and make the most out of your client engagements and proposals today!
Setup
This integration is an Add-On feature and must be activated before the integration tab will be visible. Please visit the Add-On support page to learn how to activate Add-Ons.
Note: You will need to create an Access Token in CompanyCam to complete this activation.
After CompanyCam integration has been activated, a new Settings Tab will become visible. Click on that new tab to continue with the setup process.
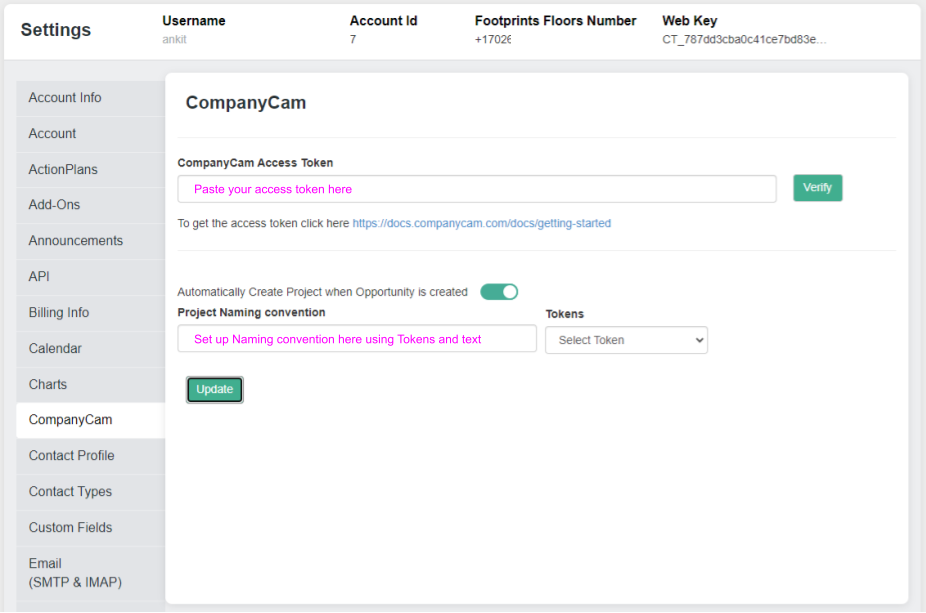
There are two fields in the setup.
1. CompanyCam Access Token: this is a token that you create inside of your CompanyCam account. A link is provided to the documentation from CompanyCam on how to create your Access Token. Please contact them if you have questions on this procedure. Once you have created the Access Token simple copy and paste that value into the first field.
2. Project Naming convention: This is an optional field that can be used to auto-generate Project Names if you choose to create a new project from within ClientTether. Use ClientTether Tokens from the dropdown list to the right or type in some text. For example: if I wanted projects that start in ClientTether to be named with the initials of CT_ and then the address of the property where the work would be done and finally followed by today’s date; then in the Project Naming convention field you would enter:
CT_{{client.address}}_{{tokens.today}}. Remember the tokens will come from the Token dropdown menu t the right. When you select the token by name, the value is copied to the clipboard so that all you have to do is paste into the naming convention field.
Using CompanyCam in ClientTether
After the setup is complete, there are two location where the CompanyCam icon will appear:
1. in the Contact Profile
2. in Proposals on the Overview tab
Each location is independent of each other. Below is a video showing this two locations and how to use them. We assume that you already have a CompanyCam account and know how to use it.
Triggers
May 30, 2023Triggers are a way of extending the automation in ClientTether and they are based on Notifications. If a Notifications is generated then you can tell the system to launch an Action Plan or a Text/Email Template. Not all Notifications are included.
New Meeting Scheduler
May 30, 2023An introductory walkthrough of the two paths the New Meeting Schedule can use to get contacts into your list.
ClientTether Meeting Scheduler Feature Documentation
Overview
ClientTether’s meeting scheduler is designed to optimize your daily schedule by grouping appointments within a reasonable drive time. This ensures that your appointments are efficiently managed, minimizing travel time and maximizing productivity.
Setting Up the Meeting Scheduler
- Accessing the Meeting Scheduler
- Navigate to the “Hosted Page – Add/Edit ” section in your ClientTether Settings.
- You can either create a new meeting schedule or edit an existing one.
- Meeting Details
- Meeting Name: Enter the name of the meeting.
- Description: Provide a brief description of the meeting.
- Appointment Length: Set the duration of the appointment.
- Wrap-up/Drive Time: Specify the time required to wrap up after the meeting and Drive to the next.
- Advance Notice: Choose how much notice you need before the meeting.
- Users: Select the users involved in the meeting.
- Type: Choose the type of meeting location:
- At my office location – Enter an Office Address
- At contact’s location – Enter a Default Address and Zip Code
- At phone-click to call
- Video conference – Enter a Video Conference URL
- Notes Label: Add any specific notes related to the meeting.
- Appointment Theme Color: Select a theme color for the appointment.
- Appointment Font Color: Select a font color for the appointment.
- Optimizing the Schedule
- Drive Time Calculation: The scheduler computes the drive time between appointments to keep them grouped by geolocation. This helps in avoiding long travel times between meetings.
- Wrap-up/Drive Time: Set the wrap-up and drive time to ensure there is enough time between appointments for travel.
- Default Address: Specify your starting address for the day. The first appointment scheduled on a day sets the geolocation for that day, and all subsequent appointments will be arranged around this location.
- Configuring Days and Time Slots
- Expand the “Available Days/Time of Day” section to restrict the days and times offered for appointments.
- This ensures that potential site opportunities are only offered within your available time slots.
Example Scenario
Imagine you are managing a territory in the Denver Metro area, with appointments that could range from Fort Collins to Colorado Springs. The drive time from one end to the other can be over 2 hours. By using ClientTether’s schedule optimizer, you can ensure that your appointments are grouped by location, minimizing travel time and optimizing your schedule.
Basics to Remember
- The first appointment scheduled on a day sets the geolocation for that day.
- All subsequent appointments must work around the initial location.
- Control the drive time by setting the appropriate wrap-up/drive time and default address.
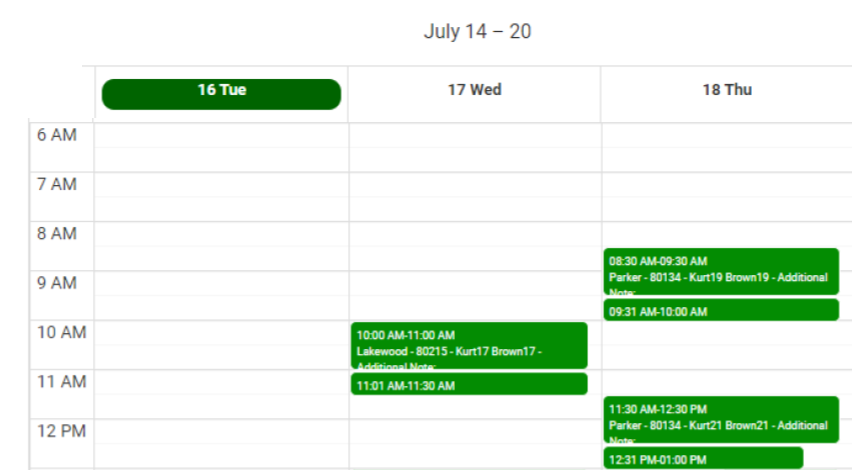
Both the Main Appointment and the Wrap-up/Drive Time will be shown on the Calendar
Filtering for Duplicates
April 20, 2023Filtering is a way of reducing the records in your Client List that you are working with. Finding duplicates is an excellent example.