Setting Tags in Action Steps
September 26, 2024The Tags feature in Action Steps allows you to automatically apply or remove tags to/from contacts as part of an action plan. Tags are useful for categorizing contacts and triggering other automated actions based on their assigned tags.
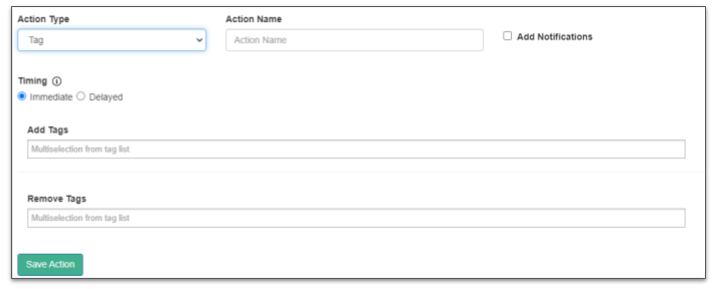
Configuring the Tag Action
- Action Type:
- Select Tag from the dropdown menu to configure tag-related actions. This is essential for adding or removing tags from contacts.
- Action Name:
- Provide a descriptive Action Name. This name should help identify the purpose of the tag action (e.g., “Apply New Lead Tag”).
- Add Notifications:
- Check this box if you would like notifications to be sent when this action occurs. This can be useful for tracking tag changes.
Timing of the Tag Action
- Immediate:
- Choose this option if you want the tags to be added or removed immediately when the action is triggered.
- Delayed:
- If the tag should be applied or removed at a later time, select Delayed and configure the delay settings accordingly (this option will become configurable once selected).
Adding and Removing Tags
- Add Tags:
- In the Add Tags field, select the tags you wish to assign to the contact. This allows you to classify contacts automatically when this action is executed.
- This is a multi-selection field, so you can choose multiple tags from the dropdown.
- Remove Tags:
- Use the Remove Tags field to select tags that should be removed from the contact. This helps keep the contact’s tags updated, removing outdated or irrelevant ones.
- Like the Add Tags field, this also supports multi-selection.
Finalizing the Tag Action
- Once you’ve configured the action type, timing, and tags to add or remove, click Save Action to finalize the step in your action plan.
Release Notes Jan 2024
January 4, 2024- Bulk Change to a Sales Cycle now updates Milestones
- Action Plan Step – Change Contact Type
- also requires Sales Cycle Setting
- can’t be blank
- Contact Profile – Quarantine Email now shows a reason
- Duplicate lead Accepted now launches Action Plan
- Duplicate leads created from simple lead form has been stopped
- Improvements to Username or Password Reset
- SMTP Settings UX improvement
- Searchable list of Accounts (in more places)
- Searchable list of attachments
- Contact List Search improvements
- Calendars – 2 way sync with new External Calendar Sync
- Franchise Estimate Count Report
- Emailed properly
- Links to raw data
- User Settings
- password changed immediately effects access
- archived user immediately effects access
- Archived User removed from New Lead Email
- Lead Routing – Duplicate Check for Multi-level Accounts to Subaccounts by Round Robin
- Notifications –
- Archive search to include contact name
- View Assigned User in right side panel
- Proposal
- Bid Type Multiplier
- Clear Signature now generates a History Note
- Show more of the Field Header for longer fields
- Block Editor – Cover Page, About Me, Terms and Conditions – Limited Release
- Thumbtack Integration to accept Appointments
- Templates for Notes / Log-a-Call
- Contact Profile
- Quarantine Email – now shows a reason
- Opportunity Count shows above the field
Triggers
May 30, 2023Triggers are a way of extending the automation in ClientTether and they are based on Notifications. If a Notifications is generated then you can tell the system to launch an Action Plan or a Text/Email Template. Not all Notifications are included.
Increase Email Open Rates with Video Content – Here’s How to Include Videos.
February 22, 2023Adding videos to emails can bring numerous benefits to your email Templates and Action Plans. Here are some of the key advantages:
- Increased engagement: Videos are a highly engaging form of content that can capture people’s attention and keep them interested for longer. When you include a video in your email, you provide your audience with an immersive experience that can help you stand out from the competition.
- Improved click-through rates: According to research by HubSpot, adding a video to your email can increase click-through rates by up to 300%. This is because videos are more compelling than static images or text, and they can encourage people to take action.
- Higher conversion rates: When people are engaged with your content, they are more likely to take the desired action, whether it’s making a purchase, filling out a form, or subscribing to your newsletter. According to Campaign Monitor, including a video in your email can increase conversion rates by up to 80%.
- Better retention: Videos can help you keep your audience’s attention for longer, which can be particularly useful if you are trying to explain complex concepts or showcase your products or services. By providing an engaging and informative video, you can improve the chances that your audience will remember your message and take action.
- Improved open rates: According to research by HubSpot, adding the word “video” to your email subject line can increase open rates by 19%. This is because people are curious about video content and are more likely to open emails that promise a video experience.
In summary, adding videos to your emails can be a powerful way to increase engagement, improve click-through rates and conversion rates, better retain your audience’s attention, and boost your open rates. With the right approach, videos can help you create a more compelling and effective email marketing campaign.
Building Tokens in URLs
February 20, 2023The expansion of Tokens has lead to an increase of Users asking about how to build Tokens into custom links or URLs inside of ClientTether. We hope the above video will help your understand this feature.
The first step is understanding what data the URL will accept in the form of Key:Value pairs. In our example the Survey Monkey form will accept three Key:Value pairs:
n:Name, dept:Department (or Company in our case) and t:Title
Next you need to know what tokens in ClientTether are going to provide you with the values you desire. In this example it is {{client.firstName}}, {{client.compName}} and {{client.job_title}}.
Then it is just a matter of putting them together to form the URL.