ServiceTitan Add-On Training
June 17, 2026For Client Success Managers and Strategic Account Managers
| Audience | Client Success Managers and Strategic Account Managers |
| Purpose | Enable, configure, and validate the ServiceTitan premium add-on for an individual ClientTether account/location. |
| Security | Never document, email, or screenshot live ServiceTitan secrets or keys. Use placeholders or masked values. |
| Primary workflow | Enable the add-on in ClientTether, connect the matching ServiceTitan app, paste values into ClientTether, save, and test before moving to the next account. |
1. What the ServiceTitan add-on does
The ServiceTitan premium add-on enables ClientTether accounts to share contact, opportunity, and job information with ServiceTitan. It is a standalone add-on and is intended to be configured per location/account when a customer needs the ClientTether-to-ServiceTitan workflow.
- ClientTether can push Customer, Location, and Job records to ServiceTitan.
- Users can send data manually from the Contact Profile, and admins can include ServiceTitan send actions in Action Plans when the add-on is available.
- After a successful push, ClientTether stores ServiceTitan record IDs and the manual send control should no longer allow duplicate manual sends for that record.
- The add-on is separate from existing Dispatch and ServiceBridge integrations.
2. Roles, prerequisites, and access
- ClientTether: The add-on and ServiceTitan settings tab are intended for Level 3+ users/admins. CSM/SAM team members should impersonate or log into the correct account/location using approved internal procedures.
- ServiceTitan: You need access to the customer/location-specific ServiceTitan tenant and the ability to open Settings > Integrations > API Application Access and connect the ClientTether app.
- Use one browser tab for ClientTether and one browser tab for ServiceTitan so you can copy values directly without storing them elsewhere.
- Confirm which account/location you are configuring before copying values. Most values differ by location.
xxxxxxxx-xxxx-xxxx-xxxx-xxxxxxxxxxxx or masked values such as ********.3. Visual reference — sanitized example only
Use the visual below to orient yourself. It is a mock training image and intentionally contains no real customer secrets, keys, tenant IDs, or business unit values.
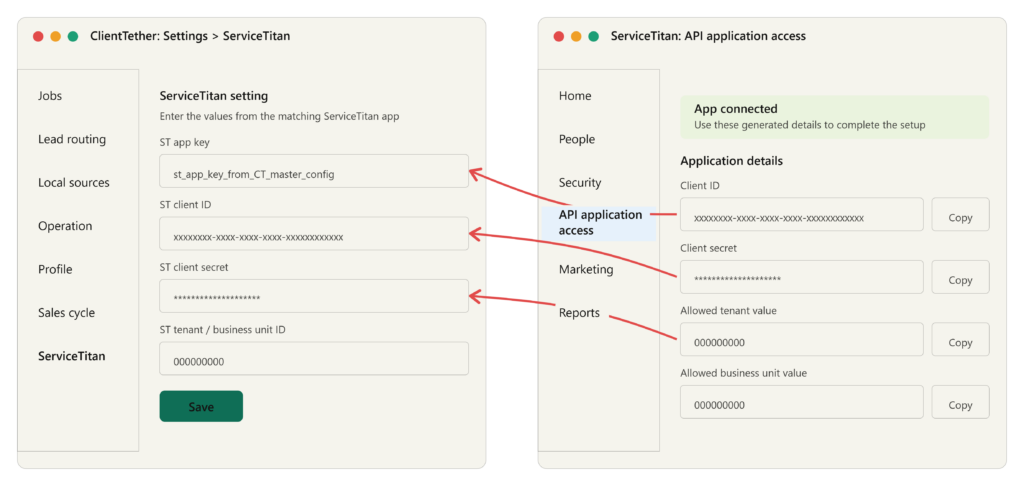
The arrows show which ServiceTitan values populate the ClientTether settings fields.
Phase A — Enable the ServiceTitan Integration add-on
- In ClientTether, open the top menu and go to Accounts.
- Select the target location/account and click Login. Confirm you are in the correct location before continuing.
- Open the user menu in the top navigation: Hello [Name] > Settings.
- Scroll to Add-Ons, open the Premium tab, and click ServiceTitan Integration.
- After activation, confirm ServiceTitan appears as a settings section/tab in the settings navigation.
- Do not move on until the ServiceTitan settings section is visible for the account/location you are configuring.
Phase B — Bridge ServiceTitan and ClientTether
- In ClientTether, stay inside the same location/account and open Settings > ServiceTitan.
- In a second browser tab, open the matching ServiceTitan tenant/location.
- In ServiceTitan, click the gear icon, open Integrations, then API Application Access.
- Connect a new app and select ClientTether. Open the ClientTether integration details once the app is connected.
- Copy the ServiceTitan application values into the corresponding ClientTether ServiceTitan settings fields. Use direct copy/paste only; do not store the values in notes or screenshots.
- Click Save in ClientTether.
- Validate before configuring the next location. A successful test should result in the expected contact/customer/job information appearing in ServiceTitan and the ClientTether record retaining the returned ServiceTitan IDs.
Field mapping cheat sheet
| ClientTether field | ServiceTitan source | Expected value pattern | Notes |
|---|---|---|---|
| ST App Key | ClientTether-provided app key / master config | Do not document live value | May be shared across configured accounts according to internal implementation guidance, but do not publish the actual key in training materials. |
| ST Client ID | ServiceTitan Application Details > Client ID | GUID-like value | Unique to the ServiceTitan app/tenant setup. Copy directly from ServiceTitan. |
| ST Client Secret | ServiceTitan Application Details > Client Secret | Masked/secret value | Treat as a secret. Do not screenshot or paste into documentation. |
| ST Tenant/Business Unit ID | ServiceTitan Application Details allowed tenant/business unit values | Numeric tenant/business unit value | Location-specific. Verify the customer/location before saving. |
7. Testing checklist before moving to the next account
- The ServiceTitan settings section is visible in the correct ClientTether account/location.
- The ServiceTitan app is connected in the correct ServiceTitan tenant/location.
- All required fields save successfully in ClientTether without validation errors.
- A test contact/opportunity/job push succeeds.
- The corresponding record appears in ServiceTitan.
- ClientTether stores the returned ServiceTitan IDs for linkage.
- The manual Send to ServiceTitan button state changes only after a confirmed successful push and does not allow duplicate sends for an already-synced record.
- History notes, Alter-n-Fade messages, or system notifications are checked if a send fails.
Troubleshooting guide
| Issue | Likely cause | What to do |
|---|---|---|
| ServiceTitan settings section is not visible | Add-on not enabled for that account or user lacks sufficient access | Return to Add-Ons > Premium and enable ServiceTitan Integration. Confirm Level 3+ access. |
| Save fails or settings validation fails | Missing or mismatched credentials/tenant values | Re-copy values from ServiceTitan Application Details into ClientTether. Confirm you are using the matching location/tenant. |
| Manual send fails | Incomplete mapping, invalid credentials, API issue, or required field missing | Read the visible error message, check History Notes, and confirm required fields before retrying. |
| Record does not appear in ServiceTitan | Wrong tenant/location or push failed before ST returned IDs | Verify ServiceTitan tenant, search in the correct location, then check ClientTether history/system messages. |
| Manual button is still enabled after a push | ServiceTitan IDs may not have been returned or stored | Do not send repeatedly. Check the record history and escalate with screenshots that mask any secrets. |
| Need help with an unclear account configuration | Customer/location setup is ambiguous | Pause and schedule a working session or escalate to Product/Engineering with sanitized evidence. |
9. Escalation notes for Product/Engineering
- Include the customer/account/location name, the ClientTether account ID if available, and whether the add-on is enabled.
- Describe the step that failed and the exact visible error message. Redact any credentials before sharing.
- Include sanitized screenshots only. Crop or blur any Client ID, Client Secret, tenant ID, business unit ID, app key, and customer-sensitive information.
- For functional defects, note whether the failure happened from an Action Plan send or a manual Contact Profile send.
Private AI Chatbots
November 1, 2023Background
Private AI Chatbots are built on our Hosted Pages platform that allows you to present the same tool to both known-contacts and non-contacts. Please see Hosted pages for more information.
Create
- Open Settings
- Click on Hosted Pages Tab
- Click on Add New
- Fill in the Hosted Pages information
- Fill in the Private AI Chatbot options
- Model: Choose between ChatGPT 3.5 and ChatGPT 4.0
- Temperature: Enter a number from 0 to 2. This sets the range from Fact to Fiction. 0 is all facts and 2 is all fiction. Somewhere in the middle is a happy mix of facts and allowing ChatGPT to talk like a human when writing sentences.
- Prompt: This is where the real magic comes. More on this below.
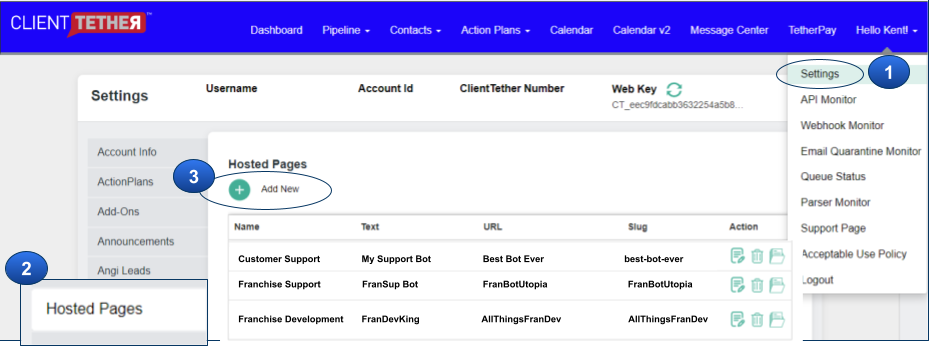
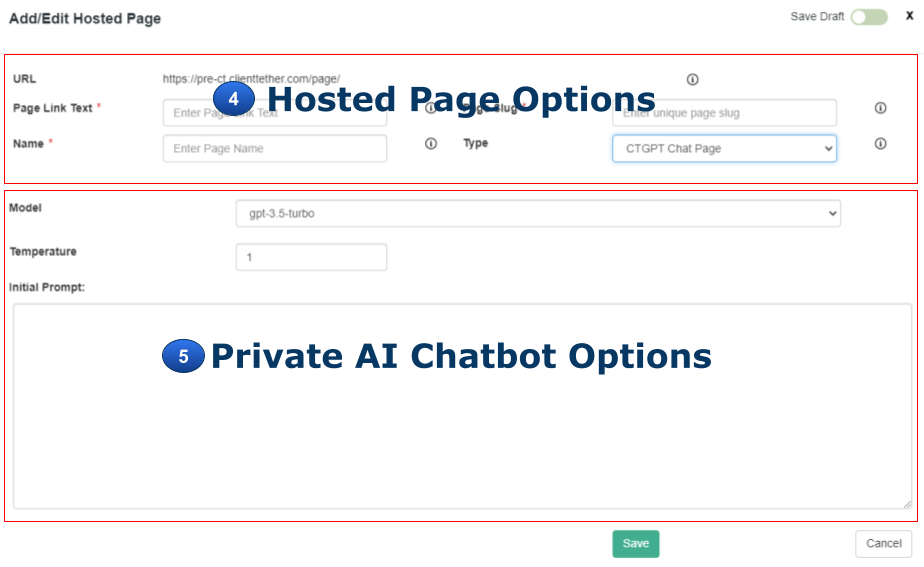
Prompt Engineering is a mix between art and science. Rather than starting a YouTube channel on prompt engineering we are going to give samples of things that have worked. For your bot, you should use all three components listed below.
Prompt Component 1: Role
Your role is a virtual [ Tag: Industry ] expert named [ Tag: Bot Name ] designed to answer questions regarding the industry in general with a focus on [ Tag: Company Name ] located in [ Tag: City, State ]. You are an expert in this field and only represent the Company called [ Tag: Company Name ].
Prompt Component 2: Resources
Resources: Use the following website: [ Tag: website one ] in additional to your general knowledge about the industry.
(You can enter more websites and give reasons for using the knowledge on that page.)
Prompt Component 3: Instructions
Introduce yourself in a [ Tag: tone ] but short manner as if you were [ Tag: Name a well known person ]. Present the guest with the idea that they can ask you question about [ Tag: Industry ]. Share with the guest a couple of common questions they should ask.
Keep the guest focused on the services of [ Tag: Company Name ]. Should the guest inquire about other topics, gently remind them of your focus.
Tag Examples
[ Tag: Industry ] – CRM
[ Tag: Bot Name ] – Clint Tetherford
[ Tag: Company Name ] – ClientTether
[ Tag: City, State ] – Spanish Fork, UT
[ Tag: website one ] – https://ClientTether.com
[ Tag: tone ] – friendly, professional, comical, stern, whimsical, etc
[ Tag: Name a well known person ] – Donkey on Shrek, Kim Garst, Guy Kawasaki, President Abe Lincoln, etc
ServiceBridge
June 29, 2023Our integration allows you to send Contact data one-way to ServiceBridge on demand from the Contact Profile with the click of a button that shows after this Add-On has been activated. Follow this link to learn how to Activate Add-Ons.

This feature assumes that you already have an account and are familiar with ServiceBridge features. If you have support questions about ServiceBridge, please contact them.
Setup
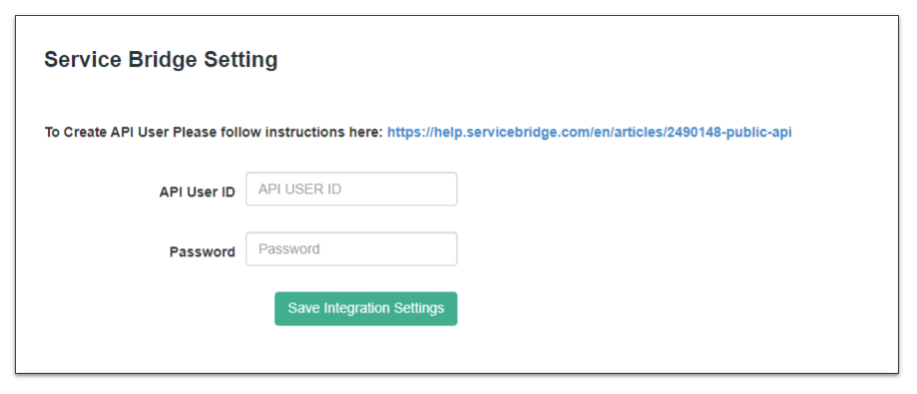
After activating the ServiceBridge Add-On, a new Settings Tab will be made available. Click on that tab and enter the necessary credentials. There is a link included on that page with instructions from ServiceBridge.
CompanyCam Integration
June 28, 2023Unlock the power of visual engagement with our seamless integration between CompanyCam and ClientTether! This innovative partnership transforms your contact engagement by allowing you to effortlessly sync and showcase CompanyCam photos directly within ClientTether’s Contact Profiles and Proposals. Elevate your proposals from good to great by embedding critical visual documentation right where you need it, ensuring that every proposal is both informative and visually compelling.
With our integration, you solve the problem of disjointed communication and improve your project’s narrative, making it easy for clients to see the true scope and quality of your work.
Setting up is a breeze—our step-by-step guide will have you enhancing your ClientTether workflow in no time. Experience a new level of professionalism and efficiency as you manage projects and impress clients with a complete, polished look that stands out in today’s competitive market. Dive into this integration and make the most out of your client engagements and proposals today!
Setup
This integration is an Add-On feature and must be activated before the integration tab will be visible. Please visit the Add-On support page to learn how to activate Add-Ons.
Note: You will need to create an Access Token in CompanyCam to complete this activation.
After CompanyCam integration has been activated, a new Settings Tab will become visible. Click on that new tab to continue with the setup process.
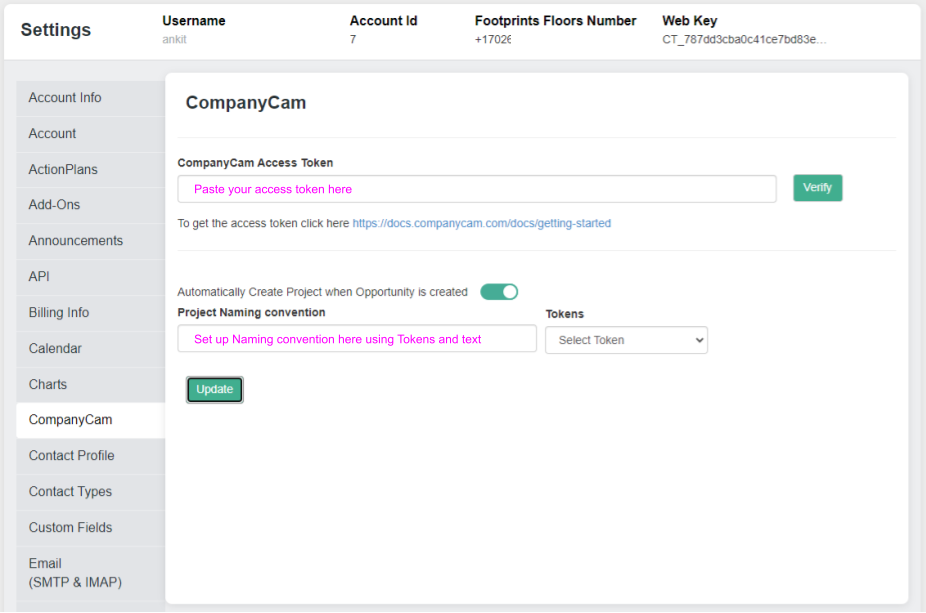
There are two fields in the setup.
1. CompanyCam Access Token: this is a token that you create inside of your CompanyCam account. A link is provided to the documentation from CompanyCam on how to create your Access Token. Please contact them if you have questions on this procedure. Once you have created the Access Token simple copy and paste that value into the first field.
2. Project Naming convention: This is an optional field that can be used to auto-generate Project Names if you choose to create a new project from within ClientTether. Use ClientTether Tokens from the dropdown list to the right or type in some text. For example: if I wanted projects that start in ClientTether to be named with the initials of CT_ and then the address of the property where the work would be done and finally followed by today’s date; then in the Project Naming convention field you would enter:
CT_{{client.address}}_{{tokens.today}}. Remember the tokens will come from the Token dropdown menu t the right. When you select the token by name, the value is copied to the clipboard so that all you have to do is paste into the naming convention field.
Using CompanyCam in ClientTether
After the setup is complete, there are two location where the CompanyCam icon will appear:
1. in the Contact Profile
2. in Proposals on the Overview tab
Each location is independent of each other. Below is a video showing this two locations and how to use them. We assume that you already have a CompanyCam account and know how to use it.
SendJim Add-on
December 13, 2022SendJim is a direct mail delivery system that makes Direct Mail a breeze. And now it is custom Add-on available in your ClientTether. BEFORE using this feature in ClientTether you must have an account with SendJim also.
To learn more please watch this video: