Event Tab
November 16, 2020Overview
This tab allows you to schedule three types of events:
- Call (An automated, scheduled call)
- Contact Reminder
- Next Appointment
You can schedule one of these events by
- Selecting the Event in the event Type drop down menu
- Decide if you would like to activate a Manual Type Event Plan from that drop down menu
- Select if you want a notification when it is time for the event by Checking the Add Notification Box.
- Select the Start Date-Time
- If you are scheduling a Appointment you will need to select End Date-Time
- Make sure you click the Correct Date on the Calendar.
- If you are Scheduling an appointment you can invite people by email.
- It does not automatically invite the client so you would need to put the client’s email in to that field.
- Type in any notes that would be beneficial for the event. All invitees will see the notes.
- If it is an Appointment you will have to select who it is assigned to from the drop down menu. This selection will put the appointment on their ClientTether calendar.
- Click
- The Event will appear in the upcoming actions section of the contact profile
After scheduling an Appointment, they often get changed. The system allows you to easily edit and update all the reminders associated with the Manual Event Plan.
NOTE: If a User has a pending appointment and the contact’s information: Name, address, phone and or email are edited, then that information is automatically synchronized into the Appointment information.
Recur360
November 13, 2020Overview
Recur360 allows you to integrate your ClientTether proposal system with QuickBooks.
Recur360 simplifies your to do list by
- Recording payments documented in ClientTether to your Quickbooks account
- Updating payments received in Recur360 to your ClientTether Proposal and Quickbooks
- Allowing you to collect payments in Recur 360 with push of a button in your proposal system.
This feature is not available to all accounts in ClientTether. If you would like access to it, please reach out to your Client Success Manager and Recur360.
You will need to coordinate with Recur360 and provide them with the information they need to set you up for this integration on their side. They will most likely need your:
- X-Access-Token
- Names/Ids for your Sales-Cycles
Topics
- Turning on Recur360/Quickbooks/ClientTether Integration
- Recur360/Quickbooks/ClientTether Integration in depth
- Turning on Recur360 Payment Collection
- Utilizing Recur360 Payment Collection
Turning on Recur360/Quickbooks/ClientTether Integration
- Set up Recur360 Account*
- Make sure Recur360 is linked to Quickbooks Online*
- Go to ClientTether Settings
- Go to API Tab
- Copy Web-Key for Account
- Go to Recur360 Settings
- Go to ClientTether
- Paste in Web-Key
Information will now flow Automatically from ClientTether to Quickbooks via Recur360.
*Please note for these steps you will need to directly coordinate with Recur360
Recur360/Quickbooks/ClientTether Integration in depth
Data Flow
This integration allows you to create your clients and proposals one time in ClientTether and Recur360 will move that information into Quickbooks for you.
The begining of this process happens when Recur360 automatically syncs with ClientTether every 6 hours. If you need it to sync more than that you can manually trigger the sync from within Recur360 at anytime.
When Recur360 Syncs with ClientTether it checks the Sales Cycles and Payments in Proposals. With each sync the following will be completed:
- When a client is in the Sales Cycle Step used to indicate you have created a proposal:
- Recur360 uses the client information from ClientTether to create a customer in QuickBooks
- Recur360 will also create an estimate in QuickBooks based on the proposal details in ClientTether.
- When a payment has been added to a proposal in ClientTether:
- Recur360 will add that payment as an Unapplied Payment to the existing customer in Quickbooks.
- When the Sales Cycle Step reflects the job is complete
- Recur360 will create an invoice in QuickBooks based on your proposal in ClientTether for the customer
- All Unapplied Payments from the customer for that invoice will automatically be applied to that invoice.
Automated Royalty Fee Collection
All payments entered in ClientTether or made directly through Recur360 are automatically tracked for you.
All franchisees are charged their royalty fee automatically, daily. This will cover all payments they have recieved for the past 3 day waiting period.
A check will automatically be written in the Franchisee’s Quickbooks Online file for the correct Royalty amount.
Recur360 Reporting
All franchisees will be able to see an audit log, within Recur360, of all data sent from ClientTether to Quickbooks Online.
Meanwhile, the franchisor will have a Royalty Fee collection report listing all pertinent details.
Turning on Recur360 Payment Collection
Once you are in the Add-Ons tab in your Settings, there are two simple steps to activating this feature.
- Check the box next to Recur360
- Enter your Unique Key from Recur360
Utilizing Recur360 Payment Collection
- Go to Proposal Overview Tab
- Click Recur360 Button
- In Recur360 window, enter in all payment information
- Once you have collected the payment in Recur360, it will automatically update the proposal with a record of the payment.
- If you don’t see the record refresh the proposal page.
Mailbox Power
November 6, 2020Overview
Mailbox Power is a robust partner platform that allows our clients to send automated marketing materials directly to their clients’ physical mailbox as part of an Action Plan within ClientTether.
Using the Mailbox Power add-on as part of your action plans, you can now send personalized gifts such as:
- Cards
- Drinkware
- Food
- Pet Gifts
- Personalized Boxes
- Gift Cards
- etc.
as an action step within your action plans.
When setting up your account with Mailbox Power please make sure you select a package that gives you access to third party integrations.
Topics
Turning on the Mailbox Power Add-On
- Make sure you have an active Mailbox Power Account
- If you need to sign up click here
- If it asks for an invite code use: CT2020
- Get your Mailbox Power API Key
- While you are logged in to Mailbox Power click on the settings Icon in the top right corner
- Then Click on the ClientTether Logo under the Integrations section
- Copy your API Key
- If no API Key appears please click the “Generate a new API Key” button
- Log in to ClientTether and go to settings
- Go to the Add-Ons Tab
- Check the box next to Mailbox Power
- Paste your API Key into the field Next to the Mailbox Power logo.
Utilizing Mailbox Power in Action Plans
- Go to Action Plans
- Select the Action Plan to which you would like to add a Mailbox Power step.
- Add a new Action Plan step
- For Action Type select Mailbox Power
- Give the action step a name
- Select if you want a notification
- Select the action timing (NOTE: These items usually take a business day or two to process and ship, and shipping can take a few business days as well. Keep this in mind as you plan how to use these steps in conjunction with texts and emails that deliver immediately when scheduled)
- Select Mailbox Power Contact list which will activate the set campaign.
- Please make sure that in Mailbox Power you have assigned you contact group(s) to trigger the correct campaigns. Click here and watch “How to Manage Campaign Recipients” to learn how to assign contact groups to campaigns.
- We have found it is most effective to name the contact group the same as the action plan it triggers.
- If you do not have any campaigns Click Here, and watch “Campaigns” to Learn How to build them
- FYI – Mailbox Power was formerly known as Banner Season and Rocket Notes
- Please make sure that in Mailbox Power you have assigned you contact group(s) to trigger the correct campaigns. Click here and watch “How to Manage Campaign Recipients” to learn how to assign contact groups to campaigns.
- Click
Enterprise Settings
November 6, 2020Enterprise Settings is available to the Enterprise Account Owner and Admins.
This portion of the account settings options allows the Enterprise Account Owner to maintain brand consistency, sale cycle, lead source, proposal template, and contact deletion consistency across all sub accounts. Our Franchisor and Dealer clients use this setting frequently to ensure data integrity across their national brands.
Remember that locking the lead source at an enterprise level will restrict franchisees or other sub accounts from adding their own lead sources to their accounts. This can restrict some flexibility at the local level that you may need to allow.
If you will be using ClientTether to track your Royalty reports, please note that you can adjust Royalty rates and Marketing Fees in this area of the account settings.
A Special Note on Sales Cycle
If you lock a sales cycle it will only lock the sales cycle for the Accounts directly under you.
It will not lock the sales cycle for accounts that are sub accounts for other accounts in your system.
It will not lock the sales cycle for other accounts that are the same level as you.
Accessing Settings
- Login to your account and navigate to the settings menu.
- Select Enterprise from the settings menu on the left-hand side.
Enterprise Sub-Account Settings
The Enterprise Sub-Account Settings section allows administrators to lock specific features and set permissions for sub-accounts.
Lock Features
Check the boxes next to the features you want to lock, preventing users from making changes to these items:
- Logo
- Tags
- Log Code
- Sales Cycle
- Custom Field
- Action Plan
- Delete Clients
- Lead Sources
Note: Checking these boxes will enforce the use of enterprise presets for all.
Subaccounts Creation
Enable or disable the ability for subaccounts to create their own settings for the following:
- Action Plans
- Log Code
- Lead Sources
Reset Password Days
Set the number of days after which users will be required to reset their passwords. Max setting is 180 days.
Contact Export Permissions
Control the ability to export contact lists based on user levels:
- Admin User
- Standard User
- Salesperson User
Steps to Adjust Permissions:
- Locate the Contact Export Permissions section.
- Use the toggle switches to enable or disable the export permission for each user level.
Tokens
October 29, 2020Overview
Tokens are predefined values that allow the system to auto fill specific data from the Contact Profile, such as the Contacts first name, your Company Name, etc. when emails or text/SMS messages are launched from the account.
Tokens are accessible for use in emails and texts/SMS messages in Action Plans, templates, and group messages (features of Contacts).
Explanation to Token Types
- Contact Tokens
- These Tokens pull information specific to the Contact Profile and include data such as the Contacts First Name.
- Common Custom Field Tokens
- These Tokens pull information from the Custom Fields added within the Account for Contact Profiles.
- Hosted Pages Tokens
- These Tokens are linked to the Account’s Hosted Pages created within the Settings menu.
- External Integration IDs
- These Tokens link to External Integrations established within the account.
- Custom Option Tokens
- This Token provides a Custom data entry.
- Logged in User
- These tokens will pull information for the Assigned or logged in User for the account.
- Account
- These Tokens pull data from the Account Info tab within the Settings menu such as Company Name and Account Owner.
- Appointments
- This Token pulls data from the scheduled Event/Appointment created within the Contact Profile.
- Proposals
- This Token links to the Contacts Proposal information.
- Current Date-Time
- These Tokens pull data from the Event/Appointment created within the Contact Profile.
Complete List of Available Tokens
- Contact
- Contact ID
- First Name
- Last Name
- Company Name
- Address
- City
- State
- Zip Code
- Home Phone (Secondary Number)
- Cell Phone (Primary Number)
- Job Title
- Deal Sized
- Deal Closed
- Age
- Education
- Gender
- Lead Source
- High Net Worth
- Home Owner Status
- Household Income
- Length of Residence
- Market Value
- Marital Status
- Occupation
- Presence of Children
- Presence of Pets
- Anniversary 1
- Anniversary 2
- Clients Date Last
- Clients Date Next
- Payment
- Filled with last Payment entered in Payment History
- Whiteboard
- Filled with all information currently on whiteboard.
- Action Plan
- Assigned User
- Close Date
- Contact Link
- Contact Type
- Created Date
- Opportunity Name
- Sales Cycle Name
- Sales Cycle ID
- Star Icon
- UTM Source: Identifies which site sent the traffic, e.g., google, newsletter, or facebook.
- UTM Medium: Describes the marketing medium used, such as email, cpc, or social.
UTM Campaign: Defines the specific campaign name or promotion.- UTM Term: Used to track paid keywords in PPC campaigns, e.g., running+shoes.
- UTM Content: Differentiates similar content or links within the same ad or campaign.
- Common Custom Fields
- List will show all Custom Field options created within the account
- External Integrations IDs
- CT External ID will show the main ID associated with a Contact
- Additional custom named External IDs “may” also show by name, but the token will fill with the ID
- Hosted Pages
- Hosted Page (User Defined)
- Replace ‘PAGE_SLUG’ with ‘Page slug’ of needed Hosted Page
- If page slug is example-Sara
- Select Hosted Page
- {{hostedpage.PAGE_SLUG}} Will appear in the email in the action plan/ template
- Change PAGE_SLUG to example-Sara
- {{hostedpage.example-Sara}}
- Replace ‘PAGE_SLUG’ with ‘Page slug’ of needed Hosted Page
- Hosted Page (User Defined)
- Custom Option
- User Defined
- User Custom Field Label and Replace Space with ‘_’ Underscore
- If custom Field is “A Label”
- Select User Defined under Custom Option
- {{client.Placeholder_Token}} Will appear in the action plan/template
- Change Placeholder_Token to “A_Label” (Remember to replace any spaces in the Field name with the underscore)
- {{client.A_Label}}
- The value for the custom field will be put in the email for the contact.
- User Custom Field Label and Replace Space with ‘_’ Underscore
- User Defined
- Logged in User
- User ID
- User First Name
- User Last Name
- User Phone
- User Email
- Account
- Today
- Account First Name
- Account Last Name
- Account Phone
- Account Office Phone
- Account Email
- Account Address 1
- Account Address 2
- Account Address 3
- Account Company Name
- Account Web Address
- Account Owner
- Account Web-key
- Reputation Link
- Appointments
- Next Appointment Start Date
- Next Appointment Start Time
- Next Appointment End Date
- Next Appointment End Time
- Proposals
- Proposal Link
- Emails Proposal Link
- Proposal Link
- Current Date-Time
- Today Date (m/d/y)
- Today Date Time (Y-m-d-H i.s.)
ClubReady
October 27, 2020Overview
Our ClubReady integration allows information about clients to be easily passed between ClientTether and Club Ready to keep both systems up to date.
Topics
- Turn on ClubReady Integration
- Getting information from ClubReady to ClientTether
- Getting information from ClientTether to ClubReady
Turn on ClubReady Integration
If the ClubReady add-on is not available in the Add-Ons section in your account settings, please reach out to your Customer Success Manager. They will help you coordinate getting access to it.
Otherwise to turn on the Club Ready integration Add-On
- Go to Add-On in Settings
- Click Check Box next to Club Ready logo

- Put in your API Key and Store ID from ClubReady

Getting information from ClubReady to ClientTether
To move new prospect and client records from ClubReady to ClientTether, follow these steps.
- Go to ClubReady Integration tab within ClientTether account settings
- Select Prospect type (from ClubReady)
- Match it to a Lead Source (Within ClientTether)
- Click Add Mapping
- Repeat as much as needed
- Click Clone Mapping to SubAccounts if you want this passed down to SubAccounts
- You can assign Prospect Types to Action Plans.
- Click to Add Mapping
- Repeat as much as needed.
- Once those are set go to top of page to Import Now and click Go.
- You can also see the date of your last import at the top of the page in the Last Import Date group.
Getting information from ClientTether to ClubReady
To send information into ClubReady
- Go to action plans.
- Select plan that you would like to update ClubReady from ClientTether.
- Add a step in the action plan called “ClubReady – New User Push”
- Move any user or group of users into an action plan that contains this step, and it ClientTether will automatically push these records to ClubReady
Proposals Settings
October 24, 2020Overview
To help you centralize your operations, ClientTether provides a proposal system that is easily customized to suit your needs.
This page will provide the details on how you can customize the proposal system on your settings page.
Topics
- Activating Proposal System
- Quote Header Settings
- Tax/Display Settings
- PDF Page Details
- Sub Contractor Emails
- Pre-Notes
- Bid Types
- Category
- Line Items
- Sharing Bid Types with Sub Accounts
Activating Proposal System
- Go to settings
- Click Add-Ons Tab
- Select Activate Proposal System 2
- Proposal tab will appear
- Select Proposal tab
Quote Header Settings
Quote Number and Prefix
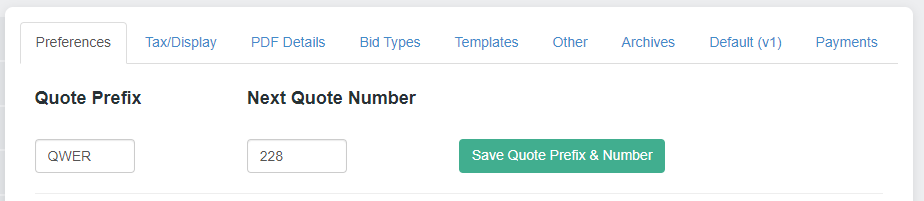
Next Quote Number allows you to set the number that will be used for your first quote. From that point forward the system will auto-increment the number. This field will display the next number in the sequence.
Quote Prefix allows you to add a prefix to the Quote number. This can be used for branding or segmenting multiple system accounts in one Quickbooks account.
Page Header Information
Proposal Header Information Allows a series of check boxes that allow you select what you would like displayed for your clients on their quotes.
Tax/Display Settings
- Tax Settings
- Allows you to decide for the account (Not sub accounts) whether you want to:
- Include Tax in Deal size
- if all Line Items are to be taxed
- If all of your line items need to be taxed this saves you time. Rather than making you go into each individual line item and have to check to tax it.
- Allows you to decide for the account (Not sub accounts) whether you want to:
- Tax Districts
- This feature allows you to create individual tax settings for different areas in your territory
- You can create a district by:
- Clicking
 Next to Tax Districts
 - Enter Name
- Enter Labor Tax
- Enter Manual Tax
- Click Save
- Clicking
- You can manage your existing Tax districts by:
- Editing them
- Marking a default
- Deleting them
Additional Display Settings
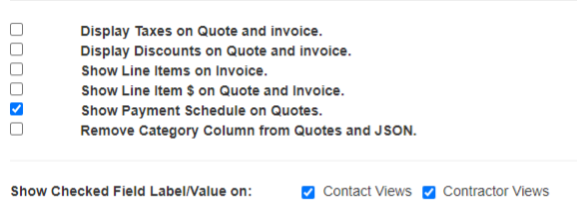
- At this menu, you can also determine the following:
- Display taxes on Quote and the Invoice
- Display discounts on the Invoice and Quote
- Show Line Items on the Invoice
- Show Line Item price ($) on the Quote or Invoice.
- Please note: If this option is selected, the Line Item price ($) and the column will both display. If not selected, neither will display on the quote or invoice.
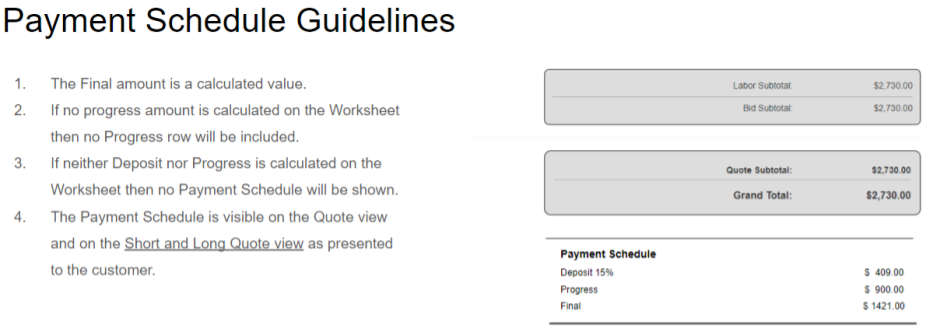
- Show Payment Schedule on Quotes
- Remove the Category column from Quotes. If your structure is better suited to 2-Tier, this is recommended.
PDF Page Details
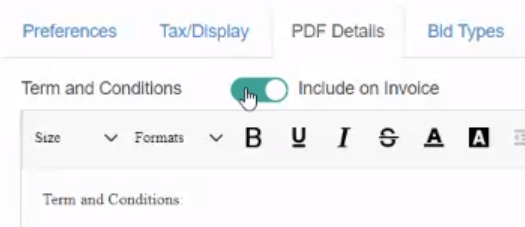
Use the top text field, labeled “Term and Conditions” to enter in any pertinent terms and conditions for your service that your clients need to know.
To include your “Terms and Conditions” information on invoices and and within the system user view, please toggle the “Terms and Conditions” switch on (as shown below) within Proposal Settings at the PDF Details tab. The default setting for this option is set as off or not shown.
Use the bottom text field, labeled “About Me” to provide any additional information about your services or company that would be beneficial for your clients.
Sub Contractor Emails
Use this setting to add in any emails for subcontractors that your company uses.
This makes it possible for you to email information directly from the proposal to your subcontractor.
Pre-Notes
The Pre-Notes section allows you to create notes for common things that you will encounter on a proposal.
Its not for a product, but rather notes about something.
An example would be “Dog present”
Bid Types
Overview
The Bid Type setting allows you to assign Types, Category and Line Items for your proposals.
To help clarify an Type is the most general grouping, for example, Flooring.
The Category is the specfic category under the Type. So for Vinyl could be a category under flooring.
Line Item is the specific product. So Johnny’s Bamboo Vinyl Flooring would be the line item.
So the pattern is we work from the most general to the most specific Type->Category->Line Item.
So in the example it would be Flooring->Vinyl->Johnny’s Bamboo Vinyl flooring.
Type
The steps for creating a Type are:
- Click the directly under Bid Type and to the right of “Add New Bid Type”
- Enter the Type name
- Select if you would like the room measurement feature to be on for this type.
- Select any sub accounts you want to allow access to this type.
- Click the
 button
 - Click the
 at the type right part of the window
 - You will see your new Type displayed at the bottom of the type list.
Category
The steps for adding a new category are:
- Hover your mouse over any of the existing Bid Types
- Click on the icon next the Bid Type you hovered your mouse over
- Enter the name for the category
- Select the display order
- Select the bid Type
- Click button
- Click in top right part of window
- Click
 next to Bid Type you assigned the new category to
 - Your new category will be displayed below the Bid Type
Line Item
- Select any Drop down of Bid Type
- Then select any drop down of bid category
- Click next to category
- You will notice if you hover over this it will say “Add Line Item”
- In the Add/Edit Line Item select the category the line item will under
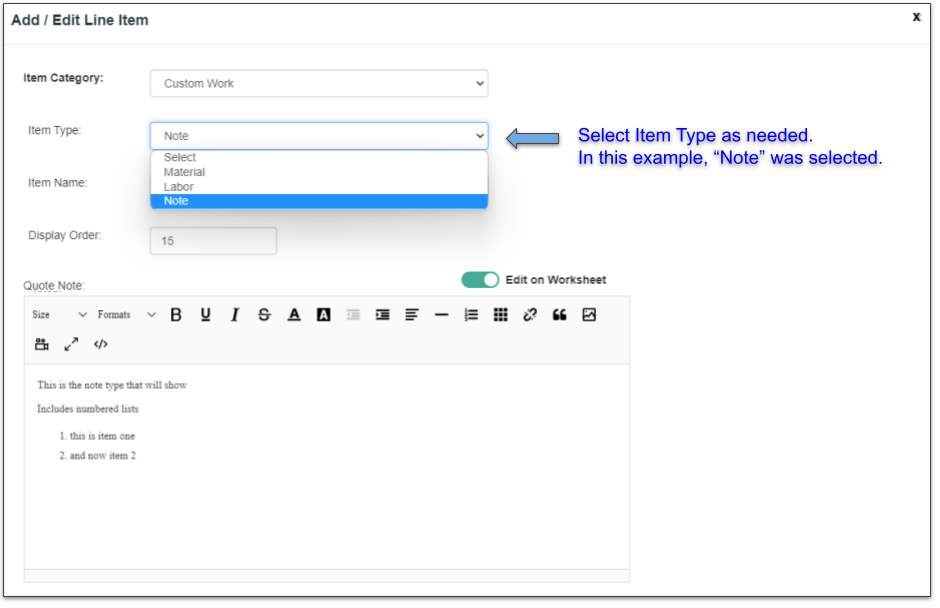
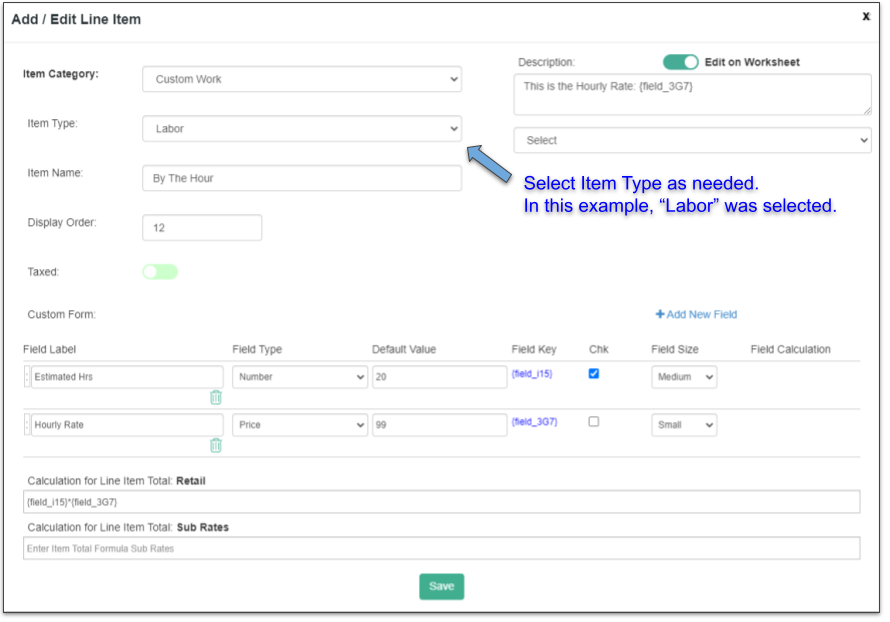
- Select item type: Labor, Materials, Notes
- Give the Item a name
- Write a description of the item
- Enter Display Order
- Check if taxed
- Add any custom fields
- Enter any calculations for retail and/or sub rates
- For me detail on Calculations see section below this.
- Click
Please note: You can also set and save the default field size for your notes in Line item.
Formatting for your notes will also carry over into the quote and invoice descriptions settings.
Please note: When you delete a Line Item, a dialogue box will appear and you must click “OK” to continue. Once deleted, you can view the Line Item in the Archives Tab in Proposal Settings. From that menu you can restore it for use if needed by clicking on the green arrow. Also note that when a Line Item is deleted and archived it will still show in Proposals where it was previously used.
Calculations for Line Items
Predefined calculations for line items will save your team lots of time and take away the potential for human error when calculating totals for proposals.
In this section we are going to walk through how to build those calculations successfully in the Proposal Settings.
These calculations can be created by using Custom Fields and Constants.
- Create any needed Constants
- On the Proposal Settings page hover your mouse over the bid type the Line item will be under
- Click

- Enter the name of the new Constant in the Label field
- Enter the Value of the new constant in the Value field
- Click
- In the specified Line item create any needed Custom Fields
- Across from Custom Form click

- Create a name for the field by entering it in the Field Label field.
- Select Field Type
- Enter Default Value (not required)
- Indicate if the Field will be included on the Quotes by checking the Checkbox
- Select Field Size
- Enter field Calculation
- Only available for Field Type “Calculated”
- Please note any variables used for these calculations must either be Constants or Field Keys for Custom field that are above the current Custom field. You cannot use Custom Fields Field Keys below the Custom field you are working on.
- Across from Custom Form click
- Create Calculations
- Three Places this can be done
- Field Calculation for a specific Custom Field
- Total for specific field
- Calculation for Line Item Total: Retail
- Total for Line Item for Quote
- Calculation for Line Item Total: Sub Rates
- Used for calculating costs for sub contractors
- This will be shown on work orders
- Field Calculation for a specific Custom Field
- Use order of operations when creating calculations
- Using Tokens in calculations
- Below is a list of symbols that could be used to create your calculations
- () to set order of operations
- * Multiplication
- + addition
- – minus
- / division
- % modulo
- Three Places this can be done

Sharing Bid Types with Sub Accounts
In the proposal settings you cannot share the following directly to sub accounts
- Sub-Contractor emails
- Pre-Notes
- Quote Types
However, you can directly share a bid type with sub accounts.
This will autmotically share the categories and line items under the bid type.
Please be aware sub accounts cannot edit line items that have been shared with them. If they wish to make a change they can duplicate the line item and make their desired adjustments to that duplicate.
To share the bid type:
- Hover your cursor over the bid type
- Click

- In the window click on the field under “Select SubAccounts”
- Select the account(s) you wish to share this with.
- Please note that any accounts you have already shared it with will appear in this field, and will appear with light grey text in the drop menu.
Account Info
October 24, 2020Overview
The Account Information page allows you to have direct control over the key information about your company and account.
It also has settings to help you control the look and feel of your account.
Please remember after making any changes you need to click  .
.
Topics
Account Information and Preferences
Below are the following setting options you have in the Account Section:
Active/Pause Switch – If this switch shows active then all action plans will be running. If it reads paused then no actions plans will run in that account.
First and Last Name – The first and last name of the main contact for the Account.
Company – The company name. This will also be how your company name is displayed.
Account Holder – the name of the Account Holder. This is usually the same as the first and last Name.
Address 1, 2, 3 – These are used to store your company’s mailing address.
Phone – This sets the default phone number for the account. This is the number that will be called by default for all Action Plan automated calls.
Office-Phone – The number that will be inserted into your email unsubscribe footer to ensure CANSPAM compliance. It is a display only field in that place.
Website – Allows you store your company’s website information in ClientTether.
Email – Sets the default email for the account. Unless other options are selected, this is the default email that will receive daily reminder notices and will be the reply-to email for outbound emails from Action Plans.
Notification Auto-Delete Days – This allows you to set how many days a notification will be in the notification bar before it will automatically be removed.
Record Call Switch – If green, or on, all calls in and out of will be recorded. If grey, or off, the calls will not be recorded.
Notification Switch – If green, or on, you will hear a ding every time you get a notification. If it is grey, or off, you will not hear the ding.
Changing Password
This allows the Account Owner to change their log in password. To do this:
- Type your current password in the field marked “Current Password”
- Type in the new password in the field marked “New Password”
- Confirm the new password by retyping it in the field marked “Repeat New Password”
Common mistakes include mistyping your current password or having the two instances of the new password not match.
Theme Settings
Theme Color will adjust the text color in certain areas of your account.
Header Color will adjust the color of the header.
Footer Color will change the color of the footer.
Logo allows you to upload your company logo. This will then be displayed in the top left of the header and the bottom right of the footer.
API Monitor
October 15, 2020Overview
The API monitoring system allows you to check all Posts from API for your account for the past 45 days.
To access the monitoring system go to the drop menu under Hello Your Name! and select API Monitor.
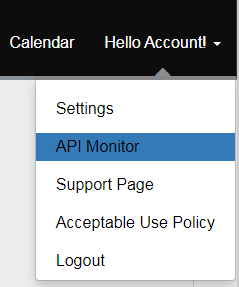
The table will display the number of requests you have had in the past 45 days, the date and time of the request (Currently in UTC not your timezone), the requested URL, the Requester’s IP, and the payload.
Trouble Shooting
September 3, 2020Overview
If you are experiencing issues with ClientTether you can do the following six things to try to resolve it. If these six things do not work please reach out to our Support Email below.
- Support@clienttether.com
6 Things to Check
1. Make sure you are using Chrome
ClientTether is designed to work with Chrome. If you attempt to use any other browser: Safari, Firefox, Edge, etc. Then you will run into issues.
2. Make sure you are using the latest version of Chrome
ClientTether is designed to work with the latest version of Chrome. If you are behind in your Chrome updates this can cause problems. To make sure you are up to date please:
- Go to the three Ellipses at the top of your Chrome Browser
- Click on “Settings”
- Select “About Chrome”
- See if your Chrome is up to date. If it is not it should automatically update itself.
3. Make sure ClientTether is not open in more than one tab
Because of the cookies used with ClientTether you cannot have it open in more than one tab or window on your computer. Otherwise it will cause a lot of issues.
4. Hard refresh the page that is having issues
Clicking the refresh button in your browser does not make everything on your page reload.
You will need to hard refresh the page by doing the following
- PC = Ctrl F5
- Chromebook = hold down Ctrl and click the refresh button
- Apple products = CMD Shift R
You may need to hard refresh up to three times before the page loads correctly (internet speed and connection issues).
5. Verify Your Account is not paused
A common issue we have is when an account is accidentally paused.
Please take a moment and check on your main menu that the word “Pause” is there. That means it is active
If it says “Play” Then that means your account has been paused. To change this just click on the play.
6. Restart your computer
Sometimes someone’s computer will be having issues not related to ClientTether.
However, because of these problems it can affect other programs and processes on your computer.
Try rebooting your computer and see if that resolves the issue.