SMS (Texting)
December 9, 2020Overview
Short Message Service, SMS, or texting is a critical communication tool that is available to you via ClientTether.
The details outlined below will provide you with information on how to effectively communicate via text/SMS with your contacts within ClientTether.
Please remember: In order to send a text/SMS to your Contact within ClientTether, the “OK to SMS?” setting in the Contact Profile must be toggled on (showing green). Please refrain from turning on this feature unless you have express permission from the Contact to communicate with them via text/SMS.
Topics
- Rules, Regulation, Best Practices
- Action Plan Text Messages
- Template Text Messages
- Manual Single Text Messages
- Manual Group Text Messages
- Unsubscribing from Text Messages
Rules, Regulation, Best Practices
If you are operating within the United States please ensure you are in compliance with TCPA regulations. If you are operating in Canada please comply with CASL regulations.
All Clients and Users are also required to follow our Acceptable Use Policy.
Action Plan Text Messages
Text messages within an Action Plan are sent directly to your Contacts and appear to them as a standard text/SMS sent from a phone.
If you are utilizing text/SMS messaging within an Action Plan, we encourage you to include the use of Tokens such as ‘First Name’ to personalize the text message.
To send a text/SMS manually, navigate to the Text panel within the Contact Profile and type your message content in the message box.
Please note that when sending a text/SMS within ClientTether, you have the option of adding in additional phone numbers, including hyperlinks, sending the message immediately or delaying the message to send at specific time/date, as well as excluding the client and sending the message to other parties, as needed.
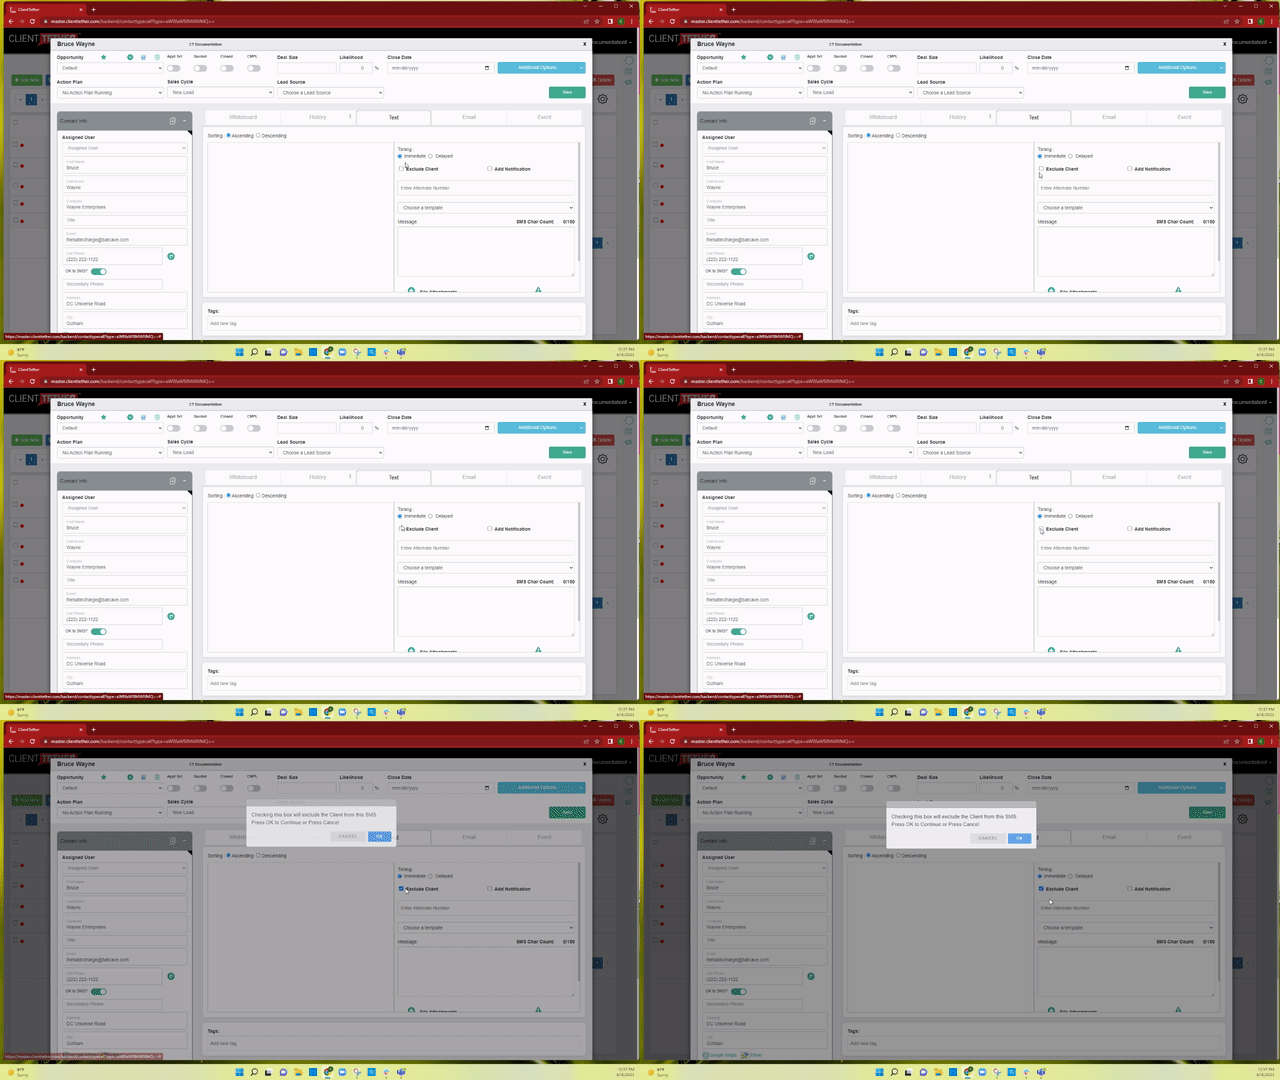
Exclude Client:
If you wish to exclude the client and send the text/SMS to other parties or members of your team and NOT include the Contact, select the “Exclude Client” box and then manually add the phone number you intend to send the message to within the “Enter Alternate Number” field.
You can also attach files to your text/SMS via the File Attachment input button just under the message box.
For more information on Action Plans click here.
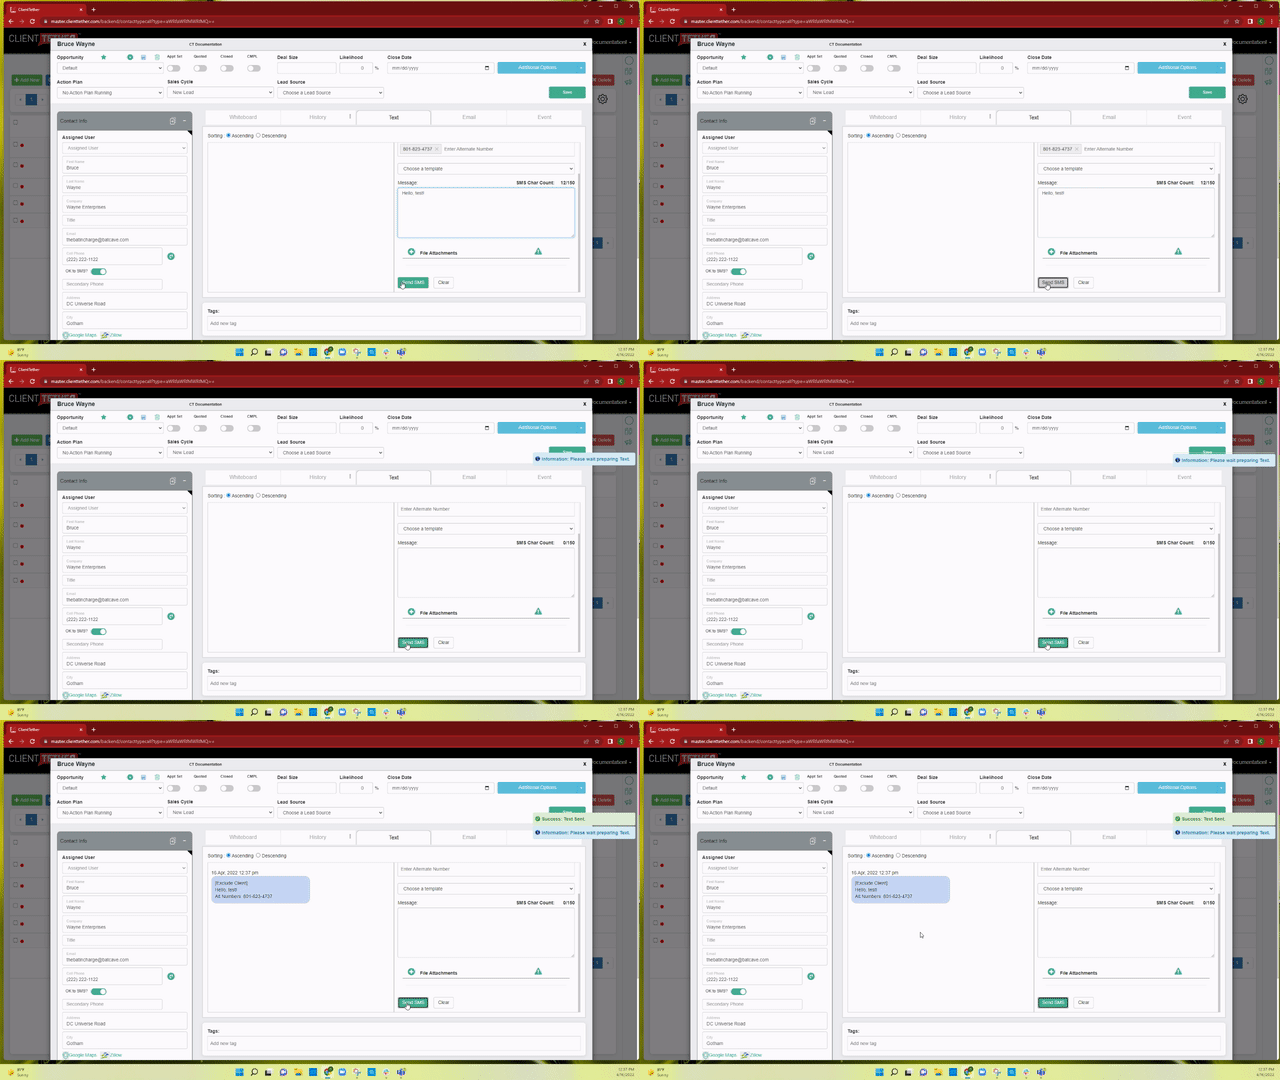
If a message has been sent utilizing the “Exclude Client” feature, this selection will be indicated above that specific message within the Text tab of the Contact Profile as well as indicated with the History Notes of the Contact Profile. This notification is provided so that you can confirm which text/SMS messages were sent to the Contact and which text/SMS messages were sent to other parties as needed with the Contact excluded.
Template Text Messages
Template Text Messages are sent via the Manual Single Text Messages or the Manual Group Messages.
These are pre-written messages that are handy to have, but don’t necessarily fit into an action plan.
They are created in the Template area (Can be found under the Action Plan Menu)
You are again able to select Tokens to personalize the message.
Also add a meaningful subject and type in your content. You can add attachments with the File input.
Also if you are sharing this template with sub accounts you may check the box next to “Protect from Overwriting” if you do not what them to be able to make any changes.
Manual Single Text Messages
These Text Messages are sent from within the Contact Profile.
Open the contact profile and go to the tab that is labeled Text.
- In here you can select to have this text be immediate or delayed.
- You can select whether you would like a notification.
- You can add in additional phone numbers
- You can opt to exclude the client
- Make sure you check the exclude client box, and include the number you want to receive the text in the box for Alternate Numbers.
- You can select a text template
- You can type your message (Note Tokens are not available)
- You can attach files.
- Click “Send SMS” When ready
- Or if you realize you don’t need to send it or just want to reset the message click “Clear”.
Manual Group Text Messages
To send these go to the contact list Check the boxes of all contacts you would like in the message.
Next click the Blue SMS button at the top left part of the screen.
Please note this does not send out a big group text, but an individual text to each recipient.
You will see the number of contacts selected.
You can from here
- Select immediate or Delayed timing
- Choose a template
- Type in a manual message
- Add an attachment with the File Input.
- Send message when ready
- Click Clear if you wish to disregard
Unsubscribing from Text Messages
Contacts have the option and the right to opt out of receiving text messages your you at any time.
This page provides information on the opt-out and opt-in keywords supported by our Programmable Messaging service. We automatically handle standard English-language reply messages such as STOP, STOPALL, UNSUBSCRIBE, CANCEL, END, or QUIT for Toll-Free and Long Code messages. When a recipient sends a STOP or other opt-out keyword, the system will creates a “block list” entry. In addition, the phone number will be set to SMS OK = False and a History Note will also be generated indicating the same. Once a block list entry is created for a specific recipient phone number, any future attempts to message them will fail. Recipients can use the START, YES, or UNSTOP command to resume receiving messages.
When a recipient uses the STOP, STOPALL, UNSUBSCRIBE, CANCEL, END, or QUIT keywords it triggers an automatic reply, which confirms that the recipient has been unsubscribed. It also tells them that the START, YES, or UNSTOP commands will re-subscribe the recipient to messages from your phone number.
When using a Messaging Service to send SMS messages, any STOP keyword replies will apply to the entire pool of phone numbers in the Messaging Service. Similarly, a START keyword will disable blocking for the entire Messaging Service, and allow messages to the recipient once more.
It is important to note that text message campaigns may be subject to various legal compliance requirements, depending on the nature of the campaign, the location of the sender and the recipient. While Twilio handles the above-described messages in accordance with industry standards, customers should consult with their legal counsel to ensure compliance with all applicable legal requirements.
Click to Copy
December 8, 2020Overview
ClientTether’s click to copy feature allows you to copy information to a clipboard with a simple click.
How It Works
Within ClientTether, certain information will be available for you to copy. Hovering your mouse or cursor over copyable text will change it to green. A text bubble will appear indicating the text can be copied to the clipboard. Click on the text and a “sucessfully copied” message will appear on the right hand side of the screen. When you’re ready to insert the imformation, either use Crtl+v, or right click your mouse and select paste.
Proposal System
December 7, 2020Overview
The proposal system allows you to easily create quotes and invoices for clients. Additionally, this feature allows you to directly engage subcontractors and other team members regarding the needs or processes related to a specific project.
Importantly, all aspects of the Proposal system are controlled by the Account and designed specifically for customization.
The Proposal System has recently been updated to include the auto-save feature throughout. This change is now in effect whenever changes are made on any screen within the Proposal System. Additionally, when changes are made to any screen within the Proposal System, calculations are also updated and auto-saved.
For additional support regarding Proposal Settings, please visit Proposal Settings.
Topics
- Turning On Proposal System
- Creating New Blank Proposal
- Creating New Proposal from a Template
- Accessing an Existing Proposal
- Editing Completed Values
- Proposal Overview Tab
- Worksheet
- Proposal Calculations
- Quote
- Payment Schedule
- Work Order
- Change Order
- Punch List
- Invoice
- Creating Templates
- Sending the Proposal
- Signatures
- Marking an Invoice Paid via an Action Plan
Turning On Proposal System
- Go to settings
- Click Add-Ons Tab
- Select Activate Proposal System 2
- Proposal tab will appear
- Select Proposal tab
Creating a New Blank Proposal
- Open the Contact Profile you wish to create a Proposal for
- Click the drop menu at the upper right:
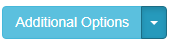
- Select New Proposal
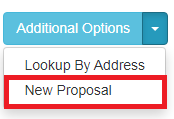
- A blank new proposal will open
Creating New Proposal from a Template
Please note: In order to access Templates when using the Proposal system, you must create those related Templates first, within the Action Plan/Templates menu.
- Open the Contact Profile for the customer you wish to access an existing Proposal for
- Click the drop menu at Additional Options:
- Select the Proposal template:
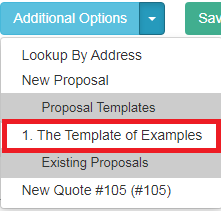
- The existing Proposal you have selected will open.
Accessing an Existing Proposal
Please note: In order to access an existing Proposal, the Proposal must have been previously created within the Contact Profile for your customer.
- Open the Contact Profile you wish to access an existing Proposal for
- Click the drop menu on
- Select the existing Proposal to access:
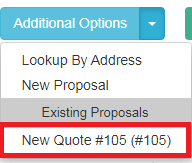
- The existing Proposal you selected will open.
Editing Completed Values
The system is designed for multi-layered account systems. From time to time the Completed date and deal size need to be edited. The system has a method designed to allow Users form a higher level account beyond your own, to edit, remove Completed Dates and Deal Size values. Watch this video.
Proposal Overview Tab
This tab allows you to view the key details of a Proposal at a glance.
This overview is provided in five sections:
- Proposal Phase
- Client Name
- Lead Source for Client
- Estimator
- By default, the logged in User will be set as the Estimator. To change this select a different User from the drop down menu.
- Type
- Allows you to name the proposal
- Proposal Notes
- Client Notes
- These are imported from the History Notes that have been added from the contact profile
- Header Photo
- Allows you to personalize and Brand your proposals.
- Work Phase
- Job Start Date
- Job End Date
- Field Manager
- Selected from the users in account
- Work Notes
- Completion Phase
- Total Due
- Date and Amount of Payments
- To add new payment Click

- Select Date
- Select How Payment was Recieved
- Cash
- Card
- You will need to enter last four digits of card
- Check
- Will need to enter check number
- Other
- Select type of payment
- Deposit
- Progress
- Final
- Enter the Amount of the payment
- Click
- To add new payment Click
- Amount still remaining
- COGS (Cost of Goods Sold)
- Name of good
- Cost of Good
- To add a new cost click

- Type in name of good
- Type in cost
- Click the button

- To add a new cost click
From this tab you can also choose between  or
or 
Please Note: This is the only location within the Account that allows you to delete a Proposal.
Worksheet
The Worksheet tab is where you build the quote. You use the Bid Types, Categories, Line Items, and Equations you have created in the Proposal Settings.
Any fields in the Worksheet that are filled with grey are not editable. Any fields that are white can be edited.
 To start you will need to add a bid type. Just click the
  next the word Estimate.
 - Select your bid type
- Enter area Name
- Enter any general comments or concerns
- Expand this bid type by clicking on the
 to show
 - Select your Category
- Select your Line Item
- If you have added any custom fields in Proposal Settings for this line item you will fill them out here.
- Check the
 if the item needs tax added.
 - In the Columns on the far right
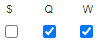 check what you want displayed.
- $ = Displayed Itemized line details on the Quote
- Q = Display this amount on the quote – Unchecking this box will remove this line from the quote entirely.
- W = displayed on the Work Order
- To delete a Line Item, click the trashcan icon
 at on the far right of the line item.
 - Continue to add any additional Line items for this bid type/ area by repeating steps 5-8.
- You can rearrange the order of these line items by clicking
 next to any of the line items. Just click and drag the item to the correct spot.
 - Add any additional notes about this Bid Type/ Area
- Add attachments, such as pictures.
- You can also designate a discount.
- If you want to take off 25% for example, just type 25 in the discount box.
- To Add more Bid Types/ areas repeat this process
Once you have completed the work sheet click
If this proposal is going to be reused. For example if you are going to do the same type of project over and over again and will require the same fields it would be wise to click  and it will save the categories and layout as a template that can be used over and over again with other customers. This is covered in more detail in Creating Templates.
Quote
The Quote tab will display as much or little detail you as you have selected with the column.
Notes for each Area / Bid Type will be displayed automatically as will the total cost.
At the bottom you will find the grand total for the quote.
Below your quote line items, your Terms and Conditions, that you have provided in the Proposal Settings, will display.
A check box is provided that allows your customer to accept the proposal and also access a signature line.
Once checked, the Signature block will show up. When the Signature is captured please click .
You can also view pdf versions of the quote by clicking  or
or  .
.
The short link is a pdf of the quote page. The long link includes your account name, logo, About Me section, and the information on quote tab.
If you click  it will take you back to the Contact Profile where you can use a template with the correct tokens to send the proposal type you wish to send to your client (Short or Long). This is covered more depth in Sending the Proposal.
Payment Schedule (New!)
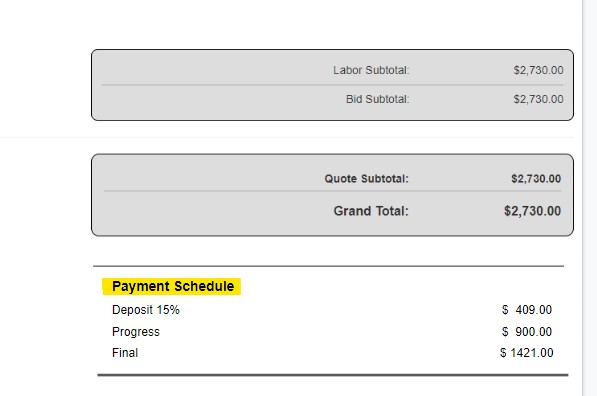
The Proposal System now includes a Payment Schedule that is available at the bottom of the Quote View and in the Customer View. The purpose of this additional information is to clearly show the Deposit amount, Progress amount and expected Final amount as applicable on Quotes created in the system.
Please note: If no values are entered at Deposit and Progress on the Worksheet, the Payment Schedule will not appear on any View of the Quote.
If entered, these values are “locked” to the signature on the Quote (more detail on Signatures found below). If a signature “seal” is broken, the Payment Schedule can be updated. Otherwise, these fields are held constant to the original signature on the Quote.
Work Order
This tab allows you to assign and manage work orders to subcontractors.
You can add items to be available for Work orders by checking checking the box under the W column.
You can then create work orders by Bid Type. You select the bid type(s) and then click  .
.
At the bottom of the page you select to which subcontractor you’d like to assign the work order. Then Click either  or
or  .
.
Change Order
The Change Order tab allows you to make changes to a Proposal after the customer has accepted your original Quote.
Such changes add or remove items by typing a description in the provided field and entering a cost.
Please note: If you are removing an item or lessening the cost then you should use a negative number in the cost field.
Once you are finished with your change order please have the customer sign in acknowledgement and approval of the change.
Change orders will show up on the Invoice for the Proposal.
NOTE: If you are concerned with Taxes or QuickBooks Online integration this legacy feature in not recommended.
You can then click or .
Punch List
The Punch List allows you to have the project manager go through a job and create a list of things that still need to be completed.
You can easily add items to the Punch List by clicking the next to “Add new Row”.
As items are completed just check box for each item to the right.
The customer can sign at any time to signify they approve the Punch List is complete.
You can click or .
Invoice
The Invoice is used after the job is complete. It lists the Bid Type and area with the total cost.
It also Shows any payments the customer has made toward Grand total and will display the total left for the customer to pay.
To email the Invoice just click and follow the instructions in Sending the Proposal.
Creating Templates
Creating templates can save you a lot of time and your estimators a lot of headaches.
To create a template for a walk through or basic bid for flooring in a house, you can either create a bid for an actual customer, which is generally applicable, or create a bid for a test customer that is representative of what you would typically see.
For either example, follow these steps:
- Create the proposal on the worksheet.
- Then click
- Give the template a meaningful name and click Save.
- If you decide you want to change something or don’t want the Template click Cancel.
Sending the Proposal
To send the Proposal, you should utilize either a Template or an Action Plan. For the purposes of this tutorial we will walk you through this process utilizing the Template option.
The first step in this process is to create a Template utilizing the appropriate Tokens. (If an email Template used for sending the Quote has already been created, skip to the second part of the process noted below.)
- At Action Plans in the top menu, click on Templates.
- Click
 next to “Email Templates”
 - Name the Template and enter the Subject line for the Template email (this will be the subject line the Customer/Client will see).
- Create/edit the content of this email message as needed and based on the purpose of the email, select the correct tokens from the Token drop-down menu at left. FYI, utilizing the Token for your Proposals allows you to send links for the Quote, Invoice, Punch List, etc. For more info on use, please visit the Tokens page for further details.
- Once you have added content, edited and formatted your email to use with your Proposals, Click
 .
.
The second step in this process is to send the email with the linked Proposal. To complete that task, follow these steps:
- Make sure you have clicked the or button for whatever item you are emailing.
- Go the Contact Profile for the person you are sending the information to.
- Go to the email tab in the Contact Profile
- Select the appropriate template and edit as needed.
- Send the email to the client/customer for review.
Signatures
Collecting Signatures is a must in some states and scenarios. This creates a binding contract. To be a valid electronic signature, a person must do two things.
In this proposal system the User must check a box as follows:
I understand this is a legal representation of my signature signifying that I accept this Proposal.
Next they are to sign in the box provided. This is captured in the system.
However, Change Orders are often requested after the signatures has been provided. The system allows for this by maintaining the original version of the proposal with its signature.
The User can edit the proposal by adding or subtracting line items and then collect a new signature.
Marking an Invoice for the Proposal as “Paid” via an Action Plan Step:
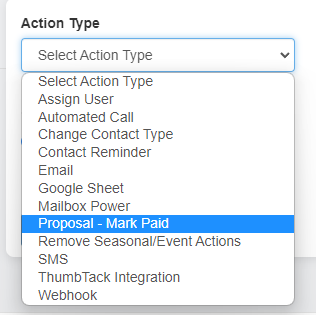
To indicate an Invoice has been “Paid” and to apply a corresponding “Paid” watermark to the Invoice, you can add an Action Plan step within your Proposal-related Action Plan process.
Standard options to name this step, enable a notification, and set timing of this step are provided.
When this step is initiated, the Invoice will be set as Paid and Show watermark.
The recommended next step in this Action Plan would send an email with an Invoice link to the Contact.
Attachments
December 2, 2020Overview
The attachment storage in ClientTether is designed to allow you to store and access files in two locations.
No matter the location the max file size for a single file is 20 MB.
File Settings
The first Location you can access File management tools in ClientTether is in the “File” tab in the account settings. This collection of attachments are available for every client within your account, and in franchises or multi-unit businesses, it can be used to share approved documents with franchisees.
To add files to this location just click next to file attachments.
You can download  , duplicate
  , copy the link
  , or delete
  any of these files.
Contact Profile
The second location you can access file management is within the Contact Profile . The attachments stored here are for a specific contact and are not available for other contacts within your account.
To add files to a client record, go under the Attachments at the bottom of the left-hand column in the Contact Profile and click
You can download or trash any attachment .
Using The Attachments
You can use these attachments in any email or text message. Just be aware that the Contact, or Client Attachments are only available for that contact.
If you are using Templates, Action Plans, Group Emails, or Group Text Messages you can only use the account attachments that are in your Files tab in settings (not those stored in an individual client record).
Limitations
SMS (Texting)
- Can only send the following file types:
- jpeg
- png
- gif
- Total Size for SMS must be less than 5.0 MB
Emails
- Limits on types of files for emails are placed by email providers for safety. Here is a link to Gmail’s list of unacceptable attachment types. This list is standard with other major email services.
- Total size for Email attachments is 20 MB.
Warning: Some PDF files will not be allowed to send via Microsoft SMTP OAUTH 2.0. This is something caused on Microsoft’s side and is outside of ClientTether Control. To be safe we always recommend attaching the PDF files as a link and not as an attachment.
Import Queue
December 2, 2020Overview
The Import Queue page can be found under the Hello “Your Name” Menu that you would use to access your account settings.
It gives a status update on all imports that have taken place in the past 30 days.
This table is organized by:
- Date
- which will list the date and time of the import
- Type
- Import Clients
- Did not check “Click if import have more than 1000 records” in the import.
- Big Import Clients
- Checked “Click if import have more than 1000 records” in the import.
- Import Clients
- Status
- Successfully Processed
- The import was successfully processed
- Import Failed
- There was an issue with the import and it did not go through.
- Waiting for Process
- The import is currently being processed
- Successfully Processed
- View Parameter
- Lists how many contacts were in import
- File that was imported
- Action Plan ID
- User ID
Whiteboard Tab
November 20, 2020Overview
The Whiteboard Tab in the Contact Profile Allows you access to three important features: The whiteboard, Add a Note, and Log-a-Call.
All three of these features provide you with critical tools for team communication and documentation.
You easily toggle between these three features in the Whiteboard tab in the contact Profile by clicking on the radio button next to each tool name.
Topics
Whiteboard
The Whiteboard is what is automatically displayed when a contact profile opens.
This is a fantastic place to record key details that team members need to know at-a-glance about the job or product a client is interested in, and other notes that would be helpful about the client, their home, or the services they may have interest in.
To edit the Whiteboard just click on the text field and make changes or add content.
When you are done click 
Add Note
Add Note allows you to directly input a note into your History Notes. Each Note added will be tagged with the User that entered it, the date, and the time of creation.
To do this:
- Toggle to Add Note using the radio button
- Click the text field and enter in your note
- Click

You can then click on the History Tab and see your note has been successfully added to History Notes.
Log-a-Call
Log-a-Call allows you to add a history note specific to logging a phone calls as well as sending that information by of way of text and/or email to the Account Owner, Account Users, or anyone else who needs the information.
How you use this feature:
- Toggle to Log-a-Call using its radio button in the Whiteboard Tab
- Select your Reason Code*
- Select your Disposition Code*
- Choose if you would like to send a email and/or text to a contact about the logged call
- Click from the list of Account Owner and Users who needs to receive a communication about the logged call
- Enter any additional Emails or Phone numbers that need to receive the information
- Click on the large text field to the left of these settings and type in the information about the call.
- Click
All information including who it was shared with will appear in the History Tab.
* These items are editable at the enterprise level in Settings in the Log Codes Tab.
Log Codes
November 20, 2020Overview
Our Log Codes function allows you to provide a systematic framework of reporting calls “Call Codes” within your organization. This directly affects what is available to your organization in the Log-a-Call feature in the Whiteboard Tab.
When your team uses this tool within a client profile, they can send automatic updates to the account owner by email or text that includes the logged call notes and Call Codes attached to it.
When setting this feature up, you can select whether communication on Log-a-Calls is done via Email and/or text by default.
You can create your Reason and Disposition Codes
- Select Contact Type
- Select Code Type
- Enter Code name
- Enter a description
- Click
You can also see the list of your current Codes at the bottom of the page.
As a note, Reason Codes are there to provide the reason for the call, such as, “Reschedule”, “Complaint”, “New Service Request”, etc. Disposition Codes are intended to indicate what action was taken with the client on the call, such as, “Rescheduled”, “Cancelled Service”, “Forwarded to Sales”, etc.
ActionPlans Settings
November 16, 2020Overview
The purpose of the ActionPlans settings are to allow you to control communications that come in and out of ClientTether.
Please make sure to click the save for each category if you make any changes in those categories.
Topics
Action Call Options
Action Call Options are settings specific to immediate or delayed automated calls in action plans.
You have three general choices
- Default – Calls the number listed as Phone on the Account Info Page
- You will note there is a check box below the Default setting. This will route automated calls to the phone number for the Assigned User. This will work as long as the Assigned User account has a phone number listed in their user profile.
- Ordered – Will ring through a set order of users.
- Simultaneous – Will call a set group of users at the same time. The first to pick up gets the call.
With ordered and simultaneous options a list of users and phone numbers will appear that you can organize between Active and In-Active columns.
Please note the order is important for the Ordered setting. The order does not matter on simultaneous.
ClientTether Phone Returns
These settings affect how things are handled in your system when someone calls your ClientTether account phone number.
You have seven general setting choices in this section.
- Caller Id – select if you would prefer to see the ClientTether Number on your phone or the number of the client calling in.
- Play Client Status Message – Let’s the caller know they have reached your company and someone will be with them shortly. This setting also immediately calls your team (per the call settings below) and notifies them of who the caller is (if known) and gives them the option to accept or decline the incoming call. If Declined, the caller will receive a notification that all agents are busy and that they can leave a message.
- Ring Time Before Rolling – how long the caller is allowed to be on without an answer. Depending on your settings this will either move them straight to voicemail or to the next number if you are using Ordered calling.
- Default – Calls the number listed as Phone on Account Info Page
- You will note there is a check box below the Default setting. This will route automated calls to the phone number for the Assigned User. This will work as long as the Assigned User account has a phone number listed in their user profile.
- Pass Through – Allows you to tell the system to NOT check for machine answering, which allows a machine to answer and give a prompt or message. Ideal if you are using a hunt group for your main number. This feature is not available in all accounts. If you are interested please reach out to your Client Success Manager.
- Ordered – Will ring through a set order of users.
- Simultaneous- Will call a set group of users at the same time. The first to pick up gets the call.
- This field is for you to type the phone number you want incoming calls to your ClientTether Account phone number to be forwarded to.
With ordered and simultaneous a list of users and phone numbers will appear that you can move between Active and In-Active columns.
Please note the order is important for the Ordered setting. The order does not matter on simultaneous.
System Emails to/from Users
This series of settings allows you to determine what happens when emails are being received into the system and being sent out from the system.
You have three General Categories
- BCC Account Owner When… – Allows you to choose to bcc the account owner when certain events take place such as when
- Action plans or scheduled emails are sent
- Bulk emails are sent
- Manual Emails are sent
- New Leads are created by parse, post, or API
- Account Owner sends an email
- Send Today’s Schedule To… – You can opt to have the schedule sent to either the account owner or the account users. If you don’t check either box it won’t be sent to anyone.
- Action Plan Emails
- You can opt to have Action Plan Emails “sent” from Assigned Users. If this is not checked all Action Plan Emails are “sent” from the account owner.
Account Text Settings
These settings affect how things are handled in your account when you receive a text to your ClientTether number.
In this category you have four settings.
- The phone number you want to receive all text notifications if there is no Assigned User (AU)
- Whether to send texts to the Account Owner during Operation hours only or not.
- Whether to send Delayed Action Plan texts during business hours only or not.
- End Connection Plan on Return Text
- This feature will turn off a current Connection Plan if a return text comes in from the contact. Please click here to learn about the different kinds of Action Plans.
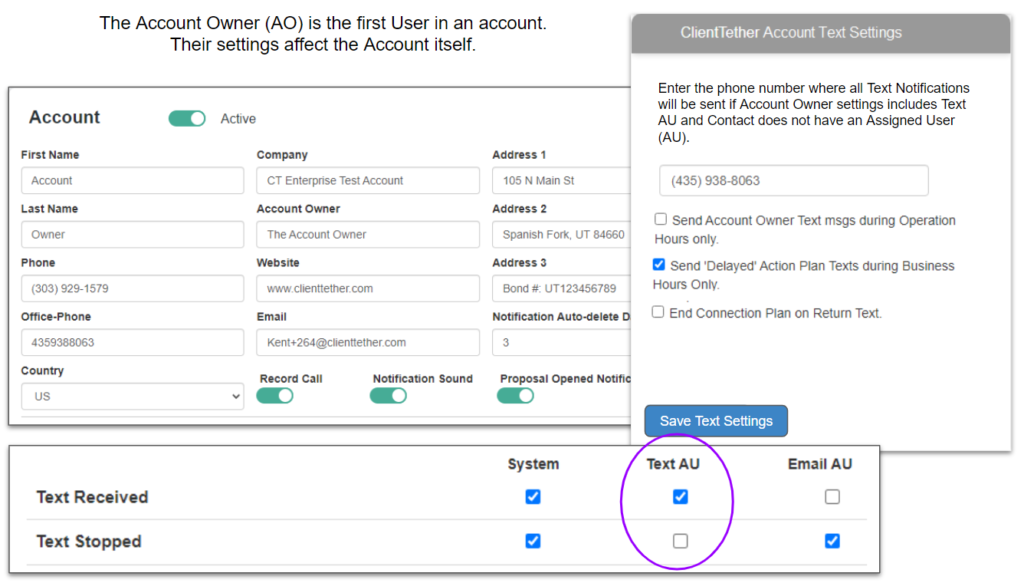
The Account Text Settings are related to the Notification Controls.
In the Account Text Settings, enter the phone number where ‘all’ Text Notifications should be sent if the Account Owner’s Settings includes Text AU and the Contact does not have an Assigned User (AU).
Notice the Purple ellipse in the image above. This highlights that Text Received is set in the AO’s settings to send the AO a message by text if they are the AU or fwd the text to the specified number if there is no AU. In other words , if a text is received from a Contact that does not have an AU, then the text notification will be sent to the phone number entered.
For example let’s suppose two different Contacts send a text message into the system. One has an AU and the other does not.
Contact 1 has an Assigned User (AU). Therefor the system will only consider the Notification Controls of the AU (both Text and Email).
Contact 2 does not have an Assigned User. In this case the Notification Controls of the AO will be considered. If Text AU is true, then a Text Notification is fwd to the specified number entered here because there is not AU. (If the Email AU is true, then the system will fwd an email to the AO’s Email.)
Notice the second checkbox in the Purple ellipse is not checked, which means if Contact 2 sends in a “Stop” texting me message, that message will not fwd to the specified number entered here.
One might ask, is it possible to shut down Notifications enough that all messages are essentially lost? The answer is, “yes”. But Notification’s control on a User by User basis is the User requested feature now embodied in Notification Control and Account Text Settings. The Account Text Settings is an attempt to have one last bucket to collect messages.
Tags Settings
November 16, 2020Overview
The Tags tab in Settings allows to see all of your accounts tags in one place.
You can:
- create new tags
- edit existing tags
- see which contacts have these tags
- duplicate the tags to a sub account
- delete tags
Contact Profile
November 16, 2020Overview
The Contact profile is a consolidated, simple location to engage with and capture all client contact information.
This area provides access to contact details including the whiteboard, history, notes, calls, texts, emails, actions, events, opportunities, sales progression, etc., in one place.
Topics
- Accessibility
- Contact Profile Header
- Contact Info
- Upcoming Actions
- Attachments
- Whiteboard Tab
- History Tab
- Text Tab
- Email Tab
- Event Tab
- Tags
Accessibility
The Contact Profile can be accessed within ClientTether from the
- Account Page
- Calendar
- Contact list
- Dashboard
- Pipeline
- Notifications
Contact Profile Header
The Header in the Contact profile provides a lot of information in a compact space. We are going to break down the two sections of the header to help you grasp everything you can glean from this area.
General Information
From the Header in the contact profile you can get the following information:
- Clients Name
- Account Name
- Assigned User
- Action Plan
- Sales Cycle
- Lead source
- Proposals
Also soon the
- Deal Size
- Quoted
- Closed
- Likelihood
- Close date
will be moved up to header.
After making any changes to the Header you must click 
Opportunities
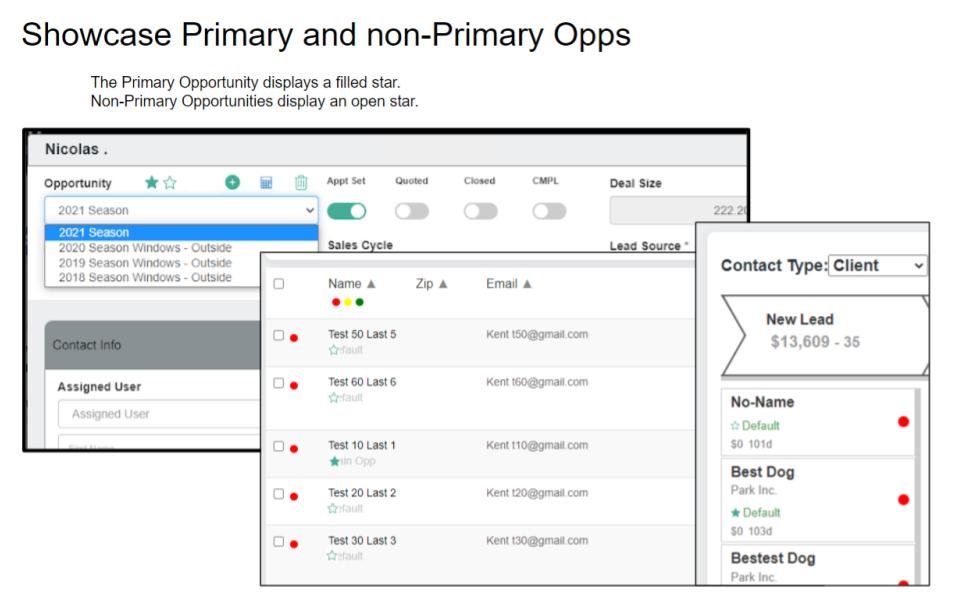
Contact Info
The Contact Info section, on the right hand side of the Contact Profile, holds all of the details about the contact.
The list of the details regarding Contact Info is broken up into two sections:Additional details on features of the Contact Profile:
 allows you to duplicate a Contact
- This will not duplicate the history notes
 allows you to delete a Contact
 - Goes to Archive, unless you are in Archive then it permanently deletes eh contact
 allows you to collapse the Contact Info field.
 - If the Contact Info field is collapsed it will be replaced with which if you click will re-expand the menu.
- If the Contact Info field is collapsed it will be replaced with
-
 directly under will show you the expanded Contact Info options
 - In the Expanded info options you can click
 to add a custom field.
 - Add your label
- Add the value
- Click
- Please note: This new Custom Field now also populates in your Custom Fields list in Settings at the Custom Fields tab. From that tab in Settings you can elect to add this new Custom Field to all Contacts within your account by clicking the far right icon.
- Cell Phone Field: Phone Number Lookup: Verification of Text-Enabled VS Landline
- When a NEW Contact Profile is created in the account, the system will automatically verify if the number entered at the ‘Cell Phone’ field is text-enabled. If the number is verified to be text-enabled, the ‘Ok to SMS?’ toggle will be set to active (on) and the corresponding Text tab will be available for use. If the number is determined to not be text-enabled/a landline number, the toggle will be set to in-active (off), the Text tab will not be accessible, and a statement in red will appear next to the toggle stating “Landline number, SMS not allowed.”
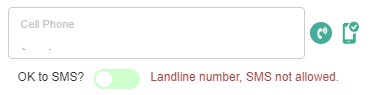
- If the number in the ‘Phone Field’ is changed, the verification process will occur again and if that time the number is determined to be text-enabled, the toggle switch will be set to active and the user will be able to text the Contact from the Text tab within the Contact Profile. If that number is also confirmed to not be text-enabled, the toggle will remain at in-active.
- If the User wishes to check the text-enabled status of a number entered in the Cell Phone field for an EXISTING Contact, the user can click on the cell phone icon to the right of the ‘click to call’ button in the Contact Information area of the Contact Profile. The same verification process and outcome described for NEW Contacts will occur.
 Allows you to designate if you have been given express permission to communicate with this Contact via text (SMS).
- If you have permission to text (SMS) this Contact, set the toggle on (green) to allow texting (SMS).
- If you have not received permission to text (SMS) this Contact, set the toggle off (grey) to disable the text (SMS) feature within this Contact Profile.
 allows you to place a manual call directly to the Contact.
 will pull up directions to the Contact’s address via Google Maps.
 will provide address related information for this Contact via Zillow.
To save any updates to the information for this Contact, please click
List of information in non-expanded Contact Info
- Contact Type
- First Name
- Last Name
- Company
- Title
- Cell Phone (Primary Phone Number)
- OK to SMS
- Secondary Phone
- Address
- City
- State
- Zip code
List of information in expanded Contact Info
- Net Worth
- Home Owner Status
- House Hold Income
- Length of Residence
- Marital Status
- Market Value
- Occupation
- Social
- Age
- Education
- Gender
- Presence of Children
- Presence of Pets
- Facebook Link
- LinkedIn Link
- Twitter Link
- Anniversary(1)
- Anniversary(2)
- Contacts Date Next
- Contacts Date Last
- Custom Fields
Upcoming Actions
Upcoming Actions lists all scheduled actions for a client. This includes Action Plan Steps, scheduled text and/or emails, appointments, contact reminders, etc.
Text Tab
This Tab allows you to see all of the text messages you have sent to the client and the messages you have received from the client.
You can also write and send text messages directly to the client in this tab. This tab updates automatically, so you can have live, 2-way text discussions with your clients.
For more information on that process please visit our SMS-Texting Page.
Email Tab
The email tab is available for you to send manual emails directly to your clients.
For more information this feature please visit our Email Page.
Tags
Tags allows you to help group certain clients that share important attributes together.
The Tags text field allows you to enter tags for the client. You can enter new tags or existing tags.
For a full list of your accounts tags please visit the Tag tab in Settings.