Self-Pay Sub Account Feature
December 31, 2020Overview
The Self-Pay sub account feature is only available for new sub accounts. You cannot use this feature with existing accounts.
In order to use this feature your account must be enabled as a multi-level accounts, which allows you to create sub accounts.
This feature allows your sub accounts to directly pay ClientTether, so you do not get charged for their account each month.
To use this:
- Reach out to your Success Manager and let them know you would like this feature turned on.
- You will know the feature is on by going to Add-Ons in Settings and see that it has a check mark next “Activate Self-Pay Subaccount Option. Ask your Success Manager for details“
- Once Active, Go to the Account tab in Settings.
- Click
 next to create a new sub account.
 - In the “Create New Account” window toggle
 to on.
Finish Setting up the account.
When the new account owner logs in for the first time they will be prompted for their Credit Card Number and then they will be allowed to select their phone number.
The credit card information for any account can be updated at anytime after set up by going to the Billing Info tab in Settings.
Templates
December 31, 2020Overview
Templates are text or email messages which are regularly used. They can help your users increase efficiency when sending the same message to multiple contacts or repeatedly to different contacts.
Topics
Creating a Text (SMS) Template
- Go to Action Plans > Templates
- Select “Add New” Text
- Add a subject. This will be the name of the template.
- Create your message, adding in tokens if applicable.
- Attach files if applicable.
- Save the template
Please note these templates can also be selected in the Thumbtack tab in the contact profile.
Creating an Email Template
- Go to Action Plans > Templates
- Select “Add New” Email
- Add a subject. This will be the name of the template and the Subject Line of your email.
- Create your message, adding in tokens if applicable.
- Attach files if applicable.
- Save the template
Using A Template
- Open the profile for the contact you want to message.
- Go to the Text, Thumbtack, or Email tab.
- Choose a template from the list.
- Customize the message if desired
- Send your message.
Emails
December 31, 2020Overview
ClientTether Email is another integrated communication tool we provide to help you automate engagement with your contacts. It keeps all sent emails stored and accessible through the contact’s history.
In the topics included on this page we are going to discuss everything you need to know about how to use this tool to effectively communicate with your contacts.
Topics
- Rules, Regulations, Best Practices
- Action Plan Email Messages
- Template Email Messages
- Manual Single Email Messages
- Manual Group Email Messages
- Unsubscribing From Email Messages
Rules, Regulations, Best Practices
If you are operating within the United States please ensure you are in compliance with TCPA regulations. If you are operating in Canada please comply with CASL regulations.
All Clients and Users are also required to follow our Acceptable Use Policy.
Action Plan Email Message
Email messages in Action Plans are automatically sent as an email step in an action plan.
It is highly recommended you use Tokens such as First Name to personalize the message. You can also use tokens in the subject line of the email, which can help personalize your client’s experience and increase engagement.
Type your desired message in the message box.
You also have the option of adding in additional email addresses, and excluding the client if you need to.
If you are excluding the client, check the exclude client box, and make sure you include the email address the email in the box for alternate email addresses
You can also attach files to your email via the File input right under the message box.
For more information on Action Plans click here.
Template Email Messages
Template Email Messages are sent via the Manual Single Email Messages or the Manual Group Messages.
These are pre-written messages that are handy to have, but don’t necessarily fit into an action plan.
They are created in the Template area (Can be found under the Action Plan Menu)
You are again able to select Tokens to personalize the message.
Also add a meaningful subject and type in your content. You can add attachments with the File input.
If you are sharing this template with sub accounts, you may check the box next to “Protect from Overwriting” if you do not what them to make changes.
Manual Single Emails
These Email Messages are sent from within the Contact Profile.
Open the contact profile and go to the tab that is labeled Email.
- In here you can select to have this email be sent immediatly or delayed.
- You can select whether you would like a notification.
- You can add in additional email addresses.
- You can opt to exclude the client
- Make sure you check the exclude client box. Include the email address you want to receive the message in the box for Alternate Addresses.
- Select an email template.
- Type your message (Note Tokens are not available here).
- Attach files.
- Click “Send Email” when you are ready.
- If you don’t need to send it or you want to reset the message, click “Clear”.
Manual Group Email Messages
To send a group email message, go to the contact list. Check the boxes of all contacts you would like to send the message.
Next, click the Blue “Email” button at the top left part of the screen.
Please note this does not send out a big group email, but an individual email to each recipient with the same message.
You will see the number of contacts selected.
From here, you can
- Select immediate or Delayed timing.
- Choose a template.
- Type in a manual message.
- Add an attachment with the File Input.
- Send message when ready.
- Click “Clear” if you wish to disregard.
Unsubscribing From Emails
Contacts have the option and right to opt out of emailing at any time.
To do so, they simply need to click the unsubscribe link included at the bottom of the email they received from you.
If a contact unsubscribes from emailing, ClientTether will ad a red note in the history, which when expanded, will show details about when they unsubscribed.
This note will also contain the contact’s email address, which will be removed from their email field in the client record. This helps you retain the information, and it helps ensure you do not accidentally violate their request to no longer receive your email messages.
Do not email them again unless the contact has given you express permission to do so.
Lead Sources Settings
December 31, 2020Overview
Lead Sources allow you to easily and automatically track lead attribution and lead source performance.
Lead source settings allow you to see:
To create a new Lead source:
- Click next to “Lead Source”.
- Type in the desired name
- Click
To Edit or Delete a lead source:
- Click

- Change name if desired
- Delete by clicking
 if desired
 - Exit out of Edit mode by Clicking

To acquire or get a new Web Key for posting:
- On the desired lead source Click

Note: If you refresh the web key, any place you were using the previous web key will need to be refreshed with the new web key you generate.
If you cannot see Lead Sources or edit Lead Sources in Settings then they have been locked at the enterprise level.
Opportunities
December 31, 2020Overview
The opportunities feature, available in the Contact Profile, allows you to track multiple opportunities from a single contact.
Every Opportunity can be placed in its own Action Plan, and have its own Assigned User, Sales Cycle, and Lead Source.
Also all contact information is tied to a single opportunity. This is helpful if a client owns multiple properties, requires multiple services, or otherwise needs to track different deals. This new feature allows you to save a different address with each opportunity.
The opportunity contact information will copy from the default opportunity and you can change it with the new opportunity.
You are also able to select or type in:
- If the appointment has been set
- The deal size
- This also can be updated by the Proposal System. If a proposal has been created for the Opportunity.
- You tie a proposal to an opportunity by having the opportunity selected. In the contact profile, and then creating a Proposal.
- This also can be updated by the Proposal System. If a proposal has been created for the Opportunity.
- Whether the client has been quoted
- Likelihood of the deal going through
- The close date
- If the opportunity is closed
- If the contact has paid.
Please be aware updating opportunities via API and Parsers will be available soon.
Topics
- Creating a New Opportunity for a Contact
- Where to View Contact’s Opportunities
- Opportunity Table
- How to Delete an Opportunity
- Display of Primary v. Non-Primary Opportunities
- Short Training on Opportunities
Creating a New Opportunity for a Contact
To create an new opportunity for a contact:
- Open the client’s Contact Profile.
- Click directly under “Opportunity”
- Select the opportunity from the templates drop down
- This drop down list is created from the Opportunity Templates you created in the Opportunity Settings.
- You can edit any of the fields for the opportunity once it has been created. You do not have to use the default setting from the template.
- If it is a unique Opportunity that does not fall in line with an existing template select “Other” At the bottom of the drop down menu.
- A new text field will appear below Other
- Type in name of Opportunity in this field.
- Fill out any needed fields
Where to View A Contact’s Opportunities
Contact Profile
In the Contact Profile there are two places you can see all Opportunities for a contact.
- The drop down menu for the Opportunity
- Will list all opportunities
- Also where you can switch which opportunity you are looking at.
- By clicking
 just to the right it will open the Opportunity Table
- Shows all Opportunities for Client in an easy to read table.
- You can edit the opportunity name in this table by hovering your mouse over the name and then clicking
Pipeline
Pipeline will display each opportunity as a contact in the Pipeline.
If you have a Contact with multiple opportunities in different parts of the Sales Cycle you are able to visualize them in the Pipeline.
Opportunity Table
The opportunity table, which again is opened by clicking above the opportunity drop list, is a powerful tool to allow you to see exactly what is going on with each opportunity.
The headers in this table are:
- Opportunity
- Name for specific Opportunity
- Deal Size
- How much money is on the line with this contact
- Can be auto filled by Proposal
- Can be manually updated as you go through the process
- Likelihood
- how likely a contact is to go through with the deal
- Close Date
- Expected Close date
- Set by the Calendar field in contact profile.
- Not the same as Closed Date below, which is the actual date the sale was closed.
- Appt Set
- Has an appointment been set
- Manually toggle on Appt Set
- Quoted Date
- Can be done via the proposal
- Can be manually done by toggling Quoted on
- $ Quoted
- How much was actually quoted
- This can only be filled in from the proposal
- How much was actually quoted
- Closed Date
- Can come from proposal
- Can manually be done by toggling Closed on
- $ Closed
- How much Contact was Closed for
- This can only be filled in from the proposal
- How much Contact was Closed for
- Completed
- Date Job completed
- Can come from proposal
- Can be recorded by manually toggling CMPL to on
- $ Completed
- How much was ultimately collected from the job
- This can only be filled in from the proposal
- How much was ultimately collected from the job
- Action Plan
- Current Action Plan
- Sales Cycle
- Current Sales Cycle
- Current Sales Cycle
How to Delete an Opportunity
Once you have created an opportunity if you wish to delete it you can click the That is found to the right of the opportunity name.
This will remove the opportunity. If you do this by accident and need to restore the opportunity you can go to Archive contact list and restore the opportunity.
If you try to delete the default opportunity it will remove the entire contact from your active list and move it to Archive.
Display of Primary v. Non-Primary Opportunities
On the contact list when, the search filter is set to all opportunities, and in the pipeline, which automatically displays all opportunities, to help with easily distinguishing between primary and non-primary Opportunities you will see a star displayed by the contact name.
If the star is filled in then it is a primary Opportunity.
If the star is unfilled then it is a non-primary opportunity.
Short Training On Opportunities
This is a short training on Opportunities that was recorded by our CTO, Kent Hall. Here is a link to the Slide Deck that he uses in his presentation.
Sales Cycle Settings
December 31, 2020Overview
The Sales Cycle allows you to track and visualize the progress of contacts throughout your sales process.
A unique sales cycle can be created for each Contact Type.
To create a new step in the Sales Cycle, first, navigate to the Settings menu, click on Sales Cycle, and:
- Click next to “Add New”
- Select whether the new step is Inactive or Active
- Enter the step’s Sort Order
- This designates where in your Sales Cycle this step should fall.
- Name the Step
- If during this step in your sales process a customer is quoted or closed select the appropriate check box to automate tracking of this parameter.
- If customer is neither quoted nor closed in the step don’t check either box
- Note: Each step following the point when a client is quoted, you will want to check that box, so the data is tracked correctly.
- Select if the step has a designated Assigned User
- Check the Add Notification box if you want a Notification that a contact has reached this step.
- Click
If you cannot see or edit your Sales Cycle that means it has been locked at the enterprise account level.
Please Note: If you have any contacts currently in a sales cycle step, you can only edit it, you will not be able to delete it.
Opportunity Settings
December 30, 2020Overview
Opportunity Settings allow you to see and create Opportunity Templates that are available for all contacts.
To create a new template:
- 1. Click next to “Add New”.
In the new window enter: - The Opportunity Name
- The likelihood of this type of opportunity closing
- The Deal Size
- If an Appointment has generally already been set
- Click
 when done
Please note the only required filed is the Opportunity name. Fill out the remaining fields based on what will work best for your organization.
To edit an existing Opportunity template click .
To delete an existing Opportunity click .
Contact Reminders
December 24, 2020Overview
Contact Reminders help a user remember to connect with a contact on a specific date.
Topics
- Manually Creating a Contact Reminder
- Action Plan Contact Reminder
- Reminder Visualizations (Color Dots)
Manually Creating a Contact Reminder
- Open a profile of the customer you want to connect with in the future.
- Go to the Event Tab.
- Select the event type of “Contact Reminder”.
- Choose the date you want to connect with them. Please note: You will not be able to select a time for this reminder – only a day.
- Save Event.
Notes: the event will now be shown in the ‘Upcoming Actions’ list.
Action Plan Contact Reminder
- Click ‘Add New’.
- Select ‘Contact Reminder’ for your action type.
- Select immediate or delayed timing.
- If delayed, choose how many days, weeks, months, or years the reminder will be delayed
- Save Action
Reminder Visualizations (Colored Dots)
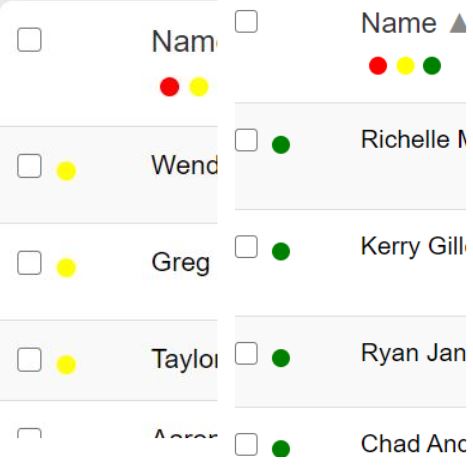
In the list of contacts, you’ll see a green dot next to a contact name. This means you have a reminder task scheduled to connect with that contact today.
The dot will change to yellow if you don’t change the current reminder date for a future date, or delete it. This is meant to call attention to the contact and remind you of past-due tasks.
Email Signature
December 22, 2020Signatures must match the email type. Hence if you plan on sending an email generated with the Sun Editor, you need to have a signature that is created with the Sun Editor.
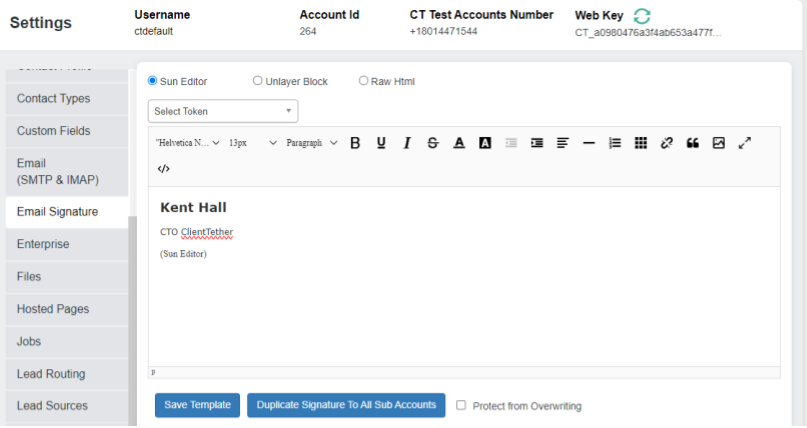
If you plan on sending an email generated with the Block Editor, you need to have a signature that is created with the Block Editor.
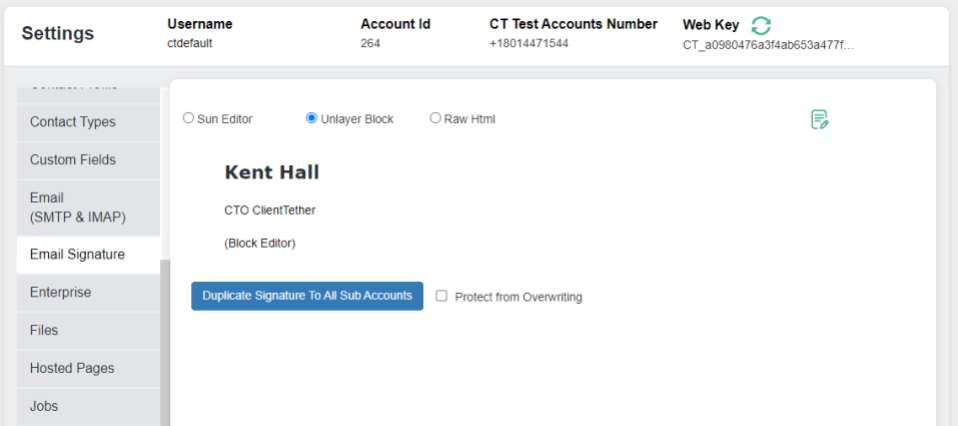
The same is true with Raw HTML.
Otherwise the coding between the email and the signature can conflict.
Overview
The email signature page allows you to create an email signature for your login and potentially for all users in your organization.
Use the text editor to insert and edit images and/or texts.
To make a signature conducive to being reused by multiple users please make sure to use the Logged In User Tokens.
We highly recommend not using the table feature of the text editor to create signatures.
When you are done click “Save Template”. If you wish to send it down to all sub accounts and users then click “Export Signature To All Sub Accounts”. If you want to protect from being changed click the box next to “Protect from Overwriting”.
Putting Logos on left side of Signature
A common issue that has been reported by our users is when they design their signatures they have an image or logo they want to the left of their information.
When they design their signature in our text editor it appears to do just that, but when it is sent the image or logo is above the information.
Here is how to fix this issue:
- Go to Settings
- Got to Email Signature
- Click
 in the text editor this will open the code editor
 - scroll to the top of the code
- This is important in case you have more than one image.
- You will see this:

- To be clear this may not be the very first thing in the code. You want to find the first <div…> followed by a <figure…> that is listed in the code.
- Highlight the <div ….> line
- Replace it with this (copying and pasting is very acceptable):
- <div class=”se-component se-image-container __se__float-left” style=”float: left” contenteditable=”false”>
- You may have to add spaces at the beginning of your text lines to create the proper space between the text and the image. This can be done in the regular editing mode. It does not need to be done in code editor.
Always test your signature in an email to make it looks the way you want it to in delivery.
Text Editor
December 22, 2020Overview
The text editor in Client Tether is used to write emails, whiteboard, history notes, etc.
The text editor is not available for writing text(sms) messages. This is because the nature of sms is simple text and will not support extra (HTML) features.
Font and Writing Style
You can easily manipulate the Font and Writing Styles:
- Size
- Style
- Headers, paragraph, quotes, etc
- Typographical emphasis
- Bold
- Italics
- Underline
- Strike Through
- Highlight Text
- Indention/Outdention
- Alignment
Media
The different medias you can add using the Text Editor
- Horizontal Line
- Lists
- Ordered
- Unordered
- Table
- This is how you make structured HTML emails
- Links
- Quotes
- Image
- Video
- Not available in emails because video files are too large to be sent via email. You must send a link, preferably with a Thumbnail.
You can also adjust the size of the editor box, as well as see the straight HTML of the email if you wish to edit directly in the code.
Topics
- Adding an Image
- Adding a Video using Video Icon (Cannot use for emails)
- Adding a Video using link and Thumbnail for Email
Adding Image
How to add an image into the text editor
- Click

- Paste the image’s URL
- You have to have a url for the image. Trying to paste an image into the text editor can create issues. Note: You can add an image into the Account File repository, which can produce a link to the image to use as a thumbnail.
- Add Alternative text – a brief explanation of image in case it has an issue with displaying.
- Set Proportions.
- It is recommended to allow these to be Auto. You can easily adjust them once the image is embedded.
- Check if you would like to insert a description.
- This would provide a space to caption the image
- Select Alignment
- Basic
- Left
- Center
- Right
- Click Submit
You can adjust the size by clicking on the image and selecting a point to manipulate the size.
Depending on your alignment choice you can click  that will display at various points on an image and add text in the designated locations.
Adding a Video using Video Icon (Cannot use for emails)
To add a video via the video Icon the video must be on YouTube.
- Click

- Paste YouTube URL
- Width and Height will auto fill.
- You can change this once the video has been embedded by clicking and dragging the edges of the video.
- Choose Alignment
- Basic
- Left
- Center
- Right
- Click “Submit” when done
Remember this option is not available for Emails, because email servers will block videos embedded this way.
Adding a Video using link and Thumbnail for Email
To embed a video link and thumb nail into an email. You have a couple of options.
With these options the video does NOT have to be on YouTube.
Option 1: just drop a link to the video.
- Click

- Paste URL to video in URL to link
- Put in what you want the text that displays the link to say.
- Click “Open in new window” if you would like the video to open and play in a new window.
- click “Submit”
Option 2: Insert an image (Thumbnail) and link the image.
This option is simpler than it sounds. You will want a picture that is related to the video. Usually with a play sign on it to signify it will take someone to a video.
- Follow the steps for adding an image
- Before you hit submit, Click the Link tab and put in the Link to the video.
- Select if you would like this link to open in a new window.
- Then click “Submit”