Integrations
September 22, 2021Overview
ClientTether has a robust API, accepts form posts, has a built-in no-code email parsing solution and we integrate with other applications. Below is a list of integrations. Click on the links to learn more.
Integrations
QuickBooks Online Integration
September 21, 2021Overview
There is an Add-On feature in ClientTether to integrate with QuickBooks Online. Once that Add-On is activated and the first Sync is complete, a regular synchronization is done every two hours at 2, 4, 6, 8, 10, 12 Mountain Time.
- The synchronization is initiated when a Contact, with an existing proposal, is marked as Closed or CMPL.
- A new invoice will be created in your QuickBooks Online account, with the same name and number as the ClientTether proposal.
- If the client already exists in QuickBooks, then the invoice will be tied to that client.
- If the client does not exist, then a new client record will be created in QuickBooks with the information from ClientTether and the invoice will be tied to that client.
- Any “Product” that exist in ClientTether that do not exist in QuickBooks will be created.
- Any payments recorded in ClientTether will be added to that invoice.
- As payments are added in ClientTether they will be added to the existing invoice.
NOTE: Our CSMs are NOT QuickBooks user. How you use the data once transferred, is up to you.
How to Set up QuickBooks Online integration
This is done in a few quick steps
- Go to Add-Ons tab in setting and check the box for Quickbooks (this is a premium option.
- Go to the new Quickbooks tab and click on Provided links
- Sign into your Quickbooks account.
- Next, Choose how to match Proposal data to your QB Products.
- Lastly, there is an option to map three fields to your custom QB fields.
You can see this is set up once you have completed these steps by going back to the Quickbooks Tab. The email tied to your Quickbooks account will display as well as a notification that the integration is turned on.
QuickBooks Online integration is a premium add-on, and there is a cost associated with using this integration. Please contact your account manager to discuss any costs associated with activating this feature.
2021 Releases
June 24, 2021Quick Links
- October 28, 2021
- October 7, 2021
- September 30 2021
- September 23 2021
- September 16 2021
- September 2 2021
- August 26 2021
- August 19 2021
- August 5 2021
- July 22 2021
- July 15 2021
- July 8 2021
- July 1 2021
- June 24 2021
Thursday October 28, 2021
- Settings->Tags
- When viewing the Clients with Tag the clients names are now hyperlinked. If you click it will open their contact profile.
- System users are now archived when they are deleted so that reporting remains accurate
- Archived users cannot login to the system.
- They also cannot be restored
- Common Custom Fields
- Can now be locked at the enterprise level
- New account tab in Custom fields in Settings allows you to create custom fields for Just the local account.
- Cannot be shared
- Will have own token available under Accounts soon.
- New data type options for custom fields
- Text
- Textarea
- Phone
- Date
- Boolean
- Checkboxes
- Radio
- URL
- Number
- Number with Range
- Number with Decimal
- Contact List
- You can now add Common Custom Fields as column headers in the Contact list
- Any field, other than a Common Custom field is now sortable
- AnnAck
- Now able to schedule when Announcements go live and are to be taken down.
Thursday October 7, 2021
- Tags
- If you release or reassign a contact to a different account they have a tag that does not exist in that account the tag will be outlined in red and you have the option of removing it from the contact or adding it to the account.
- Home Advisor has been updated to Angi Leads throughout the system.
- Addons
- Settings Tab
- Please note the unique endpoint URL that still says home-advisor is fine and does not need to be updated.
For clarification, as part of last week’s ability to lock action plans for multilevel accounts.
If you are using that setting the multilevel account will have a new toggle for your action plans. It can be set to draft or ready.
Draft = not shared with your sub accounts.
Ready = shared with your sub accounts.
Thursday September 30, 2021
- History Notes
- Now have a history note that is created when changes are made to existing appointments.
- SMS Okay Capability
- If someone unsubscribes from your text messages you will not be allowed to turn sms okay back on until the contact texts “Start” into the system.
- Enterprise settings
- Can now lock Action plan
- This will automatically push all action plans down to your sub accounts.
- If you do not click “Subaccounts can create their own.” Then the subaccounts will not have access to any action plans they have currently created and cannot create any new action plans.
- If you do click “Subaccounts can create their own.” Subaccount will keep current action plans in there account and will be able to create new ones.
- We recommend that multilevel accounts convert to this new system, because a common Action Plan ID can be used for API calls. Before doing so though contact your CSM for more details.
- Can now lock Action plan
Thursday September 23, 2021
- Event Invite
- Now shows account email for Account sending invite
- Now pulls logo from Account sending the invite
- If no logo then the logo space will be blank
- Invited by now shows the Account name the invite is coming from
- Proposal V2
- Progress Payment % now is just calculated from the grand total of the work sheet.
- Export
- Created date is now showing in a Date format recognized in Excel.
Thursday September 16, 2021
- Contact Page List
- You can now use Account wide custom fields as column headers on the contact list page.
- Proposal V2 updates
- You can use a toggle in the Settings->Bid Types-> line Items above the description box to opt to allow the description to be editable in the actual proposal.
- All fields, except summation types, for line items have a checkbox above them in the proposal. checking that box will allow that detail to be on the quote and work order.
- There is now Icon to the right of the notes box in the proposal that will allow you to select which pre-notes you wish to include.
- We now have a discount box that can be either a percentage or a dollar figure.
- We now support HEIC image types in the proposal system.
- Tokens
- We now have a token type that incorporates any external IDs that are stored in our system via integrations.
Thursday September 2, 2021
- Updates made to API calls to include contact’s tags
- read_client_list
- read_client_by_id
- New action type in Action Plans Remove Seasonal/Event Actions
- This will clear out all actions that are tied to a seasonal or Event Action Plan for the contact.
- Event Plans based on anniversary date now work with Month and Day so you do not have to update the year every year.
Thursday August 26 2021
- Event invites not have account’s logo and name displayed
- Cloning process now clones Files in Settings
- Cloning process now clones attachments in Templates
- Group Email now requires validation for sending if the subject line is empty
- Lead Routing
- Notifications now created when contacts moved to different account because of Lead Routing
- History note created to document lead route move of contact between accounts
- Contacts moved to new accounts via lead routing are duplicate checked in the account they are moved to
- Round Robin Option Update
- IF To Who is set to User
- Checklist created of all account users, including Account Owner, so you can select who is involved in Lead Routing Round Robin
- IF To Who is set to Account
- Checklist created of all accounts, including the parent account creating the lead routing, so you can select which accounts are included
- Note toggle to include current account removed because that account is included in the checklist.
- Checklist created of all accounts, including the parent account creating the lead routing, so you can select which accounts are included
- IF To Who is set to User
- Hosted Page – Online Scheduler
- The online scheduler now availability based on appointments set in ClientTether.
Thursday August 19 2021
- V2 Proposal Invoice Updates
- On the worksheet tab:
- Two new fields
- Deposit
- Progress
- For Deposit
- % – Tells System to calculate on Percentage of Grand total
- NOT Total Remaining
- $ – Hard Coded Number you provide
- % – Tells System to calculate on Percentage of Grand total
- For Progress
- % – Worksheet Total – calculated Deposit – payment(s) +/- Change Orders ) * % Progress field.
- $ – Hard coded Number you provide
- Two new fields
- Invoice Tab
- You can use the
 next to Invoice to open a drop menu with the following options
- Invoice Type
- Deposit
- Progress
- Final
- Watermark Display
- Watermark
- No Watermark
- Invoice Type
- You can use these options to keep your invoice up to date and adjust the look of the invoice.
- Please remember the link you send to clients links to a living document, meaning it will show whatever you have the current invoice tab set to.
- Don’t change the invoice type unless contact has seen and paid on the last invoice.
- If you want a stagnant document you can open the link provided in your template email and create a pdf and send that instead.
- You can use the
- On the worksheet tab:
- Contact list display
- This is now set to save the last setting used in the account (not by user) for the display of the contact list and use it next. The options are to the right of the search bar
- Main Contacts
- Active Opportunities
- All Opportunities
- This is now set to save the last setting used in the account (not by user) for the display of the contact list and use it next. The options are to the right of the search bar
- Export now allows you to select exactly what fields you want to export
- Allows you to select if you want to export history notes
- Options none
- Only Note Type
- All Types
- You can select custom fields
- Will export ALL custom fields for contacts in their own separate columns
- Allows you to select if you want to export history notes
- Export selection will be all contacts selected by your current search or filter, unless you use check marks. If you check mark the specific contacts those will be the only ones to export.
- Export sheets can now be used for updates and imports
- Expect to see documentation coming very soon going over which fields can be used to update and which field can be used in import.
Thursday August 5 2021
- Opportunity Templates are now organized by contact type
- Common Custom Fields can be created for specific contact types within an account
- Lead Routing – Round Robin for accounts – now has option to include parent account
This video goes over how to print a pdf of items in V2 proposals using the browser features.
We have updated Proposal V2 that by using this browser feature it prints correctly and nicely onto standard 8.5in X 11in paper.
Thursday July 22 2021
- Bug fix – Linked In field in contact profile now save value
- Proposal-> Worksheets -> Room Measurements UI has updated so that it linear and easier to edit for each line item.
- We have added verbiage to the Find Phone Number page for new account set up to clarify the number being picked is permanent
- If an opportunity has an active V2. proposal attached to it then deal size field will not be able to be manually manipulated.
Thursday July 15 2021
- New advanced filter option for the contact list
- “No lead source selected”
- Will show any contacts with lead sources unknown or blank in your list
- “No lead source selected”
- A new contact/opportunity must be saved before a proposal can be created for it
- We can now delete certain items from the proposal settings and they will be available in an archive tab – Archive Tab only shows up once something has been deleted
- Bid Types
- Can be archived but not permanently deleted
- Can be restored
- Categories
- Can be archived but not permanently deleted
- Can be restored
- Line Items
- Can be archived but not permanently deleted
- Can be restored
- Quote Type
- Can be permanently deleted
- Can be restored
- Pre-Notes
- Can be permanently deleted
- Can be restored
- Sub’s
- Can be permanently deleted
- Can be restored
- Bid Types
- In Proposal Settings’ Tax/Display tab We now have options to
- Show line items on Invoice
- Default setting is unchecked
- Show Line Item $ on Quote
- Default setting is unchecked
- Show line items on Invoice
- In a proposal if you update the room calculations they now auto update on the worksheet.
- Proposal Constants
- List now displays in alphabetical order
- Be used as valued in default value fields for line items (Proposal Settings)
- Can be edited in a proposal and only affect that proposal
- Can be edited in settings and it will not affect existing proposals
Thursday July 8 2021
- Daily Emails Should deliver at 5 am for the time zone which is selected in the accounts operation settings.
- Contact Reminders will update at 5 am each day in the account
- Green dots appear
- Green dots turn to yellow dots
- If your SMTP setting is for a Google account and your password was updated, but you have not updated your SMTP settings within ClientTether the following will occur:
- SMTP will be turned off
- Error message will display
- Error notification will display asking you to reconnect your SMTP.
Thursday July 1 2021
Updates to Settings->User ->user edit capabilities
- update username
- select if user is to receive daily emails
Changes to Settings-> Proposal
- New layout in tabbed format to make navigation easier
- Template tab
- Duplicate
- Share templates with other accounts in your organization
- Delete templates
- Proposal Default Tab
- IF version 1 of proposal system is active in your account this will show
- Allows you to edit default values
- If this is showing and it is blank or you no longer use V1 please reach out to your CSM and they will coordinate having it removed for you.
- IF version 1 of proposal system is active in your account this will show
Changes to Settings->Account
- Any selection to the Accounts Display setting is global for that individual account. Meaning it will be the same for all users
- The selection of Account Admin will switch the two columns on the Account Page of Account Admin and Company Name
- Selection of the Notifications option will make it so users will only see the accounts they have set to see roll up notifications for.
Thursday June 24 2021
- Change User Levels from Admin to Standard and vise versa
- User setting for daily email is now controlled in the user tab in settings.
- Account Owner still controlled in Action Plans
- Now able to save Contact list filters
- Can choose how to order accounts
- Account Name
- Admin User
- Notification roll up selections
- Account Deactivate puts count in 10 day waiting period and then it is deleted. You cannot access the account while it is deactivated.
- You can reactivate the account anytime in this 10 day window and have all of the settings and contacts restored
- Once the 10 day count down is finished the account is permanently deleted from the system.
- Default Date range selection for dashboard has been changed from the last year to the last month.
- New tab in settings called “Charts” allows you to edit that for your specific account
- Proposal Line items drop-down type
- can pick display and value by typing display|Value
- can now have designated default by adding * to item you wish to be default.
- display|Value*
- Reset Password from login page has been fixed.
Google Sheets Integration
March 25, 2021Overview
In Action Plans, you can now create an action plan step to instantly update a Google Sheet. This is an easy way to push updates to Google Analytics or other third party platforms that integrate with Google Sheets. To do this:
- Go to Action Plans
- Open the Action Plan you wish to add the step to
- Add a new action step
- In the Action Type drop down list select Google Sheet.
- Link the Google account that has editor rights to the Google Sheet you wish to update, by clicking on the drop menu for Authorized Google Accounts.
- To add an authorized Google account just select “Add New”
- Click the blue button that appears that says “Authorization with google”
- Select which of your Google accounts you wish to authorize
- Click Allow
- Then go back to the drop-down list and select the newly authorized account.
- Next, paste in the Google Sheet ID
- This is found opening the desired Google Sheet and copying the id number from the URL for the Google Sheet

- Select the Payload
- If you opt to send full Contact Payload your sheet needs to be designed to have headers for every piece of the contact’s payload
- If you want to only send specific information from the Contact, you need to map your Sheet’s Columns to the specific data being sent. Be sure to place the data you are sending in the same order of the Sheet’s Columns. For easy mapping, put the same name of the Sheet’s column header as the Key Name. Then select the corresponding Contact Token as the Value to be sent. Click Save after each Key Name-Value pair you create.
- You can also set a fixed Value without a token, but that value will always be what is sent.
- Click “Save Action” once you are done with editing the step
Each time this action step runs, it will push the selected data from the client record into the specified Google Sheet.
Angi Leads (Home Advisor)
March 22, 2021Overview
Our Angi Lead integration allows you to instantly get ALL information from new leads from Angi Leads, formerly Home Advisor, brought straight into ClientTether.
You can also easily monitor all incoming leads from Angi Leads via our API Monitor.
All information is stored and easily accessible within the Contact Profile for the lead.
Based on your settings you can arrange for an Action Plan to instantly fire off once the lead has come into the system.
There are two parts to getting this integration going and they must be done in the following order:
- Activating within ClientTether
- Activating with Angi Leads
Here is the link to the slide deck used in this presentation.
Topics
- Activating Angi Leads Integration within ClientTether
- Activating Angi Leads Integration with Angi Leads
Activating Angi LeadsIntegration within ClientTether
We have made our side of this integration as simple as possible.
- Go to Settings
- Go to Add-Ons tab
- Check the box next to Activate Angi Leads
- Click on the tab that appears called “Angi Leads”
- Select your lead sources for “With an Appointment:” and “Without an Appointment”
- Even if you don’t ever expect to get a lead with an appointment or without an appointment always set the lead source for both anyways.
- Click on the Unique Endpoint at the top of the page to copy it.
Here is the link to the slide deck used in this presentation.
Activating Angi Leads Integration with Angi Leads
To activate the Angi Leads API on the Angi Leads side you will need to send an email to: crmintegrations@homeadvisor.com (This is still correct even they have changed name to Angi Leads).
This email needs to contain:
- A Subject with the number of Accounts you wish to add to the API
- {{Your Company Name}} X Number of Accounts for API Set up
- We strongly recommend not doing more than 10 at a time, and testing those 10 accounts, because Angi Leads manually enters the data on their end and have made errors on entries before.
- Create a table with the columns for the account owners first name, last name, Angi Leads’ Account ID, and the Unique Endpoint you copied from ClientTether.

- Make sure to specify for them to turn off any parser emails coming into ClientTether from Angi Leads
- Otherwise you will have the same lead come in via the API integration and the parser, which will cause you to get a lot of duplicates.
- Send the email
- Please be aware Angi Leads Standard Operating Procedure is to send you a test contact once the account is connected. This test contact will be a duplicate of an existing contact. If you wish for them not to do this please specify it in your email.
Here is the link to the slide deck used in this presentation.
CT Sign
January 20, 2021Overview
CT sign allows you to create documents that can be signed by a contact.
You will need to use Tokens and the Text Editor to build your documents.
Please note there are four specialized tokens for CT Sign that are only available in this feature.
- Initials
- Checkboxes
- Today’s Date
- Text Field
Do not pre-write and format your document outside of the Text Editor and then try to copy and paste it into the Text Editor. This can cause many formatting issues.
Topics
Creating a new CT Sign Document
To create a CT Sign Document:
- Go to Settings
- Go to the Hosted Pages tab
- Click
 next to “Add New”
 - Pick a name for the page
- Pick a Page Slug
- Page Slug cannot have any spaces in it.
- Select CT-Sign under type
- Use the Text Editor and Tokens to build the documentation
Please note the signature line for the contact will automatically be added to the bottom of the document. Currently we can only have one signature line per document.
If you would like to put your signature in the document Please turn it into an image and insert it.
Sending a CT Sign Document
To send the CT Sign Document you have created:
- Go to Settings
- Go to Hosted Page Tab
- Select the Hosted Page you would like to send
- Copy the page slug
- Put this in a template using the token “Hosted Page”
- It will look like this {{hostedpage.PAGE_SLUG}}
- Paste the Page Slug you copied from step 4 over PAGE_SLUG in the token.
- Use the template in an email or text to send this to the contact.
- The contact will see a link in their email or text and be able to see and sign the document from there.
You will also receive a notification when a CT Sign document was viewed by a contact and another when it has been signed by the contact.
When the document has been signed a pdf of the document will be saved in the contact’s files in the contact profile.
Lead Routing
January 20, 2021Overview
Lead routing allows you to automatically sort your leads to either sub accounts or users within your own account.
Lead routing will automatically sort any new leads, and you can also signal for it to sort any old leads as well.
Please note you are only allowed to have one lead routing plan per Enterprise account.
Topics
Activating Lead Routing
To activate lead routing:
Once this is done you will see the Lead Routing tab appear above the Lead Source Tab in Settings.
Using Lead Routing
To utilize lead routing
- Go to Lead Routing tab in Settings
- Select whether you are sorting leads to Users or Sub Accounts
- Select how you want to sort the leads
- Round-Robin
- Evenly distributes leads among Users or Sub Accounts.
- State/Province
- Allows you to assigns specific States/Provinces to the Users or Sub Accounts.
- Postal Code
- Allows you to assigns specific Postal code(s) to the Users or Sub Accounts.
- Lead Source
- Allows you to assigns specific Lead Source(s) to the Users or Sub Accounts.
- Round-Robin
- Set your Mapping
- Select if you want this to apply to Existing Customers in your account
- Select if you want action plans is sub accounts to activate based on lead source. (IF you are applying the lead routing to existing customers this option is not available)
- For everything other than Round Robin, Select who you want default leads (so leads that don’t fit any of the mapping) to go to.
- For everything other than Round Robin assign the mapping to the correct User or Sub Account.
If you are lead routing to sub accounts AND want to activate action plans. Lock your Lead Sources at the Enterprise level.
Add-Ons
January 15, 2021The Add-Ons tab in Settings allows you to turn on and off various optional features that are available.
The Add-On features available in your account are dependent on several factors. Not all Add-Ons are available for all accounts.
To activate a feature, you simply need to click in the checkbox to the left of the description.
If more configuration or options are available, they will either be accessed in the Add-Ons settings tab (i.e. Mailbox Power) or in a new settings tab that will appear once the corresponding Add-On has been activated.
If you are looking for a feature and cannot find it please reach out to your Account’s Success Manager.
List of some Add-On options
- Add By Phone Button
- Angi Ads
- Angi Leads (Home Advisor)
- Call Center Suite
- ClubReady
- CompanyCam
- Dispatch Integrations Management*
- Ext Screen Pop
- Hireology*
- Lead Routing
- Mailbox Power
- Notification Roll-Up
- Proposal System 2
- Proposal System National*
- QuickBooks Desktop*
- QuickBooks Online
- Reputation Management
- Recur360
- Self-Pay Subaccount Option
- Talent+*
- TetherPay
- ThumbTack
* Designates that these features are only available for specific White Label accounts.
Accounts List Page
January 8, 2021Overview
The Accounts page is available to any Multi-Level Account. Meaning you have, or are set up to add sub-accounts.
On this page you get a list of all of your sub-accounts and their sub accounts.
You can see the acccounts’:
- Company name
- Account Admin
- Account Admin Last Login
- Created Date
- Subscription Plan
You can also:
- Login to the sub accounts by clicking

- Perform various actions by clicking the arrow on
- This will be covered in depth below
- See the full contact list for an account by clicking the
 that is next to the Company Name.
 - Search for a contact in all of the sub-accounts by using
 in top the right corner of the page.
 - You can select what you are searching for via the drop down menu between Search bar and search button.
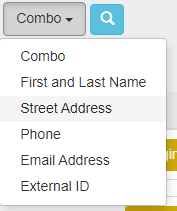
- Please note that if you select combo it will search all options with your data.
- That means if you are searching for phone number with 555-555-5555 it will pull up addresses, email addresses, etc., that have 555 in them.
- It is best practice to select the specific category you are searching in.
- Also be aware that the phone option can now accept any 10 digit formatting without it causing a problem for searches
- 5555555555
- (555) 555-5555
- 555-555-5555
- 555.555.5555
- etc.
- Please note that if you select combo it will search all options with your data.
- You can select what you are searching for via the drop down menu between Search bar and search button.
To create a new account or clone an account you have to go to the Account Settings page.
Topics
to the far right gives you many options of what you can do on this page.
Also visit Account Types to learn more about different types of Accounts in ClientTether.
Edit Account
The Edit Account Action allows you to update the following account information:
- First Name
- Last Name
- Company Name
- Account Name
- Phone
- Office-Phone
- Website
- Address information
Change Password
The Change Password action allows you to update your account’s password.
This window will show the username.
- Type in new password in New Password field
- Re-type in new password in the Confirm Password field.
- Click

- You will see a confirmation message that the password has been updated.
- To close the window click
 or click outside of the window.
Upgrade to Multi-Account
This allows you to change your sub accounts from a single level account to a multilevel account.
To do this just select to Upgrade Multi-Account.
If this upgrade is in place and you want to change the account back to a single level account. The “Upgrade to Multi-Account” option will be replaced with “Mark as Single Level” and this will change will the account back to single level account.
Move Account
The Move Account action allows you to re-arrange your accounts.
When you click on this option it will open a window with a drop list of your accounts and you can move the account under the account you wish.
Delete Account
The Delete action will completely remove an account.
Just click  and this will remove the account.
If you delete an account this will completely remove it, and all contacts and content within it from the system. You cannot undo this.
Account Settings
January 8, 2021Overview
If your ClientTether account has been enabled as a Multi-Unit account, you will be able to add sub-accounts beneath your Enterprise Account. If not, you will not see the Account tab in the Settings menu within your account.
The Account tab in the Settings menu allows you to
- Login as a Sub-Account’s Account Owner
- Edit Existing Accounts
- Delete Existing Accounts
- Create New Sub-Accounts
Topics
- Create New Sub-Account
- Login as Sub-Account
- Edit Existing Accounts
- Delete Existing Accounts
- Complete Set Up for New Sub-Account
Create New Sub Account
Click next to “Create New Account”
Once the new window appears you can enter in the following information:
- First Name*
- Last Name*
- Phone Number*
- Email*
- Username*
- Company Name*
- Web Address
- Account Owner*
- Time Zone
- Choose if you are cloning an account
- Activate Proposal System (Must be activated in Add ons)
- Royalty Rate
- Marketing Rate
- Set the Password*
- Select if Self Pay Account (Must be Activated in Add ons)
Anything that is denoted with a * is required.
Login as Sub-Account
You can click  next to the account to login to that sub account.
This is helpful if you want to review that account’s pipeline details, lead conversion rate, activity, or other reports. It also enables you to view contacts, history, and to help support sub accounts by engaging contacts on their behalf.
Edit Existing Account
Click  and you can edit the account’s:
- First Name
- Last Name
- Phone Number
- Company Name
- Web Address
- Account Owner
- Time Zone
- Activation of Proposals
- Royalty Rate
- Marketing Rate
- Update Password
Please remember you cannot currently activate self pay for an existing account.
Delete Existing Account
Click  to delete an account.
You cannot undo this action once it is done.
Also be aware that you cannot delete an account that has sub accounts.
Complete Set Up for New Sub-Account
Once a new sub account has been created, regardless if it is a clone, you will need to complete set up for the account.
In order to do this you must log in to the account via the ClientTether Login Page. You cannot do this by logging in via the Accounts or Accounts Settings pages.
Once you login as via the ClientTether login page you will be prompted to:
- Enter your credit card information
- If this sub-account is a self-pay account
- Select a phone number
Once those two pieces are entered the set up for the sub account is complete.