April 7, 2022
September 7, 2022New Features/Settings:
- Customize Contact Name
- To customize the name of the Contact Types (Employee, Partner, Vendor and Other) within the account, visit the Contact Type tab in Settings.
- From the Contact Type tab, click on the Contact Type name you wish to edit and update the name accordingly. Click enter and the update is autosaved. Refer to the video for a full tutorial of this process.
Updates to Existing Features/Settings:
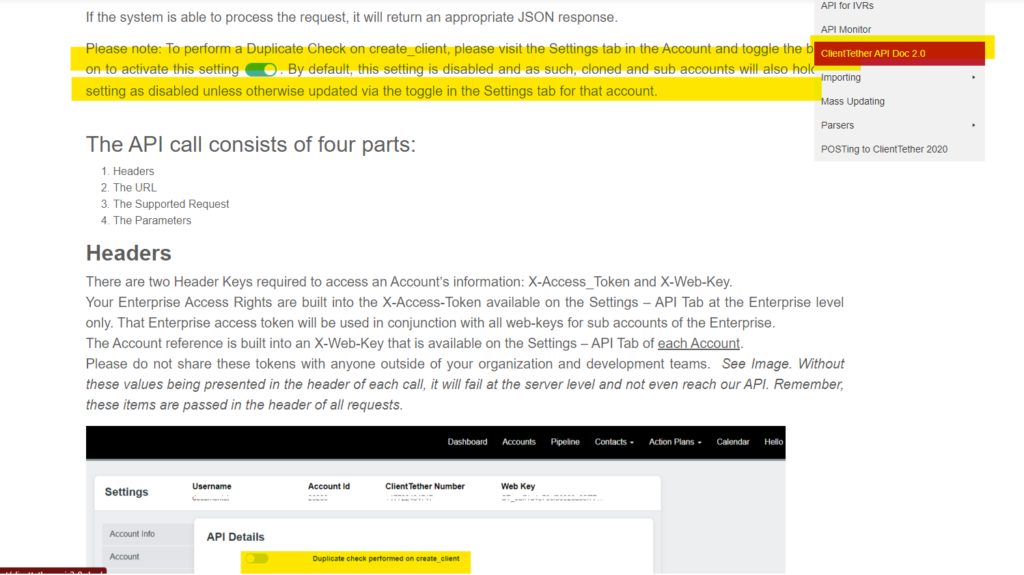
- API Duplicate Check at create_client
- To perform a Duplicate Check on create_client, visit Settings and toggle the button to on. Note that by default for existing accounts and new accounts this feature is set to false (off). Additionally, cloned or sub accounts created will also be set to false. To update, visit Settings and update toggle accordingly.
- Custom Fields
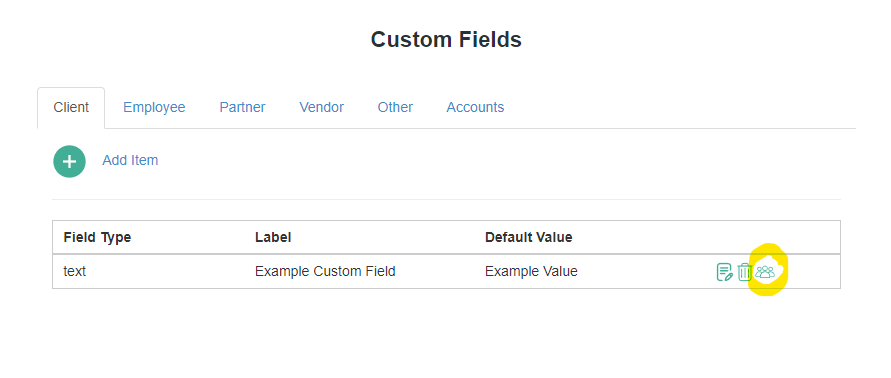
- When adding a Custom Field within a Contact Profile, the new field is currently also added to the Custom Fields list in the Settings menu. Now, from the Custom Fields tab in Settings you can elect to add this new Custom Field to all Contacts within your account by clicking the far right icon
 .
. - Please note that when updating all Contacts to include this newly added Custom Field, the update process timeline will be determined by both the volume of Contacts within the Account as well as ongoing system activity.
- When adding a Custom Field within a Contact Profile, the new field is currently also added to the Custom Fields list in the Settings menu. Now, from the Custom Fields tab in Settings you can elect to add this new Custom Field to all Contacts within your account by clicking the far right icon
- Editing Manual Appointments now includes the option to edit related Event Plan Action Plan steps.
- If an existing Appointment is edited/changed there is now a pop-up menu feature that gives you options to continue, restart or remove existing Event Plan Action Plan steps that were tethered to this Appointment set within the Events tab in the Contact Profile.
Files
July 16, 2022The Files feature in the Settings menu allows the user to add and save content to be used within the account.
Files added here can include PDFs, company logos, videos, thumbnail and other images, etc.
The most common use of this feature is to have the system generate a URL to be used when embedding content within emails and SMS messages sent from the system. The purpose of utilizing the File feature and URL tool is to allow the system to store and host added account content on system servers that may otherwise be too large or if included directly, cause a message to be flagged as spam.
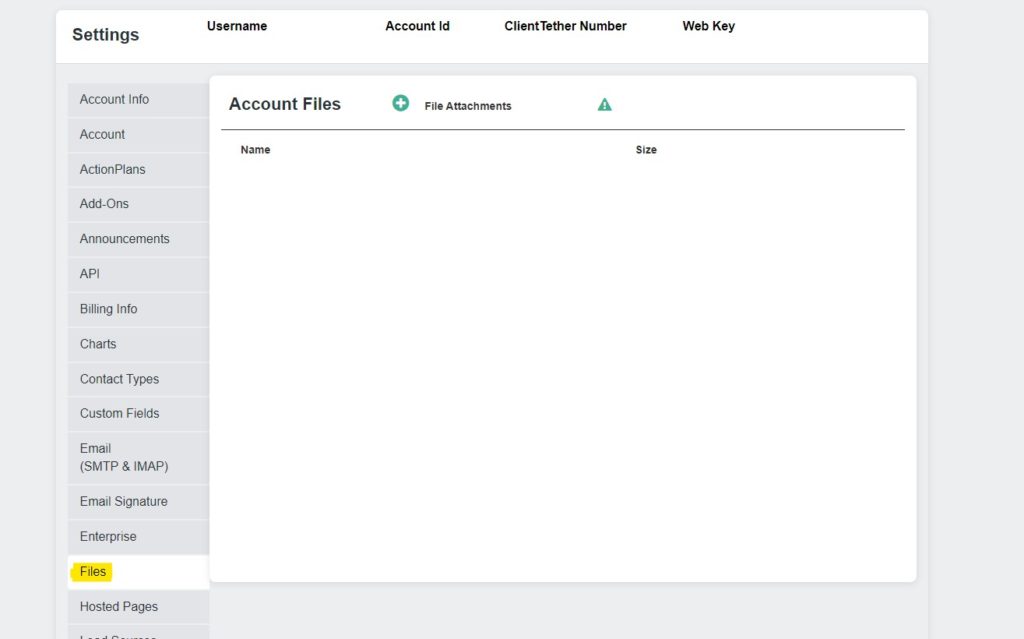
To add a File within this menu, click on the green plus sign at the top of the page.
Next, select the File to be added to the account, from your device/computer files.
Once the selected File has been added to this menu, note the icons generated at the far right: 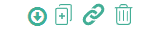
The circled down arrow icon allows for download of the File to your device/computer.
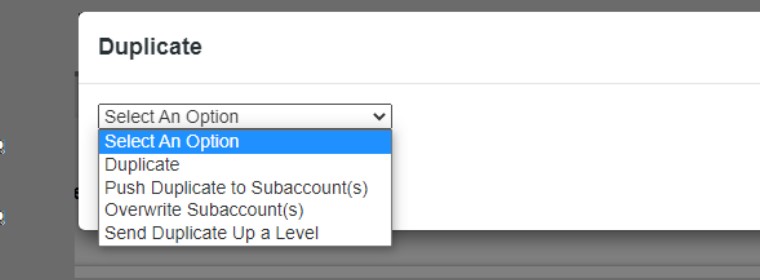
The plus-sign icon allows duplication of the File within the account.
- At the Duplicate menu, select from provided options to only duplicate the File or share/send a duplicate of the File as preferred.
The link icon allows the user to copy the system generated URL to the clipboard to then be used to embed the link to this File within emails and SMS messages sent from the system.
Dashboard
July 16, 2022Overview
The Dashboard is the reporting command center for the account. Data displayed within the Dashboard provides clear insights to lead acquisition, sales, team performance, lead progression, and more.
The charts and figures displayed provide actionable data that allow the monitoring of process efficiency as well as evaluations of the ROI regarding marketing and other processes.
Please note: Data displayed in the reports on the Dashboard is directly tethered to the activity of users in the system including but not limited to how accurately Leads are moved through the Sales Cycle on the Pipeline and how milestone toggles are updated within the Contact/Client profile.
Topics
- Selecting data to display on the Dashboard
- Account Features that that determine available Dashboard reports
- Data Charts available on Dashboard
Selecting Data to Display
You can adjust the data displayed in several ways
- Adjusting the Date Range
- Manually or with Speed Ranges
- Changing the Contact Type
- If you have sub accounts using the Check Boxes in the Accounts List to select which accounts’ information is being displayed.
After selecting the preferred data display options, click the “Refresh Report” button to update the Dashboard reports and review the data specific to your specifications.
Please note: You must click on the “Refresh Report” button to refresh and update the report data you have selected.
Account Features that determine available Dashboard reports
Data options and corresponding data displayed on the Dashboard will be determined by the following factors:
Single-level v. Multi-level Account Views
Multi-level View
Multi-Level view allows you to compare data for all Sub-Accounts using the Account List found in the top left corner of the dashboard.
Single-level View
If the account is Single-level, there will be no list of Sub-Accounts at the top left. Data displayed on the Dashboard will pertain to this Single-level account only.
For more information on different types of accounts click here.
Proposal System v. No Proposal System
If the Proposal feature is activated in the account, three additional data chart options will be displayed:
- Sales Report
- Collected
- Collected Sales Report
If the Proposal feature is not activated in the account, this report option will not be displayed.
For more information on Proposals click here.
The Dashboard is a powerful tool driven by data captured and compiled based on activity in the account and is provided in clearly labeled, easy to review charts. The data displayed is determined by options selected after first determining a specific Contact type and date range at top of the Dashboard reports page.
For reference and ease of navigation, please refer to the list below for current data charts available on the Dashboard.
Note: The * designates reports that are displayed if the account is utilizing the Proposal feature.
Note: The Salesperson Statistics Report will be displayed only if the Account includes Salesperson-type Users.
- Revenue Report*
- Salesperson Statistics Report
- Lead Flow
- Lead Source
- Sales Cycle Progression Rate
- Contact Clients
- Pipeline Summary for Active Path
- Client Count per Action Plan
- Activity List
- Average Job Size
- Closed Ratio
- $ Closed Ratio
- Collected*
- Collected Revenue Report Flow*
- This Month Minute Usage
- This Month SMS Usage
Revenue Report*
The Revenue Report provides a monthly report of total sales within the account and can be displayed via one of two viewing options:
- Line Chart: This comparison view is a simple line graph.
- Bar Chart: This view is a representation of the same data in a stacked graph format.
Salesperson Statistics Report
The Salesperson Statistics report displays lead data broken down into the following report options:
- New Lead Progression to Today: This option displays Lead activity data captured through today’s date ONLY for Leads that have entered the account during the selected date range indicated at top of the Dashboard.
- New Lead Based Activity within Date Range: This option displays Lead activity data captured ONLY during the selected date range and ONLY for Leads that have been added during that same selected date range indicated at the top of the Dashboard. Activity captured for Leads added to the account outside of the indicated date range will not be shown in this option.
- Any Recorded Activity within Date Range: This option displays all Lead activity captured within the selected date range regardless of when the lead entered the account.
Lead Flow
The Lead Flow report displays a monthly breakdown of total leads that have come into the account within the specified date range indicated at the top of the Dashboard menu.
Lead Source
The Lead Source report provides an exact detail of the origin of each Lead. This lead attribution is automated as Leads flow into the account from integrations including sources such as web forms, social media platform lead forms, as well as lead portals and other sources.
Sales Cycle Progression Rate
The Sales Cycle Progression Rate report is one of the most important and unique reporting tools provided on the Dashboard.
This report provided a breakdown of how leads are progressing through the Sales Cycle on the Pipeline and where leads stop engaging during the sales process.
Franchise and multi-unit businesses can utilize this tool to perform real-time comparative analysis of selected locations to evaluate strengths and weaknesses in performance across the entire sales process.
The Sales Cycle Progression Rate report displays lead data broken down into the following report options:
- New Lead Progression to Today displays Lead activity data captured through today’s date ONLY for Leads that have entered the account during the selected date range indicated at top of the Dashboard.
- New Lead Based Activity within Date Range displays Lead activity data captured ONLY during the selected date range and ONLY for Leads that have been added during that same selected date range indicated at the top of the Dashboard. Activity captured for Leads added to the account outside of the indicated date range will not be shown in this option.
- Any Recorded Activity within the Date Range displays all Lead activity captured within the selected date range regardless of when the lead entered the account.
Contact Clients
The Contact Clients report provides data on how many upcoming Contact Reminders for lead engagement are set for today, a future date, or have been missed.
Note: Current and missed Contact Reminder status is indicated by the dot color noted at the Lead name, within the Contact List and Pipeline of the account. Green dots indicate a Contact reminder active for today; Yellow dots indicate a Contact Reminder that has been missed. On the Sales Cycle within the Pipeline of the account, a gray dot will indicate an upcoming action that could include a future scheduled Contact Reminder.
Pipeline Summary for Active Path
The Pipeline Summary for Active Path report provides data on the total dollars for potential and current sales related to Leads in each stage of the “Active” Sales Cycle on the Pipeline.
Client Count per Action Plan
The Client Count per Action Plan report displays how many leads/Contacts are currently assigned to an Action Plan within the account. You can select which Action Plan client count to view by selecting that Plan from the drop-down menu.
Activity List
The Activity List report allows you to view the account activity of users/team members working with the account.
Numbers are provided for each activity they engage in, which creates a high level of transparency and accountability within your organization.
Average Job Size
The Average Job Size report allows you to view the average job size within your account broken down into the following categories
- Assigned User
- Lead Source
- Service*
- Zip Code
- Quote Type
This data provides a clear picture of which factors are involved in potentially bringing in the largest job sizes.
Please note: Data displayed in this report is derived from use of the use of the “Quoted” and “Closed” milestone toggles located at the top menu of of the Client/Contact Profile within the account.
Closed Ratio
The Closed Ratio report allows you to view how many new Leads have “Closed” first by selecting either to view New Leads only or Any Lead via the toggle, then broken down into the following categories:
- Assigned User
- Lead Source
- Service*
- Zip Code
- Quote Type
This allows you to view which factors are driving higher close ratios. This data will allow you to make confident decisions regarding which marketing investments are generating ROI and which should be abandoned or altered.
Please note: Data displayed in this report is derived from use of the use of the “Quoted” and “Closed” milestone toggles located at the top menu of of the Client/Contact Profile within the account.
$ Closed Ratio
The $ Closed Ratio report allows you view total revenue of “Closed'” Leads first by selecting either to view New Leads only or Any Lead via the toggle, then broken down into the following categories:
- Assigned User
- Lead Source
- Service*
- Zip Code
- Quote Type
Please note: Data displayed in this report is derived from use of the use of the “Quoted” and “Closed” milestone toggles located at the top menu of of the Client/Contact Profile within the account.
Collected*
The Collected report allows you to view total dollars collected for the specific Contact type and within the designated date range. This data is broken down into the following categories:
- Assigned User
- Lead Source
- Service*
- Postal Code
- Quote Type
Collected Revenue Report Flow*
The Collected Revenue Report Flow allows you to view total dollars collected each month within your designated date range, and displays it in a stacked graphic. This data is broken down into the following categories:
- Assigned User
- Lead Source
- Postal Code
- Quote Type
Historical Usage per Month
Historical Minutes and Text usage charts are available. You can ask for 1-8 months history and the system will show you the Chronological usage rates. Notes this does NOT synchronize with your billing cycle but it will give you a trend per month.
This Month Minute Usage
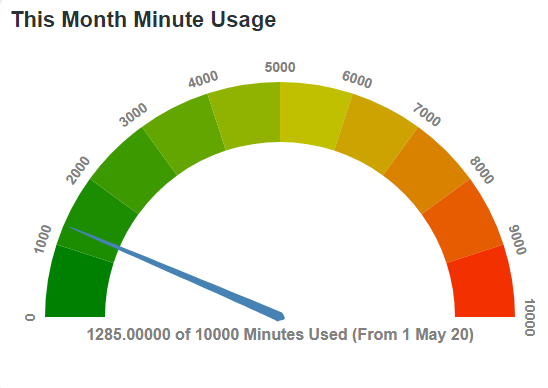
The Month Minute Usage counter displays the total number of phone service minutes utilized by all users in the account during the current invoicing period. This includes minutes used for both outbound calls (manual and via Action Plans, etc.) as well as inbound/return calls to the designated account phone number.
This Month SMS Usage
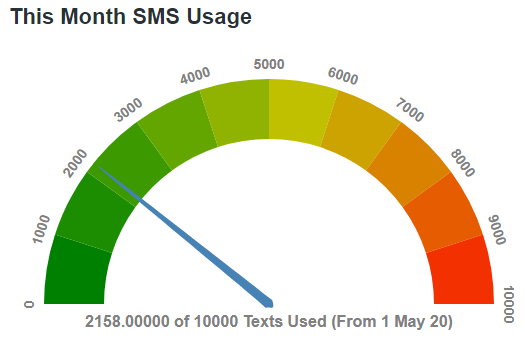
The Month SMS Usage counter displays the total number of text message segments both sent from and received by the designated account phone number during the current invoicing period. Please note: A text segment is counted as 150 characters.
Steps to Control the Charts Displayed on Your Dashboard
- Activate Dashboard:
- Ensure that the Dashboard page is active by clicking on the Dashboard main menu.
- Show/Hide Specific Charts:
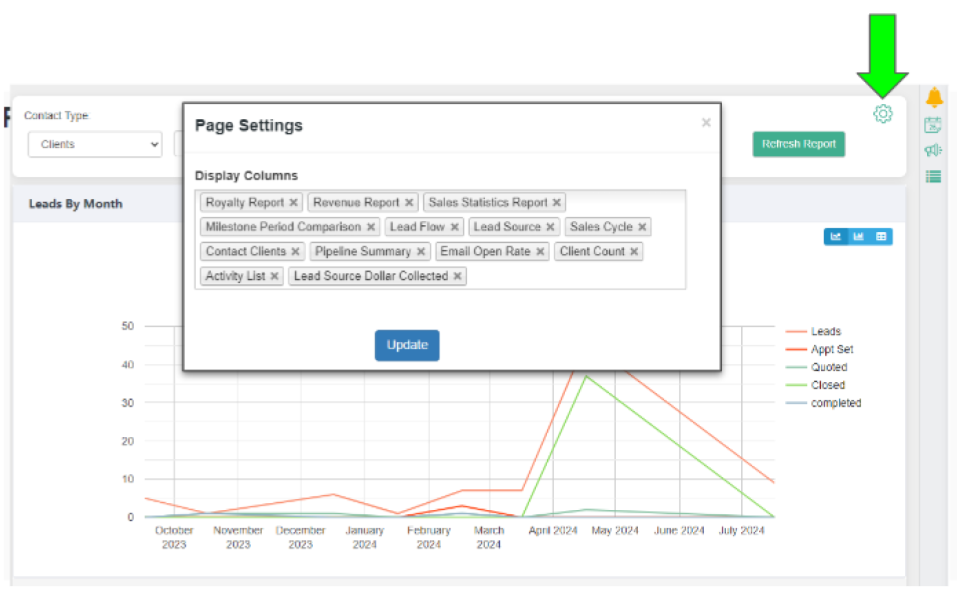
- Go to the Page Settings by clicking the gear icon (indicated by the green arrow) on the dashboard interface.
- In the Page Settings dialog, you will see a list of available charts under “Display Columns.”
- Use the checkboxes to remove undesired Charts
- To restore charts click in the multi-select field to see available options. Click on the desired chart.
- Click the “Update” button to apply the changes.
Example:
The image provided shows an example of the settings interface where you can manage your dashboard charts. Use this interface to customize the visibility and layout of various reports and charts according to your preferences.
Angi Ads
May 5, 2022Overview
Our Angi Ads integration allows you to receive information on new leads from Angi Ads.
(Angi Ads id different than Angi Leads! Please be sure you are selecting the correct Add-On. )
You can also easily monitor all incoming leads from Angi Ads via the API Monitor.
All information is stored and easily accessible within the Contact Profile for the lead.
Based on your settings you can arrange for an Action Plan to instantly fire off once the lead has come into the system.
There are two parts to getting this integration going and they must be done in the following order:
- Activating Add-On for Angi Ads
- Making selections for Angi Ads
Activating Angi Ads Integration
We have made our side of this integration as simple as possible.
- Go to Settings
- Go to Add-Ons tab
- Check the box next to Activate Angi Ads
- Click on the tab that appears called “Angi Ads”
- Select your lead sources for incoming leads from Angi Ads. (if you need to create a Lead Source, you can do that now and return to this point later.)
- Click on the Unique Endpoint at the top of the page to copy it. Give that endpoint to Angi Ads.
Contact Type
April 6, 2022Contact Types are used to segment various Contacts into logical groups for managing, reporting and sales. Additionally, you are able to create a unique Sales Cycle for each Contact Type.
The System defaults to 5 Contact Types named as follows: Clients, Employees, Partners, Vendors and Other.
Many Account Owners elect to rename the Contact Types within their account to better suite their specific business needs. This process can be completed via the Settings Menu at the Contact Type tab.
Renaming Contact Types:
Custom Fields
March 30, 2022Overview
To capture information within a Contact Profile that is not already included in available fields, add a Custom Field.
To view available information fields and add a Custom Field, click the Contact Info tab to expand the information panel.
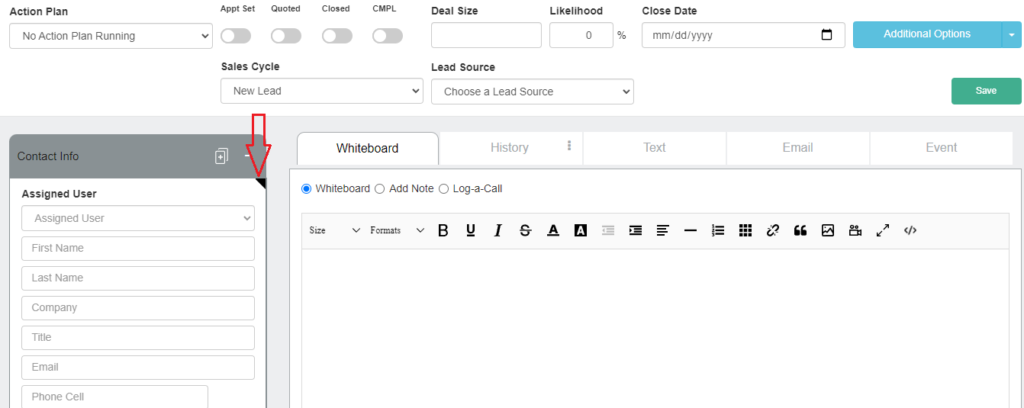
To create a Custom Field, follow these steps:
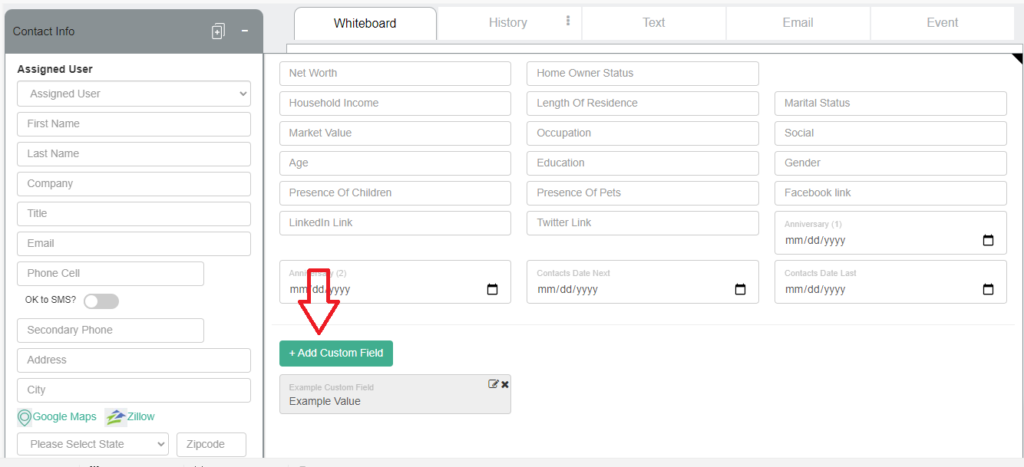
- To add a Custom Field, after clicking the tab icon
 to expand the Contact Info tab, click on the
  button. Now choose the input field type from the drop-down selections. Next, add the name of this Custom Field in the Label field and then add the Value and click the
  This Custom Field is now added to this Contact Profile. To also add this Custom Field to ALL CONTACTS within your account, proceed to the next step.
- When adding a Custom Field within a Contact Profile, to also add this new Custom Field to all Contacts within the account, navigate to Settings–>Custom Fields and click this icon at the far right of that specific Custom Field you wish to add to all Contacts within your Account.
- Please note: When updating all Contacts to include this newly added Custom Field, the update process timeline will be determined by the volume of Contacts within the Account as well as ongoing system activity.
Phone Calls
March 3, 2022Overview
ClientTether provides you several options for placing calls to contacts.
- Click to Call from the Contact List
- Click to Call from within the Contact Profile
- Scheduling a call from the Event Tab with a Contact Profile
- Scheduling a call via an Action Plan
Calls placed from ClientTether will be made with the phone number selected for your account. It is displayed in the Settings header under the ClientTether Number heading.
Having your calls placed through ClientTether is very advantageous because:
- Option to record calls
- Calls are documented in History Notes
- Automation options with the Event Tab and Action Plans
Resources
From time to time an account’s phone number may have been flagged as spam. If this has happened to you will have errors given as you try to call the contact’s number.
Please feel free to check such numbers using numlookup or a similar service to verify if the numbers are valid and if they are what carrier they use.
Below is a list of resources for reaching out to get your account number removed from the spam lists for various carriers.
- T-Mobile
- AT&T:
- Sprint, Verizon, U.S. Cellular:
- Comcast, Charter, Cox, Altice and other fixed line (VoIP) providers, email Nomorobo for call blocking services:
- A helpful third party
Ultimately, you can reach out to your Account’s CSM to request a new number for your account, but there is no guarantee the new number will not have the same issue. We strongly encourage you to reach out via the above resources.
Thumbtack
February 3, 2022Overview
This is a powerful tool combining the automation and centralization of ClientTether with the marketing and communication of Thumbtack.
With this integration you will be able to:
- Have leads directly added to ClientTether from Thumbtack
- Assign Lead Source
- Launch Action Plan
- Receive incoming Thumbtack messages
- Send outgoing Thumbtack messages
- Manually
- Action Plan Step
- Use Text Templates
- View Thumbtack conversation within Contact Profile
- Please note this does not currently include Thumbtack messages you send from within Thumbtack. Only messages you send out of ClientTether, but does include ALL incoming messages from Thumbtack.
Topics
- Setting up Thumbtack ClientTether integration
- Thumbtack for Multi-Level Accounts
- Using integration within ClientTether
Setting up Thumbtack ClientTether integration
To set up the Thumbtack integration please do the following things:
- Make sure you have an active Thumbtack Account
- Make sure you have a clear Lead Source in ClientTether created for Thumbtack
- Reach out to your Thumbtack Account Manager and let them know you would like to activate the ClientTether integration.
- They must turn on the integration on their end first.
- Locate your Thumbtack Business ID for inclusion on the ClientTether Side.
- Paste your Business ID into the Thumbtack Tab in ClientTether.
This may eventually be replaced with an OAUTH Login option to Thumbtack from within ClientTether.
Settings for a Multi-Level Account Structure

There are times when the account structure in ClientTether is different than Thumbtack. For example, you might have a single Thumbtack account that generates leads for all of the greater Denver Metro area. But in ClientTether you might have a Multi-Level account for Denver with 4 subaccounts: North, South, East and West.
In this case follow these steps:
- Activate the Thumbtack Add-On for the Multi-level account.
- Complete the Business ID and Lead Source in the new Thumbtack Settings tab
- Turn on “Share Thumbtack Credentials with Subaccounts
- Activate the Thumbtack Add-On in the subaccounts. Notice they will NOT have a Thumbtack Settings tab, because they are using the credentials form the parent account.
Using Thumbtack integration within ClientTether
Once Thumbtack is set up:
- Your leads will automatically be added to ClientTether from Thumbtack
- Including being assigned the Lead Source and Action Plan you designated.
- You can receive notifications in the right side panel of incoming messages if you opt to do so in the Notification Settings Control Tab
- In the Contact Profile Thumbtack tab you will receive your incoming Thumbtack Messages and send out going messages.
- You can select existing Text Templates for your manual outgoing Thumbtack messages if you wish.
- In Action Plans you can also build in a Thumbtack Action Plan Step.
Please note outgoing messages sent from within Thumbtack do not display within ClientTether.
TetherPay
January 5, 2022Overview
TetherPay allows you to accept payments within ClientTether.
TetherPay is possible because of a partnership between ClientTether and Stax.
It is important to know that all sensitive payment information is stored and directly managed by Stax.
Before starting the process to use this integration please be aware of the following:
- You must fill out an application with Stax via our integration (more on that below) and be approved.
- Application includes a SOFT pull to get your credit score.
- You will be charged a transaction fee
- Depends on type of transaction
- ACH (least expensive)
- Debit
- Credit Card (Most expensive)
- Transaction fee differs based on
- Type of transaction
- Banks involved
- Depends on type of transaction
Topics
Information Needed
Please be aware that this is an application NOT a sign up. You can be rejected. The top three reasons for being denied are:
- Not completing your application in allotted time.
- Providing fraudulent, or false, information on the application
- Having a low credit score
- This is checked with soft pull and will not affect your credit score.
Activating TetherPay
- Turn on in TetherPay Settings -> Add-On -> Premium
- Go to TetherPay tab in Settings
- Click Start enrollment here
- Fill out form
- Confirm email
- Finish application
- Wait for approval
- Once approved Web Token and API Key will have been added to account
- This can take a couple hours or a couple weeks. Please watch for emails from STAX that maybe asking for more information.
- Access TetherPay will be available in:
- ClientTether Proposal Version 2
- New menu option in ClientTether between Calendar and Hello! menu.
Clarification: the TetherPay Menu shows up as soon as you turn on the Add-On however you will not be able to do anything with it until you applied and been approved for your Stax account.
If you are waiting on your approval you can access your application by clicking the Start Enrollment link in Settings->TetherPay and logging in with your credentials.
Using TetherPay
To fully understand and use TetherPay correctly, please thoroughly go through the following four sections. It is imperative you review this information in order.
- Making sure Royalty settings are accurate
- Understanding where you can use TetherPay
- Using TetherPay in the ClientTether Proposal System Version 2
- Using TetherPay in the TetherPay Menu option within ClientTether
Royalty Settings
Once you have been approved you are ready to use TetherPay!
If you have subaccounts, before doing anything else take a minute go to:
- The Settings Account tab, where it lists all of your sub accounts.
- Go to the edit button by each of your sub accounts.
- Look at the CT Pay section at the bottom of the account settings
- Make sure the correct boxes are checked/unchecked for royalty payments on tips and Convenience Fees.
Make sure you do this for each of your sub accounts before taking any payments via TetherPay.
Where you can use TetherPay
With TetherPay there are two places where you can accept payments
- ClientTether Proposal Version 2
- Card Payments
- ACH Payments
- Accept tips
- Record Payments made in Tab
- TetherPay Menu link
- Card Payments
- ACH Payments
- Accept Tips
- Have access to other features available via Stax for TetherPay
- Will need to manually enter payment on existing proposal to record in ClientTether.
IF you accept payments within the TetherPay Menu Link you will have to manually add them to your proposal V2 if you are accepting a payment tied to an active proposal.
We recommend the following Payment type designations in that situation .
- Card payment – Select Card
- ACH – Select Other
You cannot select TetherPay because that will open up a feature to accept a card payment.
Using TetherPay in Proposal Version 2
To utilize the TetherPay option in the proposal system:
- Go to the active proposal that you are wanting to get paid on
- Make sure the tip, credit card and ACH options is selected correctly on the proposal
- You can set this account wide by going to the Settings-> Proposal -> Payment tab.
- Click add payment
- Select Date
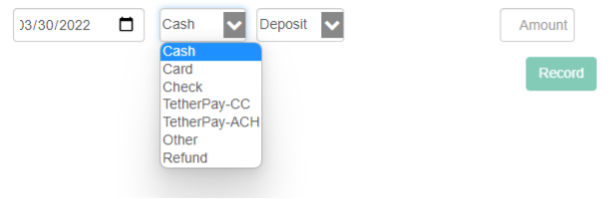
- Select payment Type
- TetherPay – ACH
- TetherPay – CC
- Select payment stage
- Enter amount
- click Record
- Enter in payment information
- Enter in Tip if appropriate
- Click Pay button
- If payment information is not correct or incomplete then you cannot click the Pay button.
- Client’s will be charged and Payment recorded in ClientTether Proposal.
Please remember that the TetherPay payment type is only for accepting new payments not recording payments you have already received via the TetherPay Tab.
IF you received payment in the TetherPay tab and not in the Proposal system, but want to record the payment to a proposal please select the other for how the payment was made.
How to use TetherPay in TetherPay Menu
Here is how to access the information in the TetherPay Menu
- Click on the new TetherPay Menu item in your ClientTether header
- Will be between Calendar and Hello! menu
- Login with your Stax Login information
- Please note there is an option for adding multiple users to TetherPay. We strongly recommend each member of your team have their own individual login.
- After Logging in you will be taken to your TetherPay Dashboard from there you can Access
- Reports
- Payments
- yes you can accept payments!
- You will have to manually update in your payment history for any active ClientTether Proposals.
- Invoices
- Not the same thing as ClientTether Proposal system
- Schedules
- Disputes
- Customers
- This list is independent of ClientTether. You will have to update separately.
- Catalog
- Apps
- Settings
For more detailed information on each of these features and EXACTLY what they entail please visit the Stax support page, and focus on the the StaxPay Section it will address these features in detail.
Controlling CC vs ACH Acceptance
There are Settings to control the visibility of CC and ACH to be used for payments.
CC vs ACH Visibility
You can control the options that your customers see, CC vs ACH, when they open their invoice. This allows you to send an invoice to the contacts and limit which options they have to pay. (See video on left and images below.)
To begin, go to your Proposal Settings and visit the Payments tab. In there you will see the Payment Options for NEW proposals. These settings do not apply to existing proposals. See image below.

New and existing proposals will have similar setting options on the Proposal Overview tab. When a Contact opens their invoice, these are the settings referenced to determine what payment options are shown to the contact. Please remember the invoice is a dynamic page and will show the current settings at the time the page is opened.
See image below.
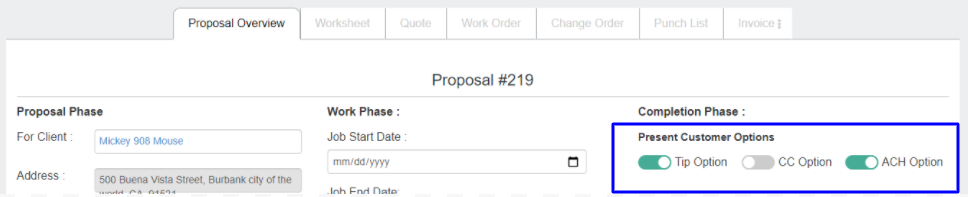
Regardless of the Customer’s options, as a ClientTether User you will be able to choose between all the payment options when taking a payment inside the Proposal system.
Notification Settings
December 2, 2021Overview
The Notification Tab is in Settings.
You potentially have two internal tabs Control and Rollup. We will discuss each of those in depth later.
However, it is important to note the notification settings for this tab are saved per user and are not universal for the account.
Also please note that the Rollup tab will only appear if you turn on the Notification Roll-up Add-On.
Please note both of these settings are applied to the specific user not the account as a whole.
Topics
Control
The control tab allows each User to decide exactly what type of Notifications they will receive.
In some cases you have three options for your notifications:
- System
- This controls whether the Notification is displayed in the right side panel of ClientTether. This is not specified by AU.
- This option is available for every Notification type.
- AU
- System Notifications will only show to you for that notification if they are generated in relation to a contact where you are the Assigned User.
- Text AU
- If the user is the Assigned User for the contact then they receive a text Notification.
- Email AU
- If the user is the Assigned user for the contact then they receive an email otification.
Please also note that if the User is rolling up Notifications they will only see the roll up of the notification types they have selected in Control.
Also if you use the gold login button for an account or the green login as button for a user the notifications you see will be the same as the user you just ‘Logged in as’. Your credentialed settings do not go with you.
Control tab is always available in the Notification tab regardless of what Add-ons are turned on or off for the account.
| Term | Description of Notification |
|---|---|
| System | Notifications Generated on the Right Side Panel in ClientTether. This is not dependent the user being the Assigned User for the contact. |
| AU | System Notifications, Notifications Generated on the Right Side Panel in ClientTether, for Contacts ONLY if you are their Assigned User. |
| Text AU | If the user is the Assigned User for the contact they will receive a text notification |
| Email AU | If the user is the Assigned User for the contact they will receive a email notification |
| Account Paused* | The toggle in Settings->Account Info has been changed from Active to Paused |
| Action Plan Steps | Steps of an Action Plan have been completed and the step had the notification option selected. |
| Assigned User | If a contact has been assigned an Assigned User via a Sales Cycle or through an Action Plan. You will not receive a notification for a manually Assigned User. |
| Client Export | Completion of a contact export. |
| Client Import | Completion of a contact import. |
| Client Update | Completion of a mass Contact Update done via update option on the contact list. This requires uploading an excel sheet. |
| Contact Moved | Contacts moved between accounts for example if a contact is lead routed, released, reassigned, etc. |
| Download Report | A report from the Dashboard is available for downloading. |
| Email Failed Error* | An email send failed. This notification only happens if you are NOT SMTPed into an outside email system. |
| Duplicate Client* | A notification that a duplicate contact has been submitted to the system. Please be aware the AU email and text options will send an email and/or text to the Assigned User of the original contact. |
| Franchisee Statistics Report | This specific report from the dashboard is available for downloading. |
| Test Inbox Read | If user has set up SMTP and clicked button to test reading the inbox. |
| Email Received | If user receives email. Please note this is only available for those SMTPed into Outlook via the Oauth2 Process. |
| New Lead | A new contact has been created for your account. Does not populate for manually created contacts. |
| Manual Appointment | If check box for notification checked when creating Appointment a notification will be generated at the time of the appointment. |
| Manual Call Schedule | If check box for notification checked when creating Call a notification will be generated at the time of the call. |
| Manual Contact Reminder | If check box for notification checked when creating Reminder a notification will be generated at the time of the Contact Reminder. |
| Manual Email Sent | Manual email sent to contact |
| Manual Text Sent | Manual text sent to contact |
| Bulk Reassigned | More than 5 contacts moved to account via Bulk Reassign |
| Bulk Released | More than 5 contacts moved to account via Bulk Release |
| Warnings* | |
| Parser Created | New contact created by Parser |
| Parser Updated | Existing contact updated by Parser |
| Pass Through | |
| Proposal Open | Contact opens proposal via long or short quote link |
| Proposal Sign* | Contact signs proposal |
| Proposal Sent to Dispatch | Proposal has been sent to Dispatch. This is a specialty only available to select clients. |
| Single Reassigned | Contact moved to the account via reassign |
| Single Released | Contact moved to the account via release |
| System Information* | |
| System Error Information* | |
| Text Received* | New text message received. Please note the AU email and text messages only send if you are the Assigned user for the contact. |
| Text Stopped* | Contact has unsubscribed from text messages from your number. Please note the AU email and text messages only send if you are the Assigned User for the contact. Texting can only resume for these contacts if the contact sends a text saying to your ClientTether number saying “Start”. |
| ThumbTack | New ThumbTack message received. Must have ThumbTack integration turned on. |
| Voicemails* | New voicemail received. Please note the AU email and text messages only send if you are the Assigned User for the contact. |
Rollup
The roll up tab allows you to select sub accounts you wish to see notifications for in your right side panel while being in the parent account.
Please note if you have selected to see only specific notification types in the control tab that those types are the only notifications that will roll up to you from the subaccounts.
Remember this setting saves per user and is NOT a universal account setting.