Importing
September 1, 2020Overview
Importing is the process where you can bring your existing client list into ClientTether.
To do this effectively, and save yourself a headache, you will need to follow the instructions on this page exactly.
You have to use our template in order for the import to work.
Topics
Downloading the Template
The very first step in importing is you have to download the template.
You will not be able to import if you do not use our template.
- Go to “Contacts” on the main menu
- Click any of the options on the drop down menu except “Archived”
- Click
 on the top right of the screen, which will open a dialogue box.
 - Click

- Close Dialogue Box
Entering Data on Template
Please follow these instructions carefully to ensure your data transitions smoothly into ClientTether. If this is your first time importing or you have any questions, please reach out to your success manager for support. Our team wants to ensure this process goes smoothly for you.
Also, before you begin a large import, we strongly recommend you import a couple of contacts (3-4) begin with to make sure you are following the process correctly. Once you have verified you have your data aligned correctly, you can then import the rest easily.
If there are any errors on the import sheet ClientTether will not accept any of the data to ensure we save you a lot of time trying to patch up an incomplete or spotty import.
This section will go over each tab available to you in the Import File.
- Header File
- Instructions Tab
- State Abbreviations
- Postal Code Format
- Date Format
- Action Plan IDs
- Sales Cycle IDs
- Lead Source IDs
Header File
This is where you enter the data to import into ClientTether.
DO NOT edit the Column headers on this sheet.
It is important to note for an import the only required information is a first and last name.
Also as you move your mouse of the sheet you will see pop ups giving you helpful hints on how to format information.
Before you enter anything on this sheet you NEED to read and be familiar with the Instructions Tab.
Instructions Tab
This provides step by step instructions for how to fill out out the Header File tab.
The instructions in the Instruction Tab are written for a more technical audience. The same information is included below, but adjusted for non-technical users.
| Column Name | Description | Limitations |
|---|---|---|
| firstName | Contact’s first Name – REQUIRED | Can accept any combination of letters, numbers, symbols |
| lastName | Contact’s lat Name – REQUIRED | Can accept any combination of letters, numbers, symbols |
| phone | 10 digit phone number. This is assumed to be a Cell phone. | Only accepts numbers. No formatting accepted. |
| smsok | If you have permission to text the contact use 1, if you do not user 0. This will default to 0 if no value is provided. | Only accepts 1 or 0 |
| second_Phone | 10 digit phone number. | Only accepts numbers. No formatting accepted. Please remove all +1 or ( ) or – or . characters. |
| Email Address for the contact. Must be unique for each contact. | Must be in proper email format. ___________@_____.___ | |
| address | Street address | Can accept any combination of letters, numbers, symbols |
| city | City | Can accept any combination of letters, numbers, symbols |
| state | US State or Canadian Province | 2-Letter Abbreviation – Reference State Abbreviations Tab. |
| zip | Postal Code | US and CA Zip/Postal Codes: 5 Digit Zip 5-4 Digit Zip 5-4-2 Digit Zip A1A 1A1, where A is a letter and 1 is a digit, with a space separating the third and fourth characters |
| compName | Company Name | Can accept any combination of letters, numbers, symbols |
| tag | Comma separated list of tags. New tags will be created if needed | Can accept any combination of letters, numbers, symbols |
| job_title | Job Title | Can accept any combination of letters, numbers, symbols |
| external_id | ID used for Contact for integrated software with CT (NOT CT Client ID) | Can accept any combination of letters, numbers, symbols |
| deal_size | Deal Size | Whole Number – No Decimals accepted |
| age | Age- Not Birthday | Whole Number – No Decimals accepted |
| education | However, your company chooses to classify someone’s education | Can accept any combination of letters, numbers, symbols |
| gender | M for Male, F for Female | Only Accepts M or F |
| high_net_worth | High Net worth | Whole Number – No Decimals accepted |
| home_owner_status | Home Owner Status | |
| household_income | House hold income | Whole Number – No Decimals accepted |
| Length_of_residence | Length of residence | Whole Number – No Decimals accepted |
| market_value | Market Value | Whole Number – No Decimals accepted |
| material_status | Material Status | Must be “Single”, “Married”, or “Divorced” |
| occupation | Occupation | Can accept any combination of letters, numbers, symbols |
| presence_of_children | Enter 1 for yes 0 for no | Only accepts 1 or 0 |
| creation_date | Date Contact Created – if blank it will auto fill with the date of the import. | Must be in year month Day format YYYY-MM-DD |
| presence_of_pets | Enter 1 for yes 0 for no | Only accepts 1 or 0 |
| anniversary_1 | Date for an Anniversary | Must be in year month Day format YYYY-MM-DD |
| anniversary_2 | Date for an Anniversary | Must be in year month Day format YYYY-MM-DD |
| Facebook Profile Link | Can accept any combination of letters, numbers, symbols | |
| Linked in Profile Link | Can accept any combination of letters, numbers, symbols | |
| Twitter Handle | Can accept any combination of letters, numbers, symbols | |
| action_plan_id | CT Action ID Number | Number copied from ClientTether |
| sales_cycle_id | CT Sales Cycle ID Number | Number copied from ClientTether |
| lead_source_id | CT Lead Source ID Number | Number copied from ClientTether |
| client_category | Not Available to All Accounts – Unless you have been told to use this leave blank. | Can accept any combination of letters, numbers, symbols |
| whiteboard | Notes that you want displayed on the contact’s Contact Profile Whiteboard. | Can accept any combination of letters, numbers, symbols |
| clients_date_last | Last date of importance to your company | Must be in year month Day format YYYY-MM-DD |
| clients_date_next | Next date of importance for your company | Must be in year month Day format YYYY-MM-DD |
| new_lead_notification | 0-No notifications (Default) 1-Software Notifications 2-Email, Text, Software Notifications | Only accepts 0, 1, 2 |
| contact_type | 1-Client 2-Employee 3-Partner 4-Vendor 5- Other | Only accepts 1, 2, 3, 4, or 5 |
| assigned_user_id | CT User ID for the assigned User | This is a set number please reach out to your CSM with request to get it. |
State Abbreviations
This sheet provides the list of acceptable abbreviations for States within the US and for Provinces in Canada.
Postal Code Format
This sheet is currently blank. Please leave it as such. This will change with a future update.
Date Format
This sheet is currently blank. Please leave it as such. This will change with a future update.
Action Plan IDs
This sheet is currently blank. Please leave it as such. This will change with a future update.
Sales Cycle IDs
This sheet is currently blank. Please leave it as such. This will change with a future update.
Lead Source IDs
This sheet is currently blank. Please leave it as such. This will change with a future update.
Uploading the Template
- Make sure import file is prepped and Saved
- Go to Contacts in ClientTether, again any option other than Archive is fine.
- Click
- IF you are putting all imports in the same action plan then select it from the drop down menu
- Please also remember if you are importing and assigning all imports to a specific action plan you want to be careful. If you import 1000 contacts and put them all in one action plan that has an immediate call, you will receive 1000 immediate calls as soon as the import completes. Also, PLEASE NOTE that if you do not select an Action Plan, your contacts will be placed into the “Default Action Plan”, which may have messaging in it you do not wish to send to your contacts. Please create a placeholder Action Plan for importing if you do not have a specific plan you want to run, or delete all of your actions from the “Default Action Plan” to avoid sending communications you did not intend to send.
- Click “Choose File”
- Select your file
- IF you are importing more than 1000 please check the box indicating that fact.
- Click
- Read notice click “Okay”
Please be patient as the system works through the import process:
- importing and validating each row of data
- creating History Notes as it goes
- assigning Lead Sources
- assigning Sales Cycles
- assigning and initiating Action Plans
- generating Pending Actions
Sometimes, very large imports can take a few hours to process and finish setting up all the automation.
Email Settings
August 26, 2020Overview
Email settings allow us to set up SMTP and IMAP configurations with outside email services.
In other words, you can send email out from ClientTether from your email account, whether it be GMail, Outlook, iCloud, etc. This can help boost your deliverability rates and keeps a record of all sent emails in your email account Sent folder.
Always make sure, when you use this feature to check the box in the top that says enable SMTP and IMAP as you set up your connection.
Make sure you have done everything with your email service to allow SMTP and IMAP options to be available. This differs by service, so you will need to verify with your email provider anything you need to do on your end.
If you need to find out who hosts your email service please follow the directions in this link.
Topics
Custom
The Custom option allows you to use any email provider to set up your SMTP/IMAP service with.
You will need to look at documentation provided by your email provider to get the
- SMTP Host address
- SMTP Port
- IMAP Host
- IMAP Port
- Password (Usually App Specific)
Make sure you check the Check Box for Enable SMTP and IMAP
Gmail
Gmail is by far the simplest setup. This can be used with any google email system.
- Check box for Enable SMTP and IMAP
- Select Gmail (Auth Process)
- If you set up Gmail through the old process you will need to do this new process. You will see the word’s OLD and NEW. Select the Gmail with NEW. See this video.
- If you don’t see New and Old then you never set up on the old system.
- If you set up Gmail through the old process you will need to do this new process. You will see the word’s OLD and NEW. Select the Gmail with NEW. See this video.
- Type your email address into the box
- Click “Sign in with Google” button
- Select the google Account you wish to use
- Click “Allow”
- You will see a message appear in green that will say “Success: Congratulations, token for your gmail is generated successfully.”
- Click “Test SMTP Send” and you will get a test email sent from ClientTether that will display that it was sent from your email address.
Please note that the name that shows on your GMAIL SMTP sent emails is your First Name and company name in your ClientTether Account.
iCloud
The the SMTP Host/port and the IMAP Host/Port are already provided for you here. You will just need to
- Check box for Enable SMTP and IMAP
- Enter your email address
- Get the correct password
- This should be an app specific password
- Log in to the app to connect your email account to ClientTether
Outlook OAuth 2.0
Topics
- Connecting
- Email Capabilities
- Calendar Capabilities
Connecting ClientTether to Outlook
To connect to Outlook please follow these steps
- Go to Settings in Hello! menu
- Go to Email (SMTP & IMAP) Tab
- Select “Outlook via OAuth2” from the dropdown Menu
- Click “Sign in with Microsoft”
- Select the Microsoft account you wish to link to ClientTether
- You will be directed to a sign in page
- Once your sign in has been verified you will be directed back to ClientTether and see you are connected.
Warning: Some PDF files will not be allowed to send via Microsoft SMTP OAUTH 2.0. This is something caused on Microsoft’s side and is outside of ClientTether Control. To be safe we always recommend attaching the PDF files as a link and not as an attachment.
Email capabilities
This connection will allow you to send emails directly from your Microsoft Outlook account via ClientTether.
As long you have clicked the checkbox next to read email your incoming Microsoft emails will create a notification in ClientTether and be accessible via the history notes.
Please be aware that there can be up to a 15 minute delay from when the reply email hits your Outlook account and it shows up in ClientTether.
Disabling SMTP and IMAP Email Setting
- Uncheck Check box for Enable SMTP and IMAP
- Go to Custom option
- Make sure all fields clear
- click “Save Settings”
Protected: How CT Works
August 20, 2020Zapier
August 20, 2020Overview
Zapier is a no-code or pseudo-code integration hub that allows you to integrate (through APIs) or send “Zaps” between two other software platforms.
A “Zap” is a packet of information that is pulled from one software platform, and formatted by Zapier so it can be used by the other.
ClientTether takes in information to our API from Zapier through “Zaps”, and sends information into Zapier as well.
You can register to use our pre-made Zaps here.
Please keep in mind this a support page for ClientTether not Zapier. This content focuses on how to use Zapier with ClientTether, not how to use Zapier in general. For more information on just Zapier, please visit their support pages by clicking here.
Topics
- How to add ClientTether to your Zapier Applications
- How to Build a Zap to get Information Into ClientTether
- How to Use Zapier’s Parser to Send Information Out of ClientTether
- How to Use ClientTether Webhook Action Steps to send information into Zapier
How to add ClientTether to your Zapier Applications
First, use this link to register to use the ClientTether pre-made Zapier Actions: Zap Link
After you’ve completed the registration, continue to build your Zap. At the time Zapier asks for the Action App name, type in “ClientTether.”
You’ll be presented with multiple options, please select the highest number version. (i.e. 1.2.0 versus 1.1.0).
Next, you’ll need information from your account to complete the integration process.
Please note the following:
- The Web Key and X Access token in Zapier for ClientTether are dummy tokens.
- You have to replace them with the correct Web Key and Access Token for your ClientTether Account.
- Your Web Key is listed in the Settings menu’s API Tab in ClientTether. If you are an Enterprise account, the X Access Token will also be there.
- You will have to copy the web key and X Access Token from ClientTether and paste it into the fields in Zapier to replace the dummy keys.
Note: If your account is a sub-account in the system, meaning you are part of a larger organization, a franchise system, or a dealer network using our platform, you will not see an access token. Please connect with your corporate/leadership team for support in accessing this information.
Click here to see the slide deck used in the video presentation.
Click here for a video to see where you edit the X-Access Token and Web Key in Zapier.
How to Build a Zap to get information into ClientTether
- Go to Zaps (Menu on left side of screen)
- Click “Create Zap” Button
- Select Application you are sending information into ClientTether from
- Select the triggering event
- Select Account
- Run Test to ensure it can access the needed information
- Select ClientTether to receive the information
- Select what you would like ClientTether needs to do with that information
- Select ClientTether Account – If you need to add a new account here click new account and update the web key.
- Fill out correct information
- Run Test
- Your Zap is good to go!
For creating contacts in Zapier you have a simple and detailed options. Generally simple will be sufficient if not use detailed
How to use Zapier’s Parser to Receive Information Sent from ClientTether
If you’d like to push information from your ClientTether account into an operations platform or other tool, you may need to set a Zapier parser to receive and route this information to the platform you’d like to integrate with. This Section is broken into three sub sections
- Creating a Zapier Parser Mailbox
- Creating a Zapier Parser Template
- Creating a Zap from a Zapier Parser
Creating a Zapier Parser Mailbox
- Go to https://parser.zapier.com/
- Select “Log in with your Zapier Account”
- Select “Authorize”
- Click “Create Mailbox”
- Click “Skip Waiting”
- Name the Mailbox (all letters need to be lowercase) something that tells you exactly what it is used for.
- Click “Save Address in Template” button on lower left part of the screen.
Creating a Zapier Email Parser Template
- In your ClientTether account go to Action Plans menu
- In the Action Plan that you will use to send information, create a step that sends an email (with the “Client excluded” option checked) to the Zapier Mailbox.
- Create a format for information to be sent. We recommend using easy headers, such as “First Name:”, “Phone:”, etc. You’ll want to use each corresponding Token following each header, which will be automatically populated by ClientTether when sent.
- Example:
First Name: {{client.firstName}} ||
Phone: {{client.phoneCell}} ||
- Example:
- Next use a contact to test this on.
- Go back to your Zapier Parser Mailbox list.
- Select settings Icon on far right of the row of the Mailbox you wish to add a template for
- The Template will auto fill the email you just sent.
- Highlight where the information is with the mouse and name them accordingly.
- Click “Save Address and Template”
- Go back to ClientTether, and send a second email.
- Check your Zapier Parser Mailbox by clicking on “View Emails” just right of the correct mailbox.
- Look over the email you sent in. Make sure that it has extracted the information correctly.
- If it has not, then click “Report inaccurate” and re-highlight the correct portions. Then retest.
- If it has, then your parser is set up and ready to go.
Creating a Zap from a Zapier Parser
- Click “Zaps” on menu on left side fo the screen
- Click “Create Zap”
- For Choose App & Event look at Built-In Apps, and Select “Email Parser by Zapier”
- For Choose Trigger Event select “New Email”
- Click “Continue”
- If first time using a parser click “Sign in to Email Parser” by Zapier
- Click Authorize in pop up window
- Click Continue again
- Select Correct Mailbox
- Click “Continue”
- Click “Test Trigger”
- If nothing fills in then there are no emails in that Mailbox.
- Click Continue
- Select the App you wish to send to
- Choose what Action Event you want Zapier to do in the Application
- Click “Continue”
- Select the correct Account
- Fill in correct information for Zap as prompted
- Click Continue
- Click “Test and Continue”
- Check You application and make sure everything was entered correctly
How to use ClientTether Webhooks to send information into Zapier
- Get URL from Zapier Zap
- Create new zap (Each Zap will have its own URL)
- Select Webhooks for Zapier as the App Event for the Trigger
- Copy URL Address from Custom Webhook URL
- Don’t click Continue yet
- Build a Webhook action plan step in ClientTether
- Go to the action plan you wish to add the step in
- Paste URL from step 1.3 into the URL field
- Leave headers blank
- Select Post Method
- Select JSON for Payload style
- Add in the information you want sent in the Payload fields
- Save Action
- Send Test from ClientTether
- Assign action plan to test contact
- Check contacts history notes
- Note made with response from Zapier will be there
- make sure it says status: success
- Run the test in Zapier
- Go back to our Zap from earlier and click continue to run the test
- Your test contact’s information you sent from 3.1 should be there
- Extract Information from Webhook to Other Software in Zapier
- Select the software you need to send the information to
- Plug it in like you would with any other Zap
Protected: ClientTether Internal Documentation
August 11, 2020Hosted Pages
July 20, 2020Overview
Hosted pages are designed to allow your team and clients access to tools that we host on our servers like:
- Online Scheduling tools
- Data Entry Forms
- Chatbots
Most Hosted Pages allow two different access points. One is for known Contacts that are already in your ClientTether CRM. The second is used for potential contacts that are not in the ClientTether CRM already.
Note: For security reasons, you cannot iframe a hosted page on your site. However, you can create links to our Hosted Pages.
Topics
Using
Hosted Pages can be used by embedding them in websites or by using them in templates by utilizing hosted page token with the correct “Slug”.
You can also use them when scheduling events in a contact profile
Creating
These are the types of hosted pages you can create.
– Simple Lead Form
– Custom Lead Form
– CT-Sign
– New Meeting Schedule
– Private AI Chatbots
ChatTool Test Page
This page will be activated by out ChatTool Engineer if you have commissioned at ChatTool to be built. It is designed to allow you to test your ChatTool before launching it on your website.
If you are interested in a ChatTool please reach out to your success manager.
Lead Form
- Go to Settings
- Select Hosted Pages Tab
- Click
 between “Hosted Pages” and “Add New” in upper left corner
 - Create unique name
- Create unique Page slug
- Select “Simple Lead Form” from Type drop menu
- Select Categories you wish to include in lead form
- When done click

Editing
- Go to Settings
- Select Hosted Pages tab
- Select
 icon next to Hosted page you wish to edit
 - Make your desired changes
- When done click
Deleting
- Go to settings
- Select Hosted Page Tab
- Find Hosted Page you wish to delete
- Select
 icon for that Hosted page.
 - Confirm you wish to delete it.
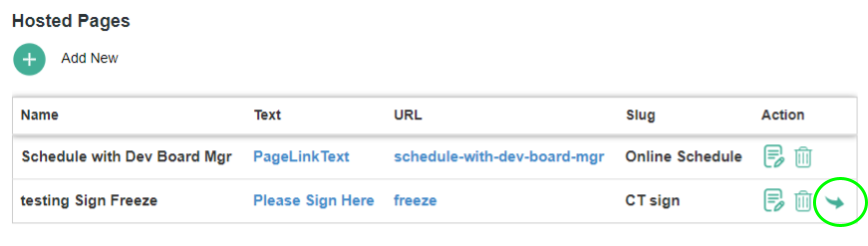
After you have create a Hosted Page, you can share that page with subaccount using the identified icon in the image just above. When shared, the receiving subaccount will NOT be able to edit the hosted page. All editing rights remain with the originating account.
Users Settings
July 15, 2020Overview
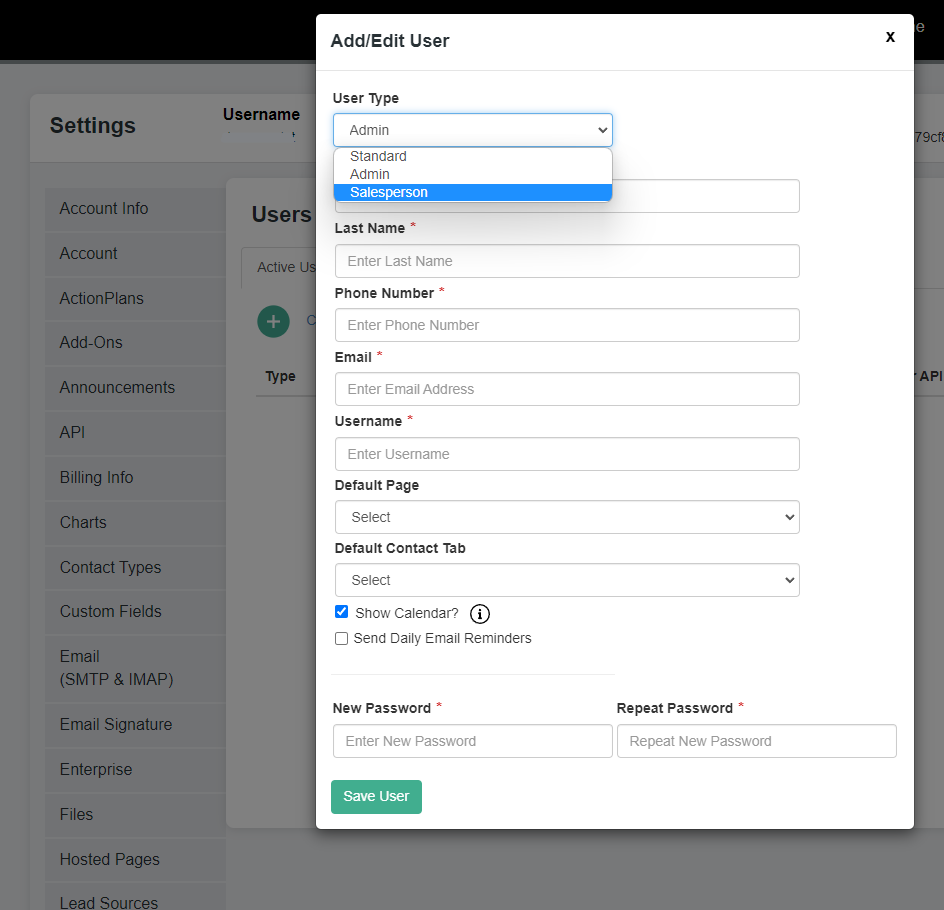
There are four User types available within your ClientTether account:
- Account Owner (AO)
- Admin User
- Standard User
- Salesperson
The AO can access all features within the account with the exception of the Call Center feature.
Admin Users can access/view all features of the account, mirroring the access/view of the AO, and also cannot utilize the Call Center feature.
Standard Users have a restricted or limited view of the account which excludes them from having access to edit Action Plans, delete Contacts, and change most Settings. Standard Users do, however, have access for to the Call Center Feature.
Salesperson Users have a restricted or limited view of the account which excludes the from seeing Contacts that are not assigned to them both in the Contacts lists and Pipeline. Additionally, Salesperson users cannot edit Action Plans or change most Settings. Salesperson users are able to set and save custom filters.
Please note: At the Users panel within Settings, the ID for API v2 is provided for use when creating an API or POSTing Calls in regards to specific Users.
Topics
Creating Users
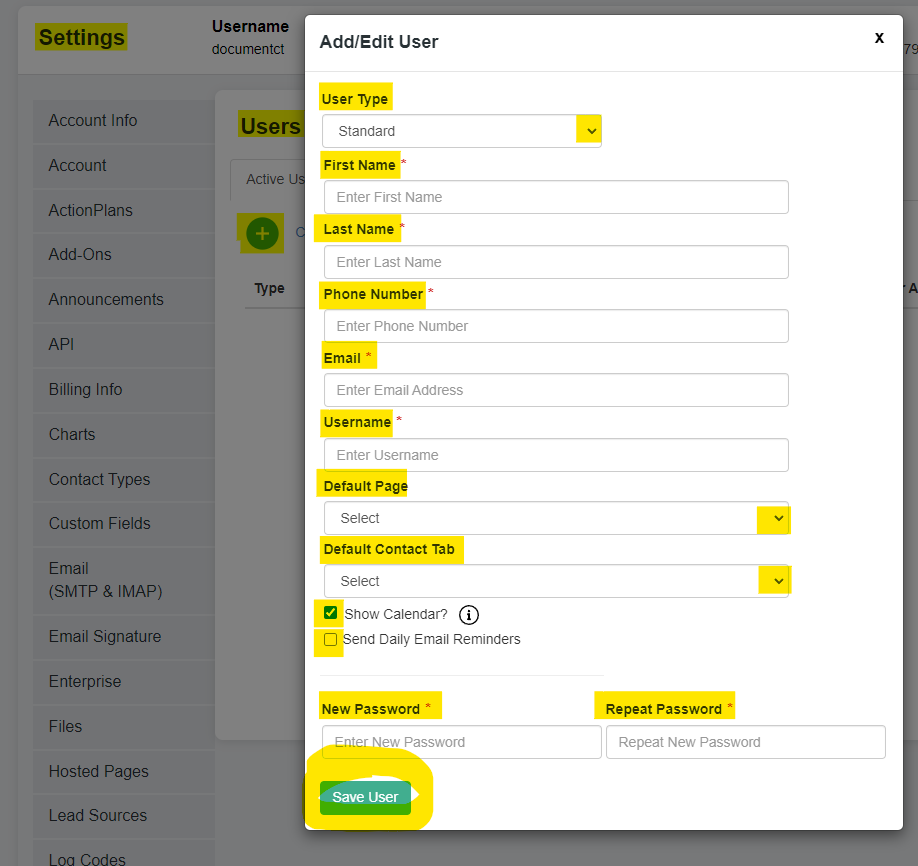
- Go to Settings
- Click User Tab
- Click on icon next to “Create New User”
- Select User Type
- Enter First Name
- Enter Last Name
- Enter Phone Number
- Enter Email
- Create a User Name
- Select the Default landing page for this User (determines the first page this User will see after logging into the account).
- Select the Default Contact Profile Tab for this User (determines which tab within the Contact Profile is shown first).
- Create your Password
- Verify Password
- Select “Show Calendar” to have your calendar shown when comparing calendars for Events.
- Check the box at “Send Daily Email Reminders” to have ClientTether email you each morning with updates regarding Contacts within your account.
- Click

Once saved, this new User profile has been created. The new User will then log into the ClientTether account using the unique User Name and Password credentials created here.
Please note: The AO and Admin Users can log in and view the account as a specific User by navigating to Settings and then the Users tab. At the Users List, click on the login button  adjacent to the User account profile you wish to view. Confirm your access choice at the pop-up menu and then view the account as that specific User/User Type to confirm access is as intended.
Editing User
- Navigate to Settings
- Click the User Tab
- From the Users List, click on the edit icon
- Update the User profile as needed
- If you update the password, please click
 to save your updates.
 - All other changes made within the User profile will automatically save when you exit the screen.
Deleting User
- Navigate to Settings
- Click the User Tab
- From the Users list, click on icon adjacent to the User profile you wish to delete.
- Confirm this selection at the pop-up menu.
- Once deleted, the User profile will be stored at the list under the Archived Users tab.
Archived Users
Once Users are deleted their profiles are accessible in the Archived Users tab within the Users List.
Please note that Contacts assigned to an Archived User will have their assigned user box outlined in orange in the Contact Profile.
When a User is archived, the password is automatically reset by the ClientTether system to prevent access to the account using those credentials.
If you wish to restore a User, then click the restore  button next the archived User you wish to restore.
Please not: If you restore the User, you must update/reset the password in the Users List and provide those updated credentials for access to the account.
Billing Info
June 4, 2020The Billing Info tab will be available to enterprise level accounts and sub accounts utilizing the Sub Account Self Pay feature.
Basic Information about your current default payment card will display.
If you want to update your card enter:
- Credit card number
- Name on card
- Expiration date
- CCV for the new card.
- Click
This is will only be available to Account Owners and Admin Users.
Assigned Users
May 19, 2020Overview
Assigned User allows ClientTether to know which of your Account Users are working with a contact.
This makes it possible for ClientTether to direct emails, text messages, and calls to the Assigned User.
Topics
- Setting Assigned User to Contact
- Seeing Contact’s Assigned User
- Directing Communication to Assigned User
Setting Assigned User To Contact
Overview
There are three ways to assign an Account User to a Contact.
Assigning User by Contact Profile
In the top left corner of the Contact Profile there is a drop down menu for Assigned user.
Select which user you would like to assign to the contact.
Assigning User by Action Plan
This allows you to automate assigning users with your Action Plans.
You would want to use this option if a specific Action Plan meant that the contact needed to be working with a certain user. This is common with early-stage lead follow-up prior to being contacted by an estimator or a sales executive.
To accomplish this:
- Go to Action Plans
- Open the Action Plan you desire to assign to a specific user
- If you want the user to be assigned before actions fire off, create a new “Immediate” action type and assign it to the first step.
- In the “Action Type” drop down menu select Assign User
- Underneath timing, the drop down menu “Select User” will appear. Use this to specify which user you would like to assign
- Also note if you would like to switch to no assigned user in an action plan you can make a step where you select “No User Assigned”
- Click “Save Action” at the bottom of the window
Assigning User by Sales Cycle
This feature allows you to automate assigning users to your Sales Cycles.
You would want to use this option if a specific user in your organization should manage lead and contact relationships within specific Sales Cycles. This is common when CSR teams engage leads at a certain point and then hand off the relationship to other teams after appointments are scheduled. Also, some organizations wish to assign certain users to manage client relationships after service has been provided.
To accomplish this:
- Go to Sales Cycles in Settings
- Select the Sales Cycle in which you would like to Assign a User
- Select the “Assign User” drop down Menu and select which user you would like to assign
- Save Sales Cycle
Seeing Contact’s Assigned User
There are two places you can see if a Contact has an Assigned User.
- The Contact Profile
- Top left Corner
- The Contact List
- Assigned User Column*
* Note: You need to have selected the “Assigned User” option to appear in the column header within the Contact Page Settings.
Directing Communication to Assigned User
Overview
You have an assigned user. How do you designate what communication goes to the assigned user?
The communication types that can be directed to the Assigned User are:
Please note that for calls and texts you will see the phrase “Divert… When Possible”. That indicates that they system will divert the calls and texts to the user as long as the user has a valid phone/cell phone number provided within their User account.
Action Plan Calls
To send all action plan calls to the Assigned User do the following:
- Go to settings
- Select the “ActionPlans” tab in settings
- In “Action Call Options”(top-left menu), select default.
- Under default, make sure “Divert to Assigned User When Possible” is checked.
- Click “Save Action Call Options”
Action Plan Emails
To send all action plan emails from the Assigned User do the following:
- Go to settings
- Select the “ActionPlans” tab in settings
- In ” System Emails to/from Users “(top-right menu), check “Send from Assigned User”.
- Click “Save Email Settings”
Incoming Calls
To send all incoming calls to an Assigned User do the following:
- Go to settings
- Select the “ActionPlans” tab in settings
- In “ClientTether Phone Return”(bottom-left menu), select default.
- Under default, make sure “Divert to Assigned User When Possible” is checked.
- Click “Save Return Settings”
Incoming Texts
To send all incoming texts to the Assigned User do the following:
- Go to settings
- Select the “ActionPlans” tab in settings
- In “ClientTether Text Return”(bottom-Right menu), check “Divert Returned Texts to Assigned User’s Phone When Possible” is checked.
- Click “Save Number”
Account Types in ClientTether
May 8, 2020In ClientTether we have three general types of accounts
- Enterprise
- Main Account Holder
- Can be single-level or multi-level
- Multi-level sub account
- A sub account to Enterprise or another sub account, but also has sub accounts below it
- Single-level sub account
- Can be a sub account to enterprise or the Multi-level sub-account