Our Angi Lead integration allows you to instantly get ALL information from new leads from Angi Leads, formerly Home Advisor, brought straight into ClientTether.
You can also easily monitor all incoming leads from Angi Leads via our API Monitor.
All information is stored and easily accessible within the Contact Profile for the lead.
Based on your settings you can arrange for an Action Plan to instantly fire off once the lead has come into the system.
There are two parts to getting this integration going and they must be done in the following order:
To activate the Angi Leads API on the Angi Leads side you will need to send an email to: crmintegrations@homeadvisor.com (This is still correct even they have changed name to Angi Leads).
This email needs to contain:
A Subject with the number of Accounts you wish to add to the API
{{Your Company Name}} X Number of Accounts for API Set up
We strongly recommend not doing more than 10 at a time, and testing those 10 accounts, because Angi Leads manually enters the data on their end and have made errors on entries before.
Create a table with the columns for the account owners first name, last name, Angi Leads’ Account ID, and the Unique Endpoint you copied from ClientTether.
Make sure to specify for them to turn off any parser emails coming into ClientTether from Angi Leads
Otherwise you will have the same lead come in via the API integration and the parser, which will cause you to get a lot of duplicates.
Send the email
Please be aware Angi Leads Standard Operating Procedure is to send you a test contact once the account is connected. This test contact will be a duplicate of an existing contact. If you wish for them not to do this please specify it in your email.
There are two sides of capturing external emails inside of ClientTether.
Inside of the SMTP Settings tab you will find a system generated BCC email. This is your key to capturing external emails inside of ClientTether.
Capture Outgoing Emails
The first use case is when you are sending an email to a contact from your email system: Gmail, Outlook or etc. Put your system generated BCC Email in the BCC field before sending. In this case, the outgoing email is sent to your contact and to ClientTether’s email parsing system. ClientTether will read the message, find the original recipient’s email and compare that to Contact Emails in the system already. Supposing the system finds a match, the body of the outgoing email will be captured as an History Note.
Capture Incoming Emails
The second use case is capturing incoming emails in ClientTether. In this case, a little more setup may be required. The basic concept is that you will fwd the incoming email to our system generated BCC Email. This can be done one at at time if you want to be strategic. Or you can set up a Filtering Rule in your email tool to send lots of items. In either instance, ClientTether will read the message and find the original sender’s email. Our system will attempt to match the sender’s email with a Contact in your list. Supposing a match is found, the body of the email is captured as an History Note.
Please Note: Google will not Fwd email with a Rule without the receiving end agreeing to such an action. Hence, you will have to work with your CSM to respond to Google in acceptance of FWD emails.
Our ClubReady integration allows information about clients to be easily passed between ClientTether and Club Ready to keep both systems up to date.
Topics
Turn on ClubReady Integration
Getting information from ClubReady to ClientTether
Getting information from ClientTether to ClubReady
Turn on ClubReady Integration
If the ClubReady add-on is not available in the Add-Ons section in your account settings, please reach out to your Customer Success Manager. They will help you coordinate getting access to it.
Otherwise to turn on the Club Ready integration Add-On
Go to Add-On in Settings
Click Check Box next to Club Ready logo
Put in your API Key and Store ID from ClubReady
Getting information from ClubReady to ClientTether
To move new prospect and client records from ClubReady to ClientTether, follow these steps.
Go to ClubReady Integration tab within ClientTether account settings
Select Prospect type (from ClubReady)
Match it to a Lead Source (Within ClientTether)
Click Add Mapping
Repeat as much as needed
Click Clone Mapping to SubAccounts if you want this passed down to SubAccounts
You can assign Prospect Types to Action Plans.
Click to Add Mapping
Repeat as much as needed.
Once those are set go to top of page to Import Now and click Go.
You can also see the date of your last import at the top of the page in the Last Import Date group.
Getting information from ClientTether to ClubReady
To send information into ClubReady
Go to action plans.
Select plan that you would like to update ClubReady from ClientTether.
Add a step in the action plan called “ClubReady – New User Push”
Move any user or group of users into an action plan that contains this step, and it ClientTether will automatically push these records to ClubReady
In Action Plans, you can now create an action plan step to instantly update a Google Sheet. This is an easy way to push updates to Google Analytics or other third party platforms that integrate with Google Sheets. To do this:
Go to Action Plans
Open the Action Plan you wish to add the step to
Add a new action step
In the Action Type drop down list select Google Sheet.
Link the Google account that has editor rights to the Google Sheet you wish to update, by clicking on the drop menu for Authorized Google Accounts.
To add an authorized Google account just select “Add New”
Click the blue button that appears that says “Authorization with google”
Select which of your Google accounts you wish to authorize
Click Allow
Then go back to the drop-down list and select the newly authorized account.
Next, paste in the Google Sheet ID
This is found opening the desired Google Sheet and copying the id number from the URL for the Google Sheet
Select the Payload
If you opt to send full Contact Payload your sheet needs to be designed to have headers for every piece of the contact’s payload
If you want to only send specific information from the Contact, you need to map your Sheet’s Columns to the specific data being sent. Be sure to place the data you are sending in the same order of the Sheet’s Columns. For easy mapping, put the same name of the Sheet’s column header as the Key Name. Then select the corresponding Contact Token as the Value to be sent. Click Save after each Key Name-Value pair you create.
You can also set a fixed Value without a token, but that value will always be what is sent.
Click “Save Action” once you are done with editing the step
Each time this action step runs, it will push the selected data from the client record into the specified Google Sheet.
Mailbox Power is a robust partner platform that allows our clients to send automated marketing materials directly to their clients’ physical mailbox as part of an Action Plan within ClientTether.
Using the Mailbox Power add-on as part of your action plans, you can now send personalized gifts such as:
Cards
Drinkware
Food
Pet Gifts
Personalized Boxes
Gift Cards
etc.
as an action step within your action plans.
When setting up your account with Mailbox Power please make sure you select a package that gives you access to third party integrations.
While you are logged in to Mailbox Power click on the settings Icon in the top right corner
Then Click on the ClientTether Logo under the Integrations section
Copy your API Key
If no API Key appears please click the “Generate a new API Key” button
Log in to ClientTether and go to settings
Go to the Add-Ons Tab
Check the box next to Mailbox Power
Paste your API Key into the field Next to the Mailbox Power logo.
Utilizing Mailbox Power in Action Plans
Go to Action Plans
Select the Action Plan to which you would like to add a Mailbox Power step.
Add a new Action Plan step
For Action Type select Mailbox Power
Give the action step a name
Select if you want a notification
Select the action timing (NOTE:These items usually take a business day or two to process and ship, and shipping can take a few business days as well. Keep this in mind as you plan how to use these steps in conjunction with texts and emails that deliver immediately when scheduled)
Select Mailbox Power Contact list which will activate the set campaign.
Please make sure that in Mailbox Power you have assigned you contact group(s) to trigger the correct campaigns. Click here and watch “How to Manage Campaign Recipients” to learn how to assign contact groups to campaigns.
We have found it is most effective to name the contact group the same as the action plan it triggers.
If you do not have any campaigns Click Here, and watch “Campaigns” to Learn How to build them
FYI – Mailbox Power was formerly known as Banner Season and Rocket Notes
There is an Add-On feature in ClientTether to integrate with QuickBooks Online. Once that Add-On is activated and the first Sync is complete, a regular synchronization is done every two hours at 2, 4, 6, 8, 10, 12 Mountain Time.
The synchronization is initiated when a Contact, with an existing proposal, is marked as Closed or CMPL.
A new invoice will be created in your QuickBooks Online account, with the same name and number as the ClientTether proposal.
If the client already exists in QuickBooks, then the invoice will be tied to that client.
If the client does not exist, then a new client record will be created in QuickBooks with the information from ClientTether and the invoice will be tied to that client.
Any “Product” that exist in ClientTether that do not exist in QuickBooks will be created.
Any payments recorded in ClientTether will be added to that invoice.
As payments are added in ClientTether they will be added to the existing invoice.
NOTE: Our CSMs are NOT QuickBooks user. How you use the data once transferred, is up to you.
How to Set up QuickBooks Online integration
This is done in a few quick steps
Go to Add-Ons tab in setting and check the box for Quickbooks (this is a premium option.
Go to the new Quickbooks tab and click on Provided links
Sign into your Quickbooks account.
Next, Choose how to match Proposal data to your QB Products.
Lastly, there is an option to map three fields to your custom QB fields.
You can see this is set up once you have completed these steps by going back to the Quickbooks Tab. The email tied to your Quickbooks account will display as well as a notification that the integration is turned on.
QuickBooks Online integration is a premium add-on, and there is a cost associated with using this integration. Please contact your account manager to discuss any costs associated with activating this feature.
Recur360 allows you to integrate your ClientTether proposal system with QuickBooks.
Recur360 simplifies your to do list by
Recording payments documented in ClientTether to your Quickbooks account
Updating payments received in Recur360 to your ClientTether Proposal and Quickbooks
Allowing you to collect payments in Recur 360 with push of a button in your proposal system.
This feature is not available to all accounts in ClientTether. If you would like access to it, please reach out to your Client Success Manager and Recur360.
You will need to coordinate with Recur360 and provide them with the information they need to set you up for this integration on their side. They will most likely need your:
Turning on Recur360/Quickbooks/ClientTether Integration
Set up Recur360 Account*
Make sure Recur360 is linked to Quickbooks Online*
Go to ClientTether Settings
Go to API Tab
Copy Web-Key for Account
Go to Recur360 Settings
Go to ClientTether
Paste in Web-Key
Information will now flow Automatically from ClientTether to Quickbooks via Recur360.
*Please note for these steps you will need to directly coordinate with Recur360
Recur360/Quickbooks/ClientTether Integration in depth
Data Flow
This integration allows you to create your clients and proposals one time in ClientTether and Recur360 will move that information into Quickbooks for you.
The begining of this process happens when Recur360 automatically syncs with ClientTether every 6 hours. If you need it to sync more than that you can manually trigger the sync from within Recur360 at anytime.
When Recur360 Syncs with ClientTether it checks the Sales Cycles and Payments in Proposals. With each sync the following will be completed:
When a client is in the Sales Cycle Step used to indicate you have created a proposal:
Recur360 uses the client information from ClientTether to create a customer in QuickBooks
Recur360 will also create an estimate in QuickBooks based on the proposal details in ClientTether.
When a payment has been added to a proposal in ClientTether:
Recur360 will add that payment as an Unapplied Payment to the existing customer in Quickbooks.
When the Sales Cycle Step reflects the job is complete
Recur360 will create an invoice in QuickBooks based on your proposal in ClientTether for the customer
All Unapplied Payments from the customer for that invoice will automatically be applied to that invoice.
Automated Royalty Fee Collection
All payments entered in ClientTether or made directly through Recur360 are automatically tracked for you.
All franchisees are charged their royalty fee automatically, daily. This will cover all payments they have recieved for the past 3 day waiting period.
A check will automatically be written in the Franchisee’s Quickbooks Online file for the correct Royalty amount.
Recur360 Reporting
All franchisees will be able to see an audit log, within Recur360, of all data sent from ClientTether to Quickbooks Online.
Meanwhile, the franchisor will have a Royalty Fee collection report listing all pertinent details.
Turning on Recur360 Payment Collection
Once you are in the Add-Ons tab in your Settings, there are two simple steps to activating this feature.
Check the box next to Recur360
Enter your Unique Key from Recur360
Utilizing Recur360 Payment Collection
Go to Proposal Overview Tab
Click Recur360 Button
In Recur360 window, enter in all payment information
Once you have collected the payment in Recur360, it will automatically update the proposal with a record of the payment.
If you don’t see the record refresh the proposal page.
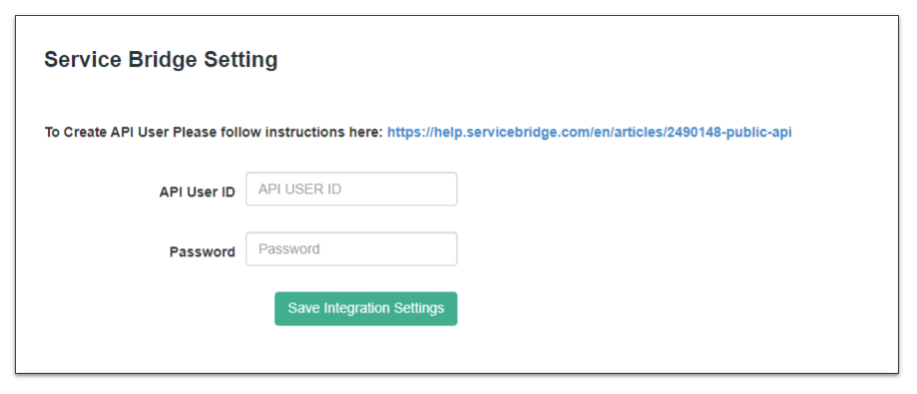
Our integration allows you to send Contact data one-way to ServiceBridge on demand from the Contact Profile with the click of a button that shows after this Add-On has been activated. Follow this link to learn how to Activate Add-Ons.
This feature assumes that you already have an account and are familiar with ServiceBridge features. If you have support questions about ServiceBridge, please contact them.
Setup
After activating the ServiceBridge Add-On, a new Settings Tab will be made available. Click on that tab and enter the necessary credentials. There is a link included on that page with instructions from ServiceBridge.
ClientTether can share Contact data with AccuLynx (and many other endpoints) via webhooks found in Action Plans. In order to create a webhook in ClientTether and send data to AccuLynx you will need an endpoint (required), Authentication Headers (required) and form data to send (required). AccuLynx has published the following in their documentation:
All API Calls [to AccuLynx] require authentication via an API Key. An API Key must be sent with every request. Each individual location within a company needs its own API key.
string or null <tel> [ 0 .. 30 ] characters Additional phone number for the primary contact. NA
phoneExtension3
string or null [ 0 .. 100 ] characters Additional phone extension for the primary contact. NA
phoneType3
string (ContactFieldDescription) Enum: “Home” “Mobile” “Work” NA
emailAddress
string or null <email> [ 0 .. 100 ] characters Primary email address for the primary contact. Email from CT
crossReference
string or null [ 0 .. 250 ] characters Cross reference identifier for the primary contact. NA
jobCategory
string (JobCategory)Enum: “Residential” “Repair” “Property Management” jobCategory custom field control.
workType
string (WorkType)Enum: “Insurance” “Repair” “Retail” “Warranty” “New” “Inspection” “Service” workType custom field control
street
string or null [ 0 .. 250 ] characters Street address of the lead/job. Address from CT
street2
string or null [ 0 .. 50 ] characters Apartment/Suite/Unit/Building of the lead/job. NA
city
string or null [ 0 .. 50 ] characters City of the lead/job. City from CT
state
string or null [ 0 .. 50 ] characters State, County, Province, or Region of the lead/job. State from CT
zip
string or null [ 0 .. 50 ] characters Zip code or postal code of the lead/job.Zip_code from CT
country
string or null [ 0 .. 50 ] characters Country of the lead/job. Hard coded US
priority
string (JobPriority) Enum: “Normal” “High” “Urgent” jobPriority Custom field control
notes
string or null [ 0 .. 1000 ] characters Notes are saved as a comment on the message board of the lead/job.job Notes Custom field control Whiteboard Token
salesPerson
string or null <email> [ 0 .. 100 ] characters Login email address of the active user the lead/job should be assigned to. If no email address is provided, the lead will be unassigned. Need some help here for Mapping or should we leave it blank? Leave it blank
initialAppointmentDate
string or null <date> Date and time of the initial appointment. If no timezone is provided it will default to the Company timezone. If there is an initial Appointment Date and there is no sales Person, the appointment time will be added to the Notes field.Next Appointment date/time. Ours is Z, Format?Wait until after assignments “MAY” be added in CT
Webhook in ClientTether
Build a Webhook in ClientTether to send data to AccuLynx on demand.
Please be aware that this is an application NOT a sign up. You can be rejected. The top three reasons for being denied are:
Not completing your application in allotted time.
Providing fraudulent, or false, information on the application
Having a low credit score
This is checked with soft pull and will not affect your credit score.
Activating TetherPay
Turn on in TetherPay Settings -> Add-On -> Premium
Go to TetherPay tab in Settings
Click Start enrollment here
Fill out form
Confirm email
Finish application
Wait for approval
Once approved Web Token and API Key will have been added to account
This can take a couple hours or a couple weeks. Please watch for emails from STAX that maybe asking for more information.
Access TetherPay will be available in:
ClientTether Proposal Version 2
New menu option in ClientTether between Calendar and Hello! menu.
Clarification: the TetherPay Menu shows up as soon as you turn on the Add-On however you will not be able to do anything with it until you applied and been approved for your Stax account.
If you are waiting on your approval you can access your application by clicking the Start Enrollment link in Settings->TetherPay and logging in with your credentials.
Using TetherPay
To fully understand and use TetherPay correctly, please thoroughly go through the following four sections. It is imperative you review this information in order.
Once you have been approved you are ready to use TetherPay!
If you have subaccounts, before doing anything else take a minute go to:
The Settings Account tab, where it lists all of your sub accounts.
Go to the edit button by each of your sub accounts.
Look at the CT Pay section at the bottom of the account settings
Make sure the correct boxes are checked/unchecked for royalty payments on tips and Convenience Fees.
Make sure you do this for each of your sub accounts before taking any payments via TetherPay.
Where you can use TetherPay
With TetherPay there are two places where you can accept payments
ClientTether Proposal Version 2
Card Payments
ACH Payments
Accept tips
Record Payments made in Tab
TetherPay Menu link
Card Payments
ACH Payments
Accept Tips
Have access to other features available via Stax for TetherPay
Will need to manually enter payment on existing proposal to record in ClientTether.
IF you accept payments within the TetherPay Menu Link you will have to manually add them to your proposal V2 if you are accepting a payment tied to an active proposal.
We recommend the following Payment type designations in that situation .
Card payment – Select Card
ACH – Select Other
You cannot select TetherPay because that will open up a feature to accept a card payment.
Using TetherPay in Proposal Version 2
To utilize the TetherPay option in the proposal system:
Go to the active proposal that you are wanting to get paid on
Make sure the tip, credit card and ACH options is selected correctly on the proposal
You can set this account wide by going to the Settings-> Proposal -> Payment tab.
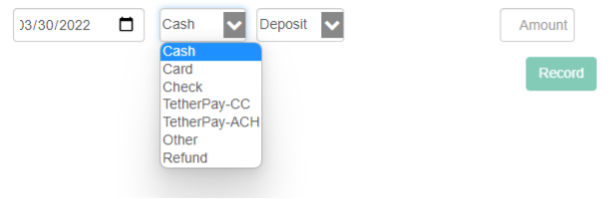
Click add payment
Select Date
Select payment Type
TetherPay – ACH
TetherPay – CC
Select payment stage
Enter amount
click Record
Enter in payment information
Enter in Tip if appropriate
Click Pay button
If payment information is not correct or incomplete then you cannot click the Pay button.
Client’s will be charged and Payment recorded in ClientTether Proposal.
Please remember that the TetherPay payment type is only for accepting new payments not recording payments you have already received via the TetherPay Tab.
IF you received payment in the TetherPay tab and not in the Proposal system, but want to record the payment to a proposal please select the other for how the payment was made.
How to use TetherPay in TetherPay Menu
Here is how to access the information in the TetherPay Menu
Click on the new TetherPay Menu item in your ClientTether header
Will be between Calendar and Hello! menu
Login with your Stax Login information
Please note there is an option for adding multiple users to TetherPay. We strongly recommend each member of your team have their own individual login.
After Logging in you will be taken to your TetherPay Dashboard from there you can Access
Reports
Payments
yes you can accept payments!
You will have to manually update in your payment history for any active ClientTether Proposals.
Invoices
Not the same thing as ClientTether Proposal system
Schedules
Disputes
Customers
This list is independent of ClientTether. You will have to update separately.
Catalog
Apps
Settings
For more detailed information on each of these features and EXACTLY what they entail please visit the Stax support page, and focus on the the StaxPay Section it will address these features in detail.
Controlling CC vs ACH Acceptance
There are Settings to control the visibility of CC and ACH to be used for payments.
CC vs ACH Visibility
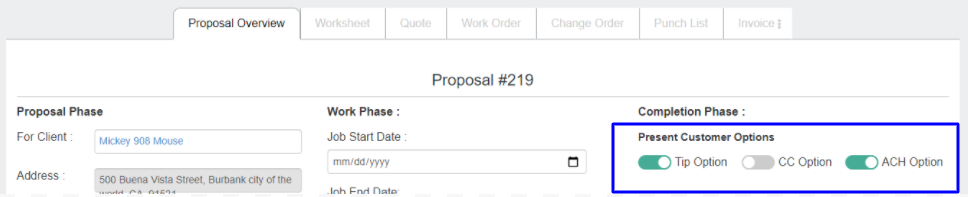
You can control the options that your customers see, CC vs ACH, when they open their invoice. This allows you to send an invoice to the contacts and limit which options they have to pay. (See video on left and images below.)
To begin, go to your Proposal Settings and visit the Payments tab. In there you will see the Payment Options for NEW proposals. These settings do not apply to existing proposals. See image below.
New and existing proposals will have similar setting options on the Proposal Overview tab. When a Contact opens their invoice, these are the settings referenced to determine what payment options are shown to the contact. Please remember the invoice is a dynamic page and will show the current settings at the time the page is opened.
See image below.
Regardless of the Customer’s options, as a ClientTether User you will be able to choose between all the payment options when taking a payment inside the Proposal system.
Please note this does not currently include Thumbtack messages you send from within Thumbtack. Only messages you send out of ClientTether, but does include ALL incoming messages from Thumbtack.
To set up the Thumbtack integration please do the following things:
Make sure you have an active Thumbtack Account
Make sure you have a clear Lead Source in ClientTether created for Thumbtack
Reach out to your Thumbtack Account Manager and let them know you would like to activate the ClientTether integration.
They must turn on the integration on their end first.
Locate your Thumbtack Business ID for inclusion on the ClientTether Side.
Paste your Business ID into the Thumbtack Tab in ClientTether.
This may eventually be replaced with an OAUTH Login option to Thumbtack from within ClientTether.
Settings for a Multi-Level Account Structure
There are times when the account structure in ClientTether is different than Thumbtack. For example, you might have a single Thumbtack account that generates leads for all of the greater Denver Metro area. But in ClientTether you might have a Multi-Level account for Denver with 4 subaccounts: North, South, East and West.
In this case follow these steps:
Activate the Thumbtack Add-On for the Multi-level account.
Complete the Business ID and Lead Source in the new Thumbtack Settings tab
Turn on “Share Thumbtack Credentials with Subaccounts
Activate the Thumbtack Add-On in the subaccounts. Notice they will NOT have a Thumbtack Settings tab, because they are using the credentials form the parent account.
Using Thumbtack integration within ClientTether
Once Thumbtack is set up:
Your leads will automatically be added to ClientTether from Thumbtack
Please keep in mind this a support page for ClientTether not Zapier. This content focuses on how to use Zapier with ClientTether, not how to use Zapier in general. For more information on just Zapier, please visit their support pages by clicking here.
How to add ClientTether to your Zapier Applications
First, use this link to register to use the ClientTether pre-made Zapier Actions: Zap Link
After you’ve completed the registration, continue to build your Zap. At the time Zapier asks for the Action App name, type in “ClientTether.”
You’ll be presented with multiple options, please select the highest number version. (i.e. 1.2.0 versus 1.1.0).
Next, you’ll need information from your account to complete the integration process.
Please note the following:
The Web Key and X Access token in Zapier for ClientTether are dummy tokens.
You have to replace them with the correct Web Key and Access Token for your ClientTether Account.
Your Web Key is listed in the Settings menu’s API Tab in ClientTether. If you are an Enterprise account, the X Access Token will also be there.
You will have to copy the web key and X Access Token from ClientTether and paste it into the fields in Zapier to replace the dummy keys.
Note: If your account is a sub-account in the system, meaning you are part of a larger organization, a franchise system, or a dealer network using our platform, you will not see an access token. Please connect with your corporate/leadership team for support in accessing this information.
Click here to see the slide deck used in the video presentation.
Click here for a video to see where you edit the X-Access Token and Web Key in Zapier.
How to Build a Zap to get information into ClientTether
Go to Zaps (Menu on left side of screen)
Click “Create Zap” Button
Select Application you are sending information into ClientTether from
Select the triggering event
Select Account
Run Test to ensure it can access the needed information
Select ClientTether to receive the information
Select what you would like ClientTether needs to do with that information
Select ClientTether Account – If you need to add a new account here click new account and update the web key.
Fill out correct information
Run Test
Your Zap is good to go!
For creating contacts in Zapier you have a simple and detailed options. Generally simple will be sufficient if not use detailed
How to use Zapier’s Parser to Receive Information Sent from ClientTether
If you’d like to push information from your ClientTether account into an operations platform or other tool, you may need to set a Zapier parser to receive and route this information to the platform you’d like to integrate with. This Section is broken into three sub sections
Name the Mailbox (all letters need to be lowercase) something that tells you exactly what it is used for.
Click “Save Address in Template” button on lower left part of the screen.
Creating a Zapier Email Parser Template
In your ClientTether account go to Action Plans menu
In the Action Plan that you will use to send information, create a step that sends an email (with the “Client excluded” option checked) to the Zapier Mailbox.
Create a format for information to be sent. We recommend using easy headers, such as “First Name:”, “Phone:”, etc. You’ll want to use each corresponding Token following each header, which will be automatically populated by ClientTether when sent.
Example: First Name: {{client.firstName}} || Phone: {{client.phoneCell}} ||
Next use a contact to test this on.
Go back to your Zapier Parser Mailbox list.
Select settings Icon on far right of the row of the Mailbox you wish to add a template for
The Template will auto fill the email you just sent.
Highlight where the information is with the mouse and name them accordingly.
Click “Save Address and Template”
Go back to ClientTether, and send a second email.
Check your Zapier Parser Mailbox by clicking on “View Emails” just right of the correct mailbox.
Look over the email you sent in. Make sure that it has extracted the information correctly.
If it has not, then click “Report inaccurate” and re-highlight the correct portions. Then retest.
If it has, then your parser is set up and ready to go.
Creating a Zap from a Zapier Parser
Click “Zaps” on menu on left side fo the screen
Click “Create Zap”
For Choose App & Event look at Built-In Apps, and Select “Email Parser by Zapier”
For Choose Trigger Event select “New Email”
Click “Continue”
If first time using a parser click “Sign in to Email Parser” by Zapier
Click Authorize in pop up window
Click Continue again
Select Correct Mailbox
Click “Continue”
Click “Test Trigger”
If nothing fills in then there are no emails in that Mailbox.
Click Continue
Select the App you wish to send to
Choose what Action Event you want Zapier to do in the Application
Click “Continue”
Select the correct Account
Fill in correct information for Zap as prompted
Click Continue
Click “Test and Continue”
Check You application and make sure everything was entered correctly
How to use ClientTether Webhooks to send information into Zapier
Get URL from Zapier Zap
Create new zap (Each Zap will have its own URL)
Select Webhooks for Zapier as the App Event for the Trigger