RN Updated Login Screen
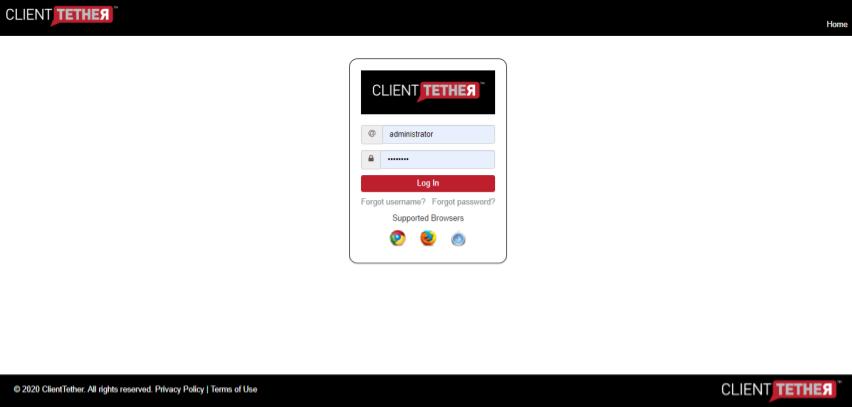
February 24, 2020Designed to more closely match the new website, the ClientTether Login screen has been changed to a white background.
Mass Updating
February 12, 2020
The Mass Updating feature was brought on by User requests. It has been expanded to update all Contact Information fields and Custom Fields as well, making this feature a very powerful one.
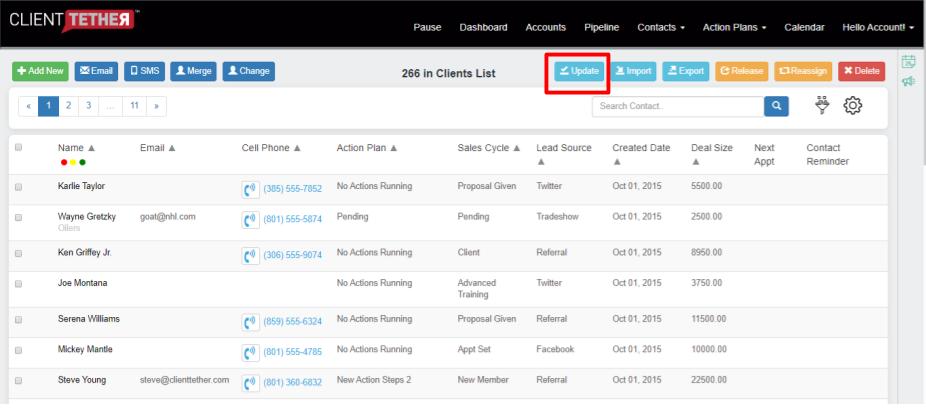
When you click on the Update button, you will be presented with a dialog box that has two choices. The first step is to download the sample spreadsheet. and the second step is upload a completed spreadsheet.
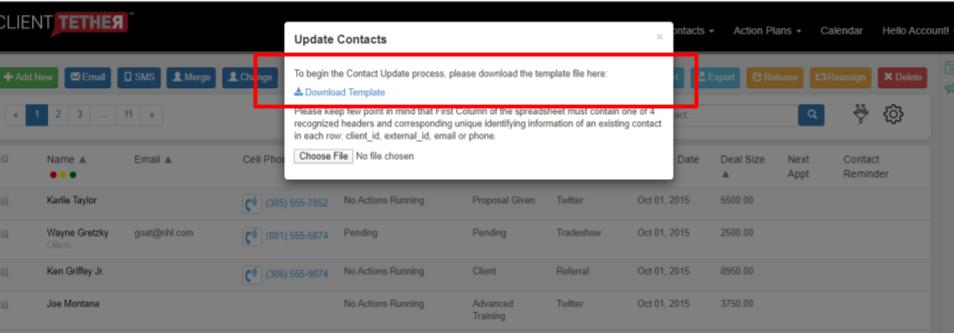
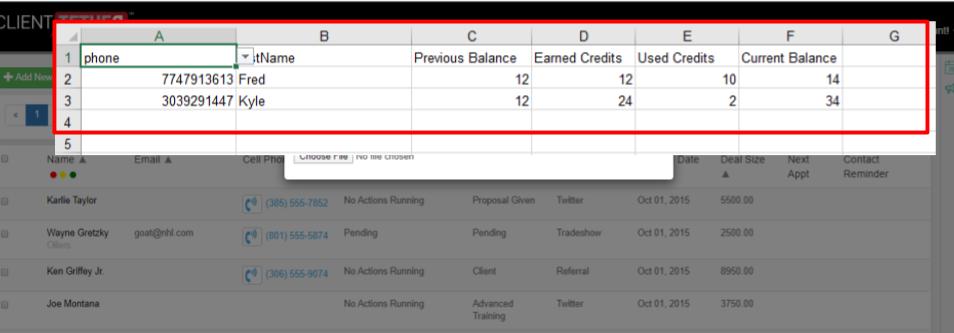
Download the sample file and open it up. It will look like the following:
Please understand:
- the first column of the spreadsheet must contain one of four recognized Headers : client_id, external_id, email or phone.
- All rows must present the value indicated in the first column Header
- The value presented must be unique identifying information to only one Contact in your List
- The rest of the columns must also have values in the header row
- Column Header values can contain any field name mentioned in the POSTing to ClientTether 2020 Contact Parameters table.
- Column Headers can contain non-reserved names from the Contact Parameters table, which will update (add) Custom Fields.
Example Explained
In the example above the Phone was selected as the First Column Header, meaning that each subsequent row must have a 10 digit phone number. Remember that our system only stores a 10 digit number with no formatting. The phone numbers entered should identify only one Contact Record in my list.
The second Column Header is firstName, which is a reserved field name in the Contact Parameters Table. So, in our example, the Contact Record that has the identified Phone will have its first name field updated to the value supplied in column B: Fred or Kyle respectively.
The next four columns have Header Row values that are not reserved field names. Hence each of those records will have those header rows updated or added as Custom Fields.
To explain the example further, imagine that you have a B2B chocolate company. Each of your customers have an account where they earn free truffles. But it is your MRP software that tracks the values earned and used.
You are able to export a CSV file with the phone and account values from your MRP, then upload those values into ClientTether to be shared by our powerful communication processes.
Recommendation
Test, Test, TEST. Please test your data by updating just a few records at a time before you update lots of records.
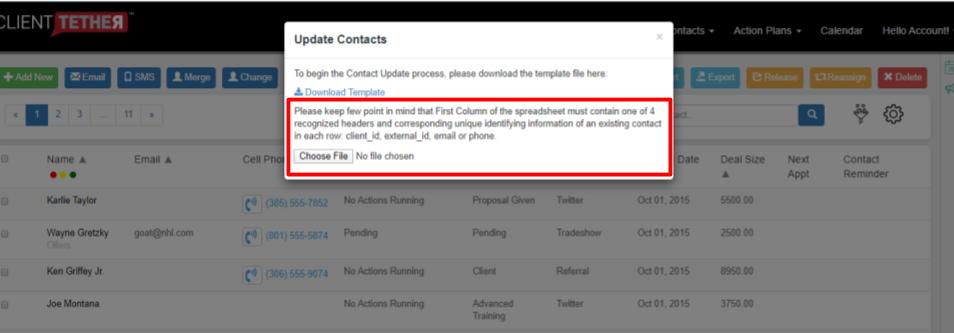
After you have filled in the data that you want to update in ClientTether, then return to the Update screen and choose the file. Each row of the spreadsheet will be evaluated and updated. Be patient, this is handled by one of our background processes.
Full List of Parsing Terms
February 11, 2020
Terms for Action Type: Create
| Name | This term expects the full name (First and Last) to be found between one set of Bookends. The system will put the first word in the First Name field and the remaining text in the Last Name field. |
| First Name | This term expects only the first name to be found between one set of Bookends. All text between the Bookends will be saved in the First Name field. |
| Last Name | This term expects only the last name to be found between one set of Bookends. All text between the Bookends will be saved in the Last Name field. |
| Company | This term expects only the company name to be found between one set of Bookends. All text between the Bookends will be saved in the Company field. |
| Title | This is the Contact’s Title. |
| Phone | This is the main contact phone number. The system only accepts 10 digit phones for the US and Canada. The system will strip any leading 1 and special characters ( ) – . |
| Home Phone | This is the secondary contact phone number. The system only accepts 10 digit phones for the US and Canada. The system will strip any leading 1 and special characters ( ) – . |
| This term saves the text between the Bookends in the Email field. No effort is made to verify a well formed email. | |
| Comma Separated Address | This term is expecting a full comma separated address to be between one set of Bookends. The system will separate the street address from the city, state and zip and place them in the proper contact fields. Example: 123 My Street, Phoenix Valley, AZ 85284 |
| Address | This term expects only the street address to be between one set of Bookends. All text will be saved in the Address field. |
| City | This term expects only the city to be between one set of Bookends. All text will be saved in the City field. |
| State | This term expects the two letter abbreviation for the State/Province to be between one set of Bookends. All text will be saved in the State field. |
| Full State | This term expects the full State/Province name to be between one set of Bookends. The Full State Name will be saved. All other text values will be saved as found between the Bookends. |
| Zip | This term is looking for the Postal Code/ Zip between one set of Bookends. All text found will be placed in the Zip field. |
| Notes | This term expects Bookends to find a specific area of text to capture as notes. The text will be put in a History Note. If you want to capture the text from a specific starting Bookend to the end of the body of the email, then your End Bookend should be “{END}”. See Garbage Bookends in the Appendix. |
| SMS OK | This term finds a value indicating your rights to text the contact. By default, we set the value to True. Acceptable values include [Y, N, Yes, No, yes, no, True, False, 1, 0]. All other values will be ignored and the setting will default to True. |
| PIN | This term is captured as a separate History Note to make it easy to find. Bookends are required. |
| Big Blob Type 1 | This term will work with following example blob and fetch data by breaking text with space. [0] – Name, [2] Phone, [4] Address, [5] City, State, Zip, [6] Email Bradley Smith678-723-8700 1234 Any Street Mytown, MN 95124 BS@Consulting.com |
| Header Name | This term will find the full name of the contact by looking in the “From” field of the email header. The name will be broken by the first space and stored in the First and Last Name fields. While the Bookends are required, they are not used. See Email Header and Garbage Bookend in the Appendix below. |
| Header Email | This term will find the email for the new contact in header of the email by using the “From Header”. While the Bookends are required, they are not used. See Email Header and Garbage Bookend in the Appendix below |
| Full Body Notes | This term will capture just the body of the email as a History Note. While the Bookends are required, they are not used. See Garbage Bookend in the Appendix below. |
| Custom Field | This term allows you to collect info into Contact Custom Fields. Using the Start Bookend as the Label of the Custom Field and collecting the text value found up to but not including the End Bookend. |
Terms for Action Type: Update
Action Type Update is designed to allow you to receive an email to your auto-generated parser email address and then update the Action Plan and/or Sales Cycle for a specific Contact. ClientTether must have context to know which Contact to update. The terms below tell the ClientTether what information is going to be used to “verify” the Contact record to update. Some of the terms also tell the system where to find the information: Header, Subject or Body.
| Ver Phone Body | This term tells the system that it will be using a phone number to identify which contact to update and that the Bookends for the phone will be found in the body of the email. |
| Ver Email Header To | This term tells the system that it will be using an email to identify which contact to update and that the email will be found in the email header “To:”. In this case the system expects to receive the email by being assigned as a BCC recipient. |
| Ver Client ID | This term tells the system that it will be using a Client ID to identify which contact to update and that the Bookends for the Client ID will be found in the body of the email. |
| Ver External Client ID | This term tells the system that it will be using an External Client ID to identify which contact to update and that the Bookends for the External Client ID will be found in the body of the email. |
| Ver Phone Subject | This term tells the system that it will be using a phone number to identify which contact to update and that the phone will be found in the subject of the email. |
| Ver Email Body | This term tells the system that it will be using an email address to identify which contact to update and that the email address will be found between Bookends in the body of the email. |
| Ver Full Name | This term tells the system that it will be using a Contact’s Full Name to identify which contact to update and that the Full Name will be found between Bookends in the body of the email. |
| Ver First Name | This term tells the system that it will be using a Contact’s First Name as part of the identity for the contact to update and that the First Name will be found between Bookends in the body of the email. Because it is unlikely that the first name alone will identify a unique contact, please include the Last Name term also. |
| Ver Last Name | This term tells the system that it will be using a Contact’s Last Name as part of the identity for the contact to update and that the Last Name will be found between Bookends in the body of the email. Because it is unlikely that the last name alone will identify a unique contact, please include the First Name term also. |
Appendix
Garbage Bookends
Garbage Bookends are place holders that mean little to nothing. For example: If the system is going to capture the full body of the email as a History Note, it already knows what to capture. But the Bookends are still required. So put something in the fields that make sense like: {Start} and {END}.
When Using the term Notes: it often occurs that there is an easy mark for the Start Bookend but nothing to mark for the End Bookend, because you want to capture everything from the starting point to the end of the email. In this case put “{END}” as the End Bookend. This tells the system to capture to the end of the email.
Email Header

You do not normally see the email header. It is information that is used to pass the email through the internet and eventually get to an inbox.
Parsers
February 11, 2020
Unlike our APIs, where you must follow a strict convention, our parsing system is a No Code solution. We have released a UI for self-developed email parsers.
A Parser analyzes an email to find logical components like First Name, Last Name and Phone Number.
Here is a Slide Deck to help with understanding ClientTether’s Parsing System.
In Case you missed it in the Slide Deck, here is a Full List of Parser Terms.
You will find the Parser Tab under Main Menu: Hello (name) – Settings
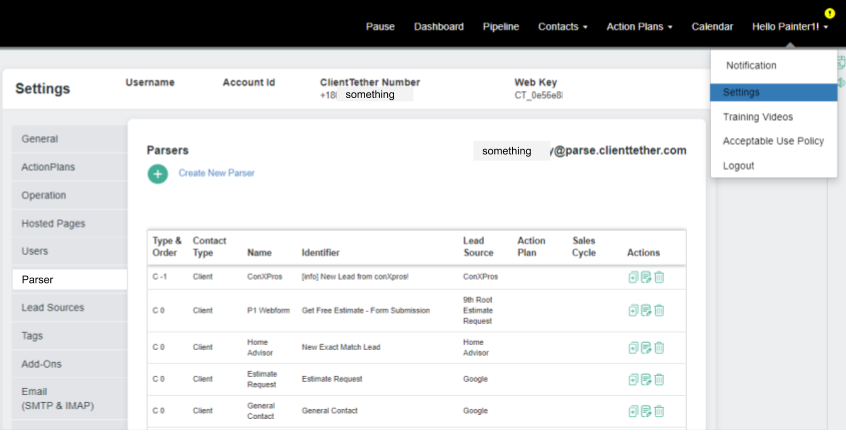
Our parsing system has been successfully used to receive custom emails from: chat bots, applications and websites to both insert New Contacts as well as Update existing contacts.
Parsers have been built by Account Owners inside ClientTether to accepts emails from lead generators like: CraftJack, Franchise Help, Franchise Gator, BizBuySell, ConXPros, HomeDepot Icon, Renovation Experts, Chat 247, Botpress, Facebook, LinkedIn and Zapier to just name a few.
Some ClientTether accounts have even sent emails to other ClientTether accounts to share and update contacts in each others account.
As a No Code solution goes, this is a great option. However, at times, the complexity of the email may require a little more knowledge of HTML than you might have in order to build a successful Parser. In this case, you can contract with us to build a Parser for a nominal fee.
Please note although we can accept incoming emails and parse them from Angi Leads, formerly Home Advisor, we strongly encourage you to utilize the integration instead. Angi Leads constantly changes up their emails format and makes utilizing the parser very difficult since you constantly have to be updating it.
Application Settings
February 11, 2020Overview
ClientTether is known for being dynamic and allowing you to customize the software to best suit your needs.
To fully take advantage of that we provide access to a series of settings.
What settings are available are dependent on the type of account you have and what type of user you are.
Please note: Documentation on account Settings is a work-in-progress as we continually evolve to provide the highest level of support to our clients. If you do not find information noted within the User Manual for a specific feature, please connect with your ClientTether CSM for further assistance.
Topics
- Account Info
- Account
- ActionPlans
- Add-Ons
- Announcements
- API
- Billing Info
- Custom Fields
- Email (SMTP & IMAP)
- Email Signature
- Enterprise
- Files
- Hosted Pages
- Lead Routing
- Lead Sources
- Log Codes
- Notification
- Operation
- Opportunity Settings
- Parser
- Proposal Settings
- Reputation Management
- Sales Cycle
- Sub Account Self Pay
- Tags
- Users
API for IVRs
February 10, 2020
Sometimes ClientTether Account holders have purchased advanced programmable phone systems like Cisco. These systems track many data points needed to manage a Call Center. We do not plan on building such complex software. However this API for IVRs is designed to open up ClientTether to accept secure input from any advanced programmable phone system. Effectively making ClientTether a Call Center CRM that can be used to manage calls for multiple clients.
The IVR API has its own URL that is separate from the URLs mentioned elsewhere.
https://ct.clienttether.com/api/tmiivr
Your advanced phone system must be able to accurately send the following data to our IVR API URL: Web_Key , agent_number, client_number
Web_Key is the same web_key as mentioned in other APIs and is found on the Settings Screen to identify a specific the ClientTether account.
Agent_number is the phone number of the agent where the IVR has chosen to send the actual call. This should be a 10 digit number with no formatting. For example: 4205551212 is a properly formatted agent number while 402-555-1212 is not. Warning: The Agent’s phone number must be in ClientTether and uniquely assigned to only one User. It should also be entered in ClientTether as a 10 digit number with no formatting.
Client_number is the phone number of the caller. This phone should also be sent as a 10 digit number only with no formatting.
When the IVR API receives input, it takes the data and uses it to display information. First the system identifies which agent to show the information to, by looking up the Agent’s phone in the User’s List. Second, the API uses the web_key to narrow down the ClientTether account in which to search for the Client’s Phone Number. If the system finds the phone number among the Account’s Client List, then the system displays that Client’s info in the Agent’s Active Call Queue in the Call Portal. Otherwise, the systems indicates in the Active Call Queue that the Caller is Unknown.
So a completed URL might look like the following:
https://ct.clienttether.com/api/tmiivr?web_key=CT_1345&agent_number=3032654879&client_number=3039291447
Right-side Panel
February 10, 2020Overview
The Right-Side Panel is designed to get you the timely information you need.
It can be accessed by selecting any of the the following Icons that are located in the top right part of your screen
 Notifications
 Calendar
 Announcements
Additional Topics
Pipeline
February 10, 2020Last Update: Nov 16, 2022
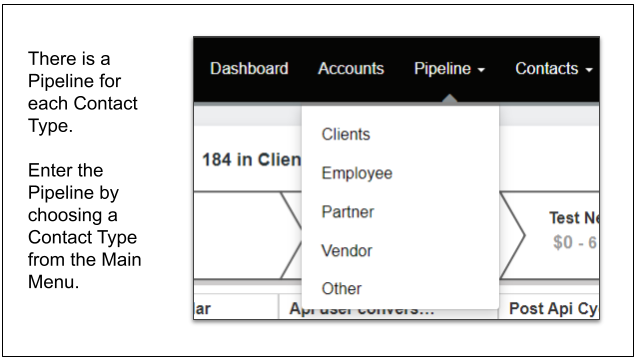
Pipeline is a visual representation of your customized Sales Cycles.
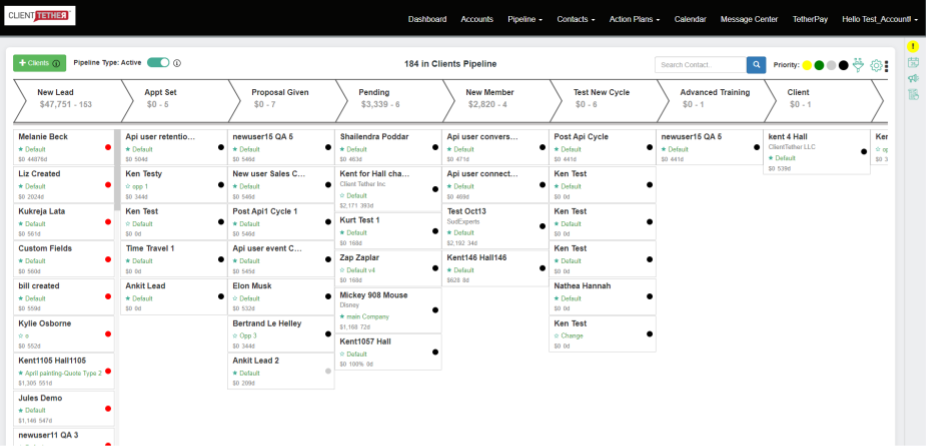
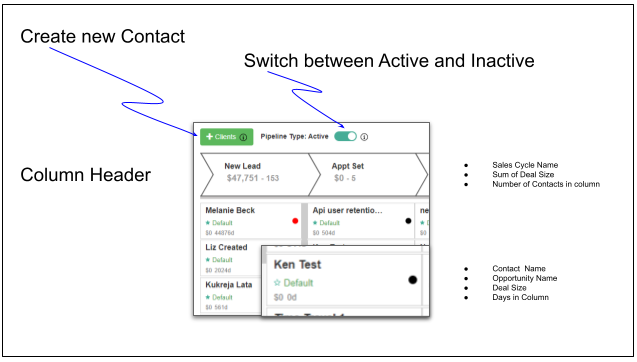
The pipeline feature in ClientTether gives you clear visibility into your sales flow and allows you to see a detailed breakdown of the following:
- How many contacts you have in each part of your sales cycle
- The deal value of each contact
- The overall sales potential rolled up in each part of your sales cycles
- Prospects in your pipeline with no pending actions, with overdue actions, and with actions due today
- Length of time each prospect has been in a sales cycle
- Likelihood for each deal to close
- Estimated close dates for each opportunity
How to Read the Pipeline
Overview
The ClientTether’s Pipeline is a powerful tool for you to be able to optimize your sales effectiveness. To get the most out of it, it’s important to understand how to read it. Below we breakdown what each part of the pipeline provides.
List of Pipeline Components
Sort Features
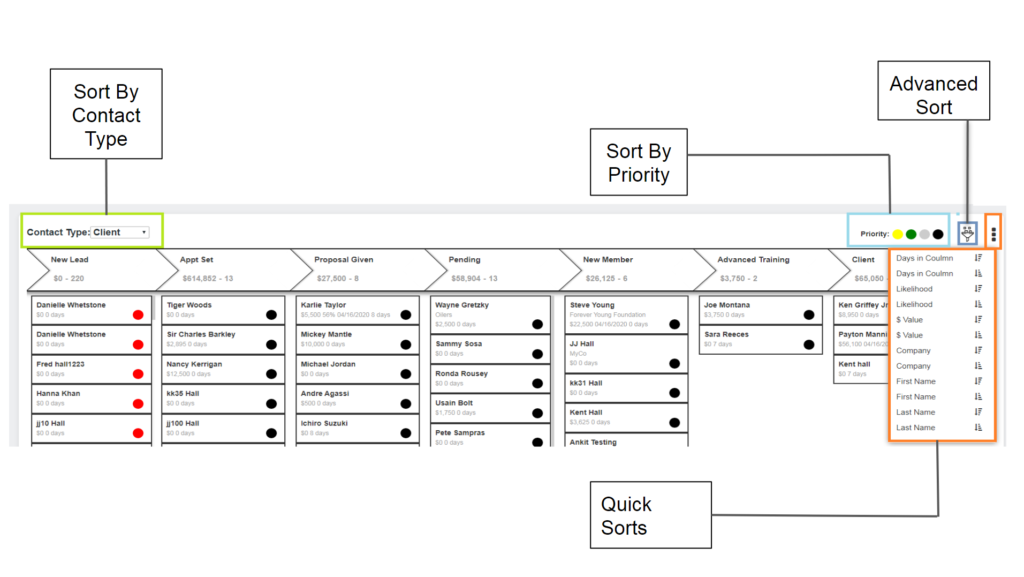
At the top of the pipeline we have all of the sort features needed. For more information on how to sort the pipeline click here.
Columns
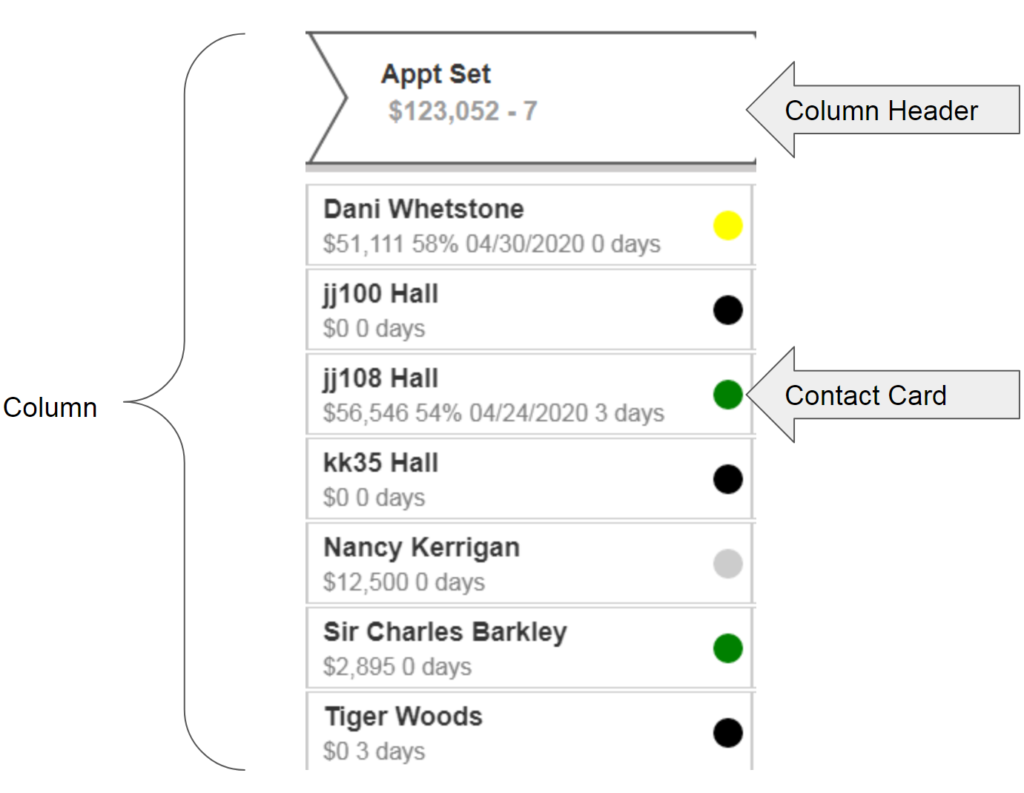
Each column has two main parts:
Column Headers
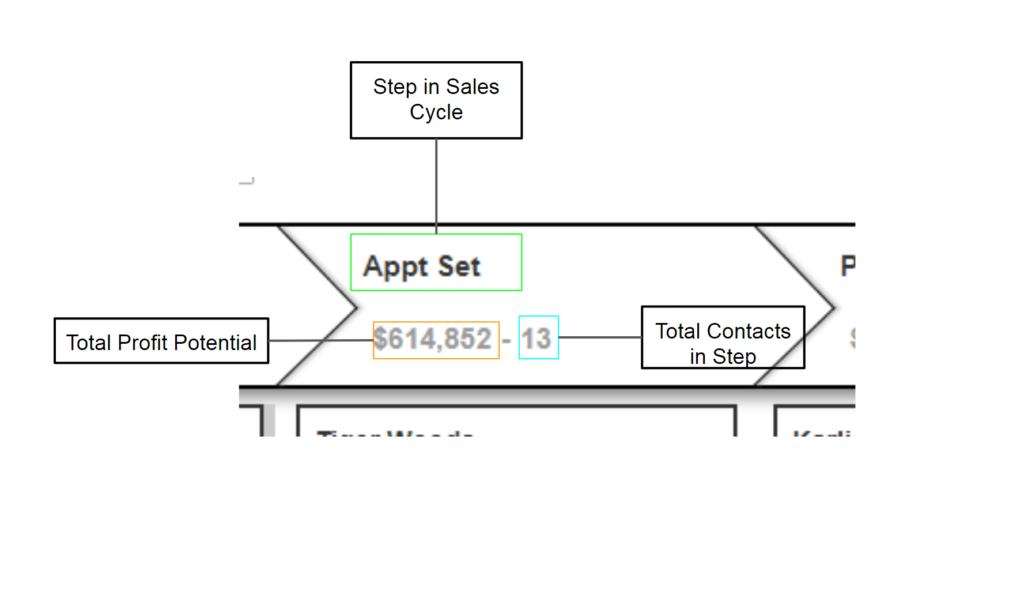
The Column Header is made of three pieces of information.
- The title lets you know what step, in your sales cycle, the contacts are in.
- The Total Sales Potential is the sum total of all deal values in that column.
- The total number of contacts in that particular step
Contact Cards
Contact Cards are available for each opportunity in your Pipeline. Keep in mind that a contact can have more than one opportunity, so I contact card will display for each opportunity for that contact that is in an active sales cycle. The Contact Card can contain 7 pieces of vital information
- The contact’s name
- Opportunity Name
- Deal size
- Likelihood of the deal going through
- Close Date
- Days in Column
- Priority
 for New Lead
 for Missed Action
 for Today’s Action
 for Has Pending Action(s)
-
 for No Pending Actions
Overview
As you are using the pipeline feature there will be times you would like to make changes to a contacts details. Those can easily be done in the pipeline.
Topics
Making Changes with Drag and Drop
This change will effectively change what step in a sales cycle a contact is in.
- Identify the contact that you would like to move into a different column
- Drag and Drop the contact onto the column header of the sales cycle you want it to be in
Making Changes via Contact Card
The contact card allows you to change the following:
- Action Plan
- Deal Size
- Quoted
- Closed
- Likelihood
- Close Date
Changes are made by:
- Clicking on the colored dot to the right of a contact’s name (this opens the contact card
- Select the field you wish to edit
- Change the value
Making Changes to Contact Profile
You can open the full contact profile in the pipeline by clicking on the contact’s name. This will open the full contact profile.
How To Search The Pipeline
Overview
To make the pipeline dynamic and easy to use to take action, we’ve added several resources to help you sort it. Here is a list of the tools you have available to sort the pipeline:
Contact Type
To sort by contact type:
- Find the
 at the top left part of the screen
 - Select the down area for the drop down menu
- Select the contact type
Priority (Communication Priority)
When you sort by communication priority it puts the selected priority at the top of each column. To do this:
- Locate
 on the right half of the top of the screen
 - Click on the color indicating the priority you wish to sort by
For a key of what the different priority colors mean click here
Advanced Filter
Advanced sort allows you to sort by:
- Action Plan
- State
- Lead Source
- User Assigned
- Tags
To use the advanced sort:
- Click on
 on the top right part of the screen
 - Select which item you would like to sort by
Quick Sort
Quick Sort allows you to sort by
- Days in Column
- Close On (Close Date)
- Likelihood
- $ Value (Deal Size)
- Company
- First Name
- Last Name
To use the quick sort
- Click on the
 on the far right of the top of the screen
 - Select the category you would like to sort by
- There are two options to sort by
 Which indicates sorting small to great
 Which indicates sorting great to small
- There are two options to sort by
Logging in
February 10, 2020
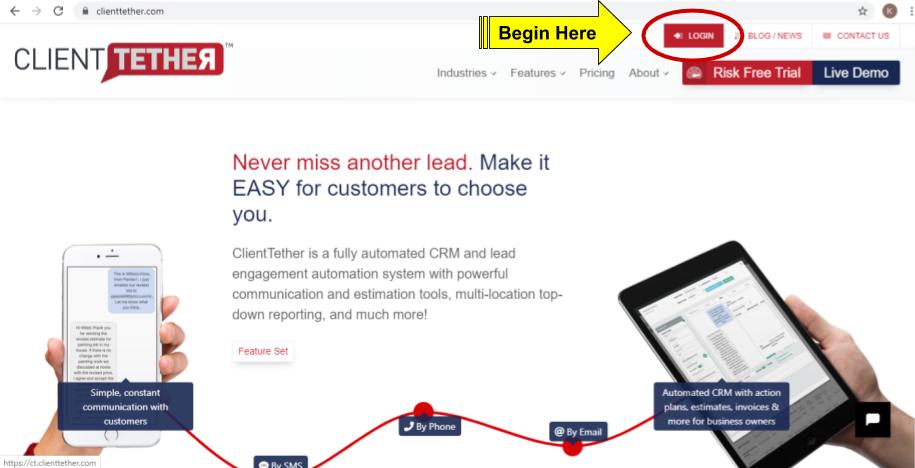
Login can begin at our website.
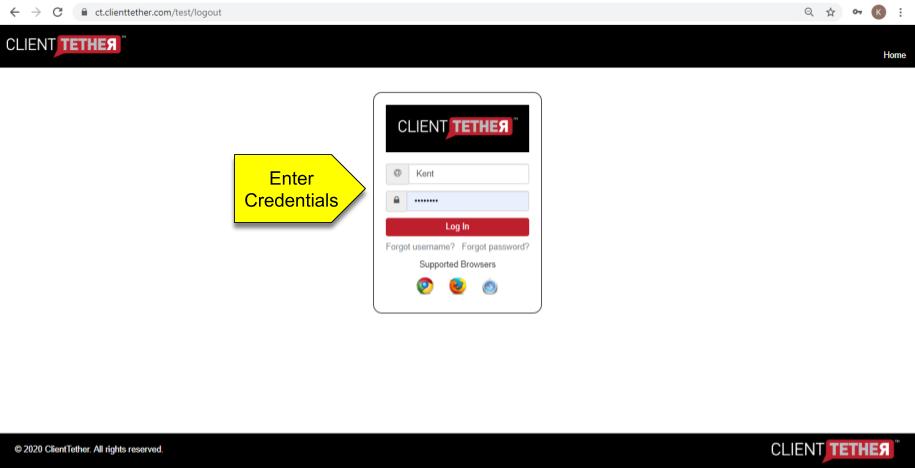
When you click on the login button you will end up on the ClientTether SaaS Login screen below. You can also bookmark the SaaS web address https://ct.ClientTether.com
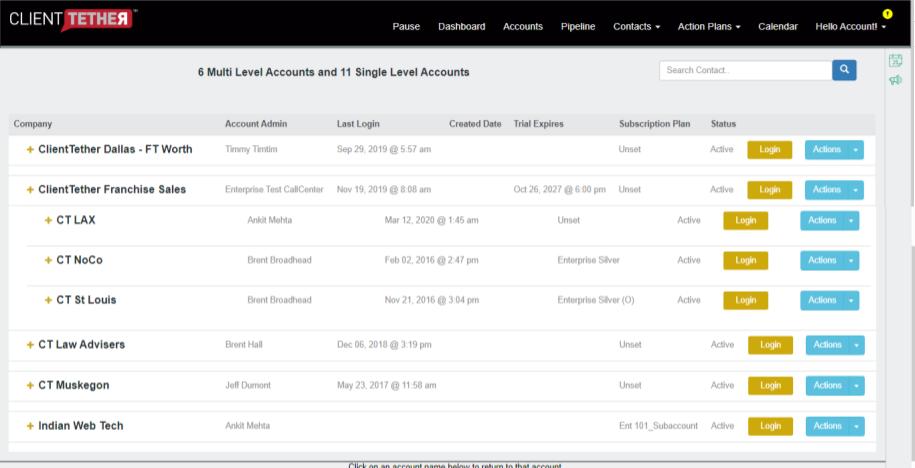
After you login, you will land on one of two options. If you login to a Multi-Level account you will go to the Account Screen. If you are a Single-Level account you will go the Client List Screen.
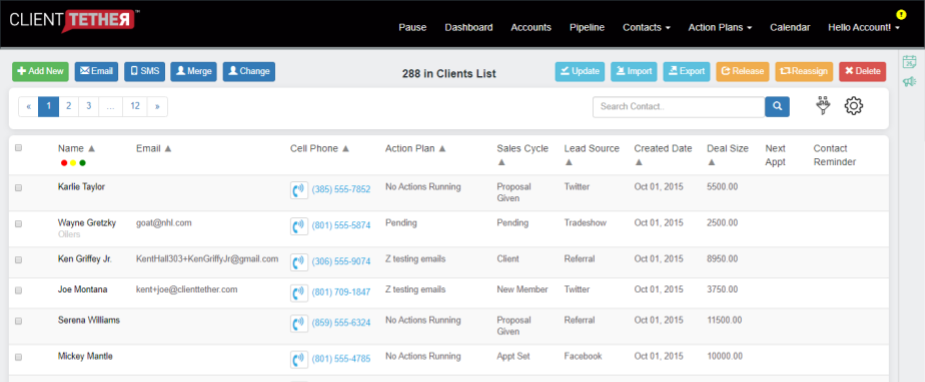
Forgot Username or Forgot Password
From time to time we forget things. Follow this process.
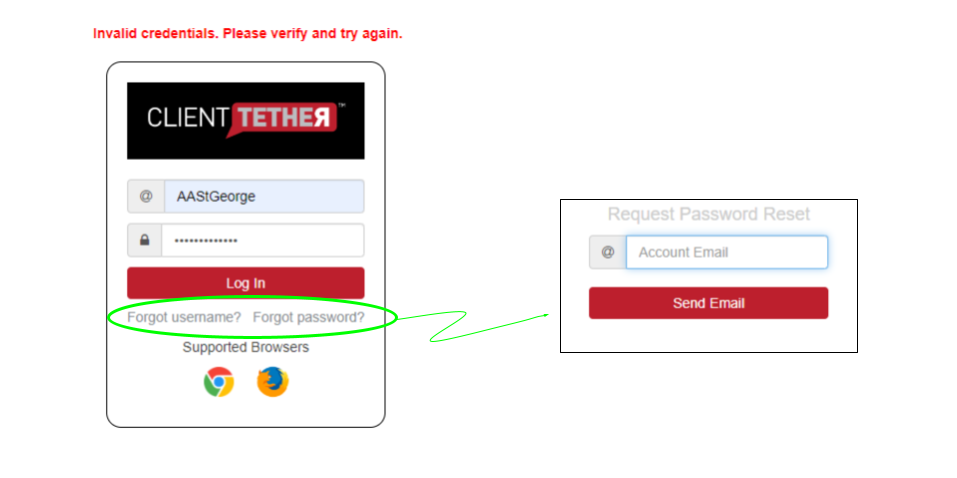
After you have put in your Account or User email address, the system will send you an email with a link to reset your password.
Contacts List
February 10, 2020Overview
ClientTether is fantastic at keeping you connected with your clients, vendors, employees and anyone else this essential for your business to be successful.
One of the essential tools for that success is our Contact management tool set. Contacts in ClientTether allow you to keep in touch with everyone that is part of your company. You are able to sort contacts based on type and keep track of all communications in one central, organized location – the Contact List.
Below are topics that go over the key features of our contacts pages. Select on any of the links below to learn more.
Topics
- Types of Contacts and the Contact List
- Know How Many Contacts You Have
- Manually Creating Contacts
- Other Ways Contacts are Created
- Group Email
- Group Text
- Merging Contacts
- Group Changes
- Combined Contacts
- Updating Contacts
- Importing Contacts
- Exporting Contacts
- Releasing a Contact
- Reassigning a Contact
- Deleting Contacts
- Searching Contacts
- Contacts Advanced Filter
- Page Settings
- Contact Profile
Types of Contacts and the Contact List
There are 6 types of Contacts with a growing features set for each. Selecting the proper Contact Type is very important because the Dashboard and Pipeline are sensitive to Contact Type selection.
- Clients
- Employees
- Partners
- Other companies/people you partner with
- Vendors
- People you buy from
- Others
- Whatever else you need to use to categorize contacts
- Moved
- This contact type designates that the contact has moved and changed locations.
- This Contact Type is Not available in all accounts. If you would like access to this Contact Type please contact your Success Manager.
- Archived
- Deleted Contacts
- This is a fail safe to make sure if you did not mean to delete someone who can easily restore the contact.
- These contacts are inactive and do not get checked in the duplicate check process.
- If you delete from Archived the contact is gone forever.
Please note when you select the “All Main Contacts” Contact List it does not show you archived contacts. .
Clicking view all Active opportunities list out each individual opportunity that is in an active Sales Cycle.
You will note the Opportunity name is listed above the contact name. This is not like the rest of the options in the contact drop down list, because it is not displaying the central contact profile, but each individual opportunity.
Also be aware you can break down the contact type by using the drop down menu to the right of Search Contact by:
- Main Contacts
- Only shows the default opportunity for each contact
- Active Opportunities
- Will display all opportunities that are in an active Sales Cycle Step.
- All Opportunities
- Will display all opportunities that exist in that contact type. Regardless of if they are active or not.
Know How Many Contacts You Have
This information is included at the top of the page of each Contact List you select.
Other Ways Contacts Are Created
Merging Contacts
This feature is useful when you discover you have multiple contacts for the same person.
- Select the contacts involved
- Click

- Select Which Contact you wish to keep
Make sure to make a history note in the contact you intend to keep that includes any information you need from the other contact.
Also change the street address to the one you plan on getting rid of to “Rid” so that it is easy for you to tell the contacts apart.
Group Changes
This allows you to make quick changes to multiple contacts in a contact list.
This feature allows you to change the following:
- Lead Source
- Sales Cycle
- Action Plan
- Assigned User
- Contact Type
- Tags
- You can add tags
- You cannot remove tags
To use this feature:
- Select multiple, at least two, contacts.
- Click

- Select field(s) you wish to change
- Click

- Or if you have decided you don’t want to update click “Cancel” on the bottom right corner, or the “X” on the top right corner.
Shortly after clicking the button to update a message like this
 will appear.
Combined Contacts
To combine contacts – meaning to combine two contacts and their opportunities – Start by:
- Checking it makes sense to combine them
- Duplicate contacts because of repeat customers
- Multiple sites for the same company that you have broken into separate contacts.
- Make sure opportunity names in all contacts you are combining make sense.
- You generally want to make sure the opportunity names are descriptive and easy to differentiate.
- Use the Main Contacts filter on the contact list you are using.
- This makes it easy for you to see that your combination has worked since one of the contacts will seem to disappear when done.
Once you have checked those items you are ready to combine the contacts.
- Select the contacts you wish to combine and click the combined button.
- You can combine as many contacts at once as you wish.
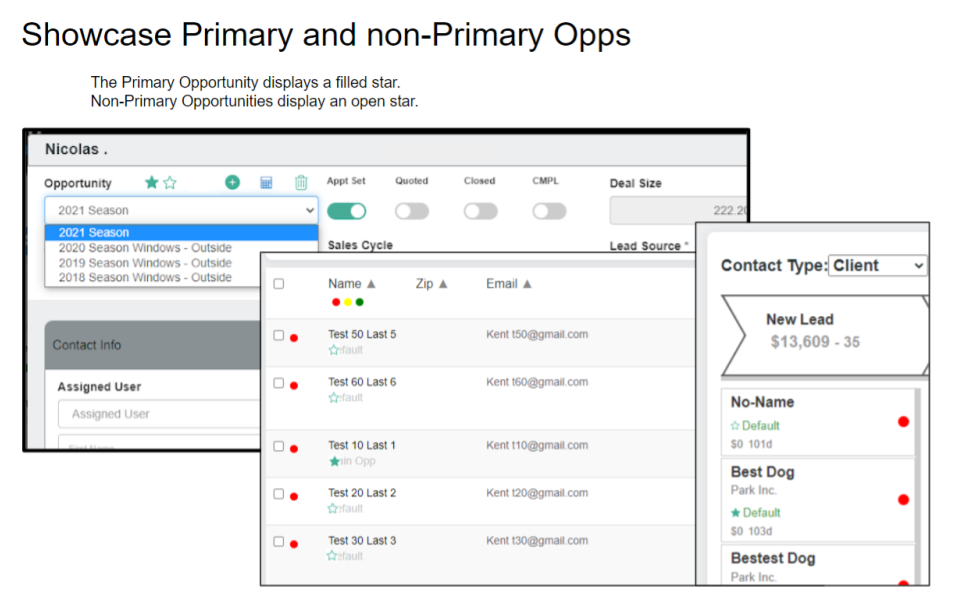
- On the list of main opportunities for the contacts you selected click the star of the opportunity you wish to be the main opportunity out of the group.
- Click Save
Once you have completed this you have successfully combined your contacts. If you open the main contact you selected and look at the opportunity dropdown menu you will see all opportunities tied to the opportunities you just combined. You will not lose opportunities by using this feature.
This feature is designed to help you and your team be able to manage and maintain your contact list with little hassle.
Exporting Contacts
This feature allows you to download a .CSV file of all your active contacts, so all contacts that are not Archived.
- In the Contact List click

- Then Click “Click here to Download Export File”
- You file will download as a .CSV
- Open in you desired software
Releasing Contacts
Releasing Contacts allows sub accounts to release their contacts to their direct Parent Account.
To release a contact or contact(s)
- Check the box next the name(s) you would like released.
- Click

- Click “Okay”
- If you changed your mind click “Cancel”
Reassigning Contacts
Reassigning contacts allows you to send a contact to any of your direct sub accounts.
- Select contact(s) you wish to reassign
- Click

- Select the sub account you want to send the contact(s)
- Click Reassign Contacts
- Or if you have decided you don’t want to reassign click “Cancel” on the bottom right corner, or the “X” on the top right corner.
Searching Contacts
You can use the “Search Contact” bar to search you contacts by:
- First Name
- Last Name
- Full Name
- email (full or partial)
- Cell phone (full or partial)
- You can search via any format of 10 digits you wish
- 5555555555
- (555) 555-555
- 555.555.5555
- etc.
- You can search via any format of 10 digits you wish
Contacts Advanced Filter
Basic Advanced Filter
Advanced Filter has the options of filtering your contacts based on:
- Action Plan
- Sales Cycle
- Lead Source
- Assigned User
- State
- Tags
Please note: Users can now filter by all Action Plans, Sales Cycles, Lead Sources, Assigned Users, States, and Tags available within the account.
Using the Advanced Filters Button
To access the Advanced Filters click  in the bottom left of the window.
This Advanced Filters option allows you to
- select a “Search”, which is based off of any variables tied to the contacts.
- The “That is” column allows you to select the logical tool you wish to search with
- “The Value” is the value you are searching
- “Continue With” allows you to choose an “And” or “Or” Relationship between your rows in the search.
- “And” means anything joined by the And must be true for results to be returned.
- “Or” means it will return anything where any of the items are true.
- You can add as many rows as you wish by clicking

Page Settings
Page settings allow you to select what columns/fields you would like to display on the contact lists and also how many contacts you want displayed per page.
When you are doing making the changes you wish click 